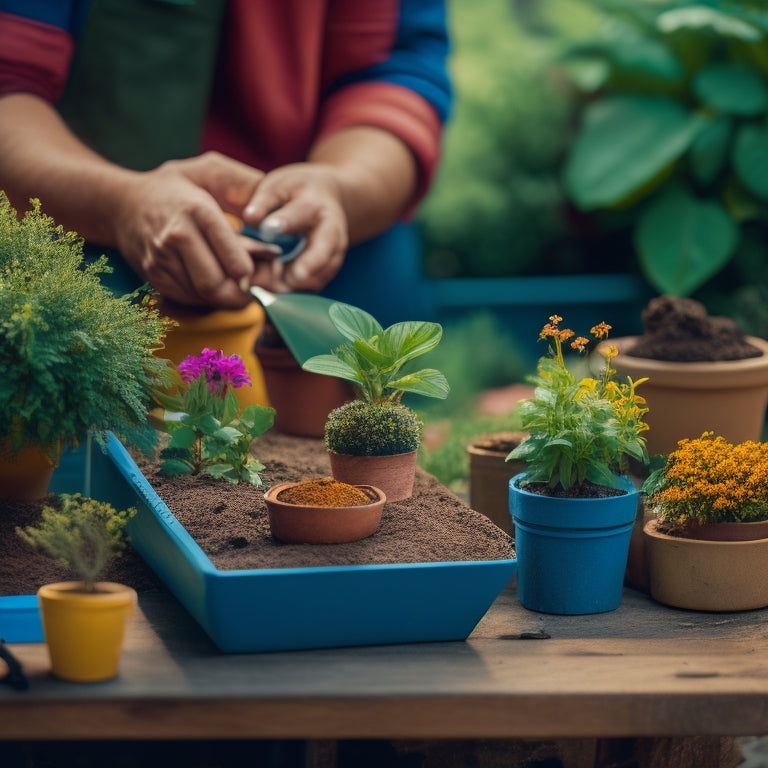
Build a Block Planter in 7 Easy Steps
You'll start by preparing your cinder blocks, selecting solid ones for the base and hollow ones for the walls, and drilling drainage holes to prevent waterlogged soil. Next, lay a level foundation layer, guaranteeing accuracy with a spirit level and string line, then add a compacted gravel layer and landscape fabric to assist with drainage. Fill the bottom third with gravel and top with high-quality potting soil, carefully selecting blocks and materials to guarantee stability and drainage. From here, you can build your planter walls, add a decorative topper, and plant your favorite greens - and that's just the beginning of bringing your outdoor space to life.
Key Takeaways
• Prepare cinder blocks by drilling drainage holes, inspecting for cracks, and handling them carefully to maintain structural integrity.
• Lay a foundation layer with compacted base material, ensuring levelness and alignment with the planter's footprint.
• Add a compacted gravel layer and landscape fabric to prevent waterlogging and weeds, followed by a layer of high-quality potting soil.
• Build planter walls using hollow blocks for drainage and solid blocks for the base, ensuring stability and alignment during construction.
• Fill the planter with a balanced blend of soil and gravel, maintaining ideal moisture levels for healthy plant growth.
Prepare the Cinder Blocks
Gather enough cinder blocks to form the base and walls of your planter, ensuring each block is free of debris and dry.
You'll need to choose the right type of cinder block for your project. Solid blocks are ideal for building the base, while hollow blocks can be used for the walls to reduce weight and improve drainage.
It's vital to take into account drainage when preparing your cinder blocks. Make sure to drill holes in the bottom of each block to allow excess water to escape, preventing waterlogged soil and root rot.
Before you start building, inspect each block for any cracks or damage. Discard any blocks that are broken or show signs of wear. You want your planter to be sturdy and long-lasting, so it's important to begin with high-quality blocks.
Once you've selected and prepared your blocks, you'll be ready to start building your planter. Remember to handle the blocks carefully to avoid chipping or breaking them, as this can compromise the structural integrity of your planter.
With your blocks ready, you're one step closer to creating a beautiful and functional block planter.
Lay the Foundation Layer
Now that you've prepared your cinder blocks, it's time to lay the foundation layer of your planter.
You'll start by preparing the base structure, which will provide a solid footing for your blocks.
Next, you'll add the bottom layer of blocks, making sure they're level and evenly spaced to create a stable foundation.
Prepare Base Structure
Lay the first course of blocks, confirming they're level and aligned with the planter's footprint, as this foundation layer sets the stage for a sturdy structure.
Verify the blocks are securely seated on a compacted base material, such as crushed gravel or sand, to promote drainage and prevent settling.
As you lay each block, check its position and levelness using a spirit level and a string line to maintain accuracy. Confirm the blocks are aligned with the planter's footprint, taking into account any obstructions or irregularities in the ground.
Select block materials that can withstand outdoor conditions and provide adequate drainage solutions, such as blocks with built-in drainage channels or holes.
Use a rubber mallet to tap each block into place, making sure they're firmly seated and evenly spaced.
As you complete the foundation layer, double-check its levelness and alignment to confirm a solid base for your planter.
With a well-prepared base structure, you'll be ready to move on to the next step and start building your block planter.
Add Bottom Layer
With the base structure prepared, you're ready to start building the planter's foundation layer, which will provide a solid base for your block planter.
Begin by laying down a layer of compacted gravel or crushed stone, guaranteeing it's level and even. This will serve as the foundation for your planter and provide essential drainage solutions.
Next, add a layer of landscape fabric to prevent weeds and help with water filtration. Cut the fabric to size, overlapping the edges by a few inches to guarantee a secure fit.
Now, it's time to add the first course of blocks. Start by placing the blocks along the perimeter of the planter, making sure they're level and securely fitted. Use a spirit level to guarantee the blocks are perfectly horizontal.
As you add each block, check for any gaps or unevenness, making adjustments as needed. This foundation layer will set the stage for your plant selection, so take your time and get it right.
With a solid base in place, you'll be able to create a thriving and beautiful block planter that will bring joy to your outdoor space.
Add the Soil and Gravel
Now that your foundation layer is in place, you're ready to add the soil and gravel.
As you start this process, it's crucial to take into account a few key factors to guarantee your planter thrives.
You'll need to prepare the soil properly, reap the benefits of a gravel layer, and prioritize moisture control to create a superior growing environment.
Soil Preparation Tips
Fill the planter's bottom third with a 2- to 3-inch layer of compacted gravel to facilitate drainage and prevent waterlogged soil. This layer will guarantee that excess water doesn't accumulate, which can lead to root rot and other problems.
Next, add a 2- to 3-inch layer of high-quality potting soil on top of the gravel. As you fill the planter, consider the soil's pH and nutrient balance. If your soil is too acidic or alkaline, it may affect the overall health of your plants. Aim for a balanced soil pH between 6.0 and 7.0, which is suitable for most plants.
When selecting potting soil, look for a mix that's specifically designed for containers and has a balanced nutrient profile. Avoid using soil from your garden, as it may compact too much in the planter and hinder drainage.
Instead, choose a soil mix that's formulated to retain moisture but still drain excess water. By following these soil preparation tips, you'll create a healthy environment for your plants to thrive in.
Gravel Layer Benefits
By incorporating a gravel layer, you create a stable base that allows water to percolate through, reducing the risk of waterlogged soil and associated root problems. This vital step enhances drainage efficiency, ensuring your plants receive the right amount of moisture without becoming waterlogged. As you add the gravel, visualize the excess water flowing freely through the porous material, preventing water from accumulating at the soil surface.
The gravel layer also serves as an effective barrier against weeds, preventing them from growing up through the soil. This means less maintenance for you, as you won't need to constantly remove unwanted growth. By controlling weed growth, you're also reducing competition for nutrients and resources, giving your plants a better chance to thrive.
As you prepare the gravel layer, make sure to spread it evenly, about 2-3 inches deep. This will provide the necessary depth for ideal drainage and weed prevention.
With this solid foundation in place, you're ready to add the soil and start planting your chosen greenery.
Moisture Control Essentials
Moisture Control Essentials
With the gravel layer in place, you'll next add a layer of soil, carefully blending it with the gravel to create a harmonious balance that regulates moisture levels and supports healthy root growth. This balance is vital, as it guarantees your plants receive the right amount of water without becoming waterlogged.
| Moisture Control | Benefits | Results |
|---|---|---|
| Drainage Solutions | Prevents waterlogging | Healthy root growth |
| Moisture Retention | Maintains ideal hydration | Thriving plants |
| Balanced Soil Blend | Regulates moisture levels | Strong, resilient plants |
When adding the soil, make certain to mix it well with the gravel to create a uniform blend. This will allow for efficient drainage and moisture retention, giving your plants the best chance to thrive. Remember, a balanced soil blend is key to maintaining ideal moisture levels, so take your time and get it right. By following these steps, you'll be well on your way to creating a block planter that supports healthy, thriving plants.
Build the Planter Walls
You'll need six blocks to form the walls of your planter, with three blocks for each long side and none for the short ends, which will remain open. This design allows for easy access to the plants and soil. When selecting blocks, consider the design variations you want to achieve. For a modern look, use sleek, rectangular blocks. For a more rustic feel, opt for natural stone blocks.
To build the walls, follow these steps:
-
Begin by laying the first block on a level surface, verifying it's aligned with the surrounding area.
-
Continue adding blocks, staggering the joints to create a strong structure.
-
As you add each block, check the level to verify the wall remains even.
Remember to choose block types that fit your design aesthetic and can support the weight of the soil and plants. With your walls built, you're one step closer to creating a beautiful block planter that showcases your green thumb.
Add the Decorative Topper
With the planter walls in place, turn your attention to crowning your creation with a decorative topper that adds a finishing touch and conceals the rough edges of the blocks. Choose from a variety of decorative materials, such as wood, metal, or stone, to find the perfect match for your planter's design inspiration.
Consider the overall aesthetic you want to achieve and select a topper that complements the color, texture, and style of your blocks.
Measure the top of your planter to determine the size of your topper. Cut your chosen material to fit, using a saw or other appropriate tool. Sand the edges to smooth out any rough spots. If desired, add a coat of sealant or paint to protect the topper and enhance its appearance.
Place the topper on top of the planter, ensuring it's centered and even. Use a level to double-check the topper's alignment.
With your topper securely in place, step back and admire your handiwork. The finishing touch is now complete, and your planter is ready for its new green inhabitants.
Plant Your Favorite Greens
Select a mix of plants that complement each other in terms of texture, color, and growth habits to create a visually appealing arrangement in your new block planter.
When choosing your herb selection, consider the different green varieties that will thrive in your planter. You'll want to select plants with varying heights, textures, and growth rates to create visual interest.
Some popular herb combinations include:
-
Basil and mint: These fragrant herbs have delicate leaves and will spill over the edges of your planter, creating a beautiful display.
-
Chives and parsley: These versatile herbs have feathery foliage and will add a pop of color to your arrangement.
-
Thyme and rosemary: These low-growing herbs have pine-like foliage and will provide a beautiful contrast in texture to your arrangement.
When planting, make sure to leave enough space between each herb for proper growth and air circulation.
Use a high-quality potting mix and gently water your herbs after planting.
With proper care, your block planter will be overflowing with fresh, fragrant herbs in no time!
Finishing Touches and Care
Once your herbs are planted and thriving, add a decorative touch to your block planter by topping it off with a layer of small rocks or pebbles to help retain moisture and suppress weeds. This finishing touch not only enhances the visual appeal of your planter but also aids in plant maintenance by reducing the need for frequent watering.
To guarantee ideal drainage, make sure to leave a small gap between the soil surface and the top of the block planter. This allows excess water to escape, preventing waterlogged soil and root rot. For additional drainage solutions, consider drilling a few holes in the bottom of the planter or adding a layer of perlite or vermiculite to the soil mix.
Regular plant maintenance is vital to keep your herbs healthy and thriving. Check the soil daily, and water only when it feels dry to the touch. Fertilize your herbs regularly, and prune them back to encourage bushy growth. By following these simple tips, you'll be enjoying fresh, fragrant herbs from your block planter in no time.
Frequently Asked Questions
Can I Use Regular Bricks Instead of Cinder Blocks?
You're wondering if regular bricks can replace cinder blocks in your planter project. The answer is yes, but consider the implications on your planter's aesthetics.
Regular bricks are smaller, heavier, and often more expensive than cinder blocks. They'll also change the overall look of your planter, potentially making it more ornate.
If you're going for a rustic, industrial vibe, cinder blocks might be the better choice. But if you want a more refined, classic look, regular bricks could be the way to go.
How Often Should I Water My Block Planter?
Did you know that plants can lose up to 90% of their water through their leaves?
To avoid this, you'll need a solid watering schedule. Check the soil daily, and water only when the top 2-3 inches feel dry. Your plant's needs will vary depending on weather, sunlight, and drainage.
Observe your plants, and adjust your schedule accordingly. Water thoroughly, making sure excess water drains out of the planter to prevent root rot.
Will My Planter Attract Pests or Rodents?
You're wondering if your planter will attract unwanted visitors, right?
Rest assured, with some simple measures, you can prevent pests and rodents from ruining your green oasis.
Incorporate pest prevention strategies like using a well-draining potting mix, avoiding overwatering, and adding natural rodent deterrents like cinnamon or cloves to your soil.
Can I Move My Block Planter to a Different Location?
As you're rearranging your outdoor space, you'll likely want to shift your planter to a spot with better sunlight or visibility. Coincidentally, this relocation can also help you avoid any pest or rodent issues that might've arisen.
When moving your block planter, consider the planting considerations, like soil stability and plant health.
Follow some key relocation tips, such as lifting carefully to avoid damaging the blocks or roots, and you'll be able to effortlessly shift your planter to its new home.
How Long Will My Block Planter Last Outdoors?
You're wondering how long your block planter will last outdoors. It all depends on durability factors like the type of materials used, construction quality, and weather resistance.
If you've built it with durable blocks and sealed the gaps, it can withstand harsh weather conditions. However, exposure to extreme temperatures, heavy rainfall, and direct sunlight can reduce its lifespan.
With proper maintenance, your planter can last for several years, but be prepared to make repairs or replacements as needed.
Conclusion
As you step back to admire your handiwork, the block planter transforms into a vibrant oasis, bursting with life and color.
The cinder blocks, once dull and grey, now provide a sturdy foundation for your lush greenery.
Like a masterpiece of urban gardening, your creation thrives, a demonstration of your creativity and DIY prowess.
Related Posts
-
What's the Ideal Timeline for a Concrete Planter Reno
You'll need to allocate around 6-12 weeks for a concrete planter renovation, broken down into seven distinct phases t...
-
What's the Ideal Timeline for a Concrete Planter Reno
You'll need to allocate around 6-12 weeks for a concrete planter renovation, broken down into seven distinct phases t...
-
What's the Ideal Timeline for a Concrete Planter Reno
You'll need to allocate around 6-12 weeks for a concrete planter renovation, broken down into seven distinct phases t...
-
What's the Ideal Timeline for a Concrete Planter Reno
You'll need to allocate around 6-12 weeks for a concrete planter renovation, broken down into seven distinct phases t...
-
What's the Ideal Timeline for a Concrete Planter Reno
You'll need to allocate around 6-12 weeks for a concrete planter renovation, broken down into seven distinct phases t...
-
What's the Ideal Timeline for a Concrete Planter Reno
You'll need to allocate around 6-12 weeks for a concrete planter renovation, broken down into seven distinct phases t...
-
What's the Ideal Timeline for a Concrete Planter Reno
You'll need to allocate around 6-12 weeks for a concrete planter renovation, broken down into seven distinct phases t...
-
What's the Ideal Timeline for a Concrete Planter Reno
You'll need to allocate around 6-12 weeks for a concrete planter renovation, broken down into seven distinct phases t...
-
What's the Ideal Timeline for a Concrete Planter Reno
You'll need to allocate around 6-12 weeks for a concrete planter renovation, broken down into seven distinct phases t...
-
What's the Ideal Timeline for a Concrete Planter Reno
You'll need to allocate around 6-12 weeks for a concrete planter renovation, broken down into seven distinct phases t...
-
What's the Ideal Timeline for a Concrete Planter Reno
You'll need to allocate around 6-12 weeks for a concrete planter renovation, broken down into seven distinct phases t...
-
What's the Ideal Timeline for a Concrete Planter Reno
You'll need to allocate around 6-12 weeks for a concrete planter renovation, broken down into seven distinct phases t...
-
What's the Ideal Timeline for a Concrete Planter Reno
You'll need to allocate around 6-12 weeks for a concrete planter renovation, broken down into seven distinct phases t...
-
What's the Ideal Timeline for a Concrete Planter Reno
You'll need to allocate around 6-12 weeks for a concrete planter renovation, broken down into seven distinct phases t...
-
What's the Ideal Timeline for a Concrete Planter Reno
You'll need to allocate around 6-12 weeks for a concrete planter renovation, broken down into seven distinct phases t...
-
What's the Ideal Timeline for a Concrete Planter Reno
You'll need to allocate around 6-12 weeks for a concrete planter renovation, broken down into seven distinct phases t...
-
What's the Ideal Timeline for a Concrete Planter Reno
You'll need to allocate around 6-12 weeks for a concrete planter renovation, broken down into seven distinct phases t...
-
What's the Ideal Timeline for a Concrete Planter Reno
You'll need to allocate around 6-12 weeks for a concrete planter renovation, broken down into seven distinct phases t...
-
What's the Ideal Timeline for a Concrete Planter Reno
You'll need to allocate around 6-12 weeks for a concrete planter renovation, broken down into seven distinct phases t...
-
What's the Ideal Timeline for a Concrete Planter Reno
You'll need to allocate around 6-12 weeks for a concrete planter renovation, broken down into seven distinct phases t...
-
What's the Ideal Timeline for a Concrete Planter Reno
You'll need to allocate around 6-12 weeks for a concrete planter renovation, broken down into seven distinct phases t...
-
What Makes a Great Planter for Succulents
When selecting a great planter for succulents, you'll want to take into account a combination of factors to guarantee...
-
What Makes a Great Planter for Succulents
When selecting a great planter for succulents, you'll want to take into account a combination of factors to guarantee...
-
What Makes a Great Planter for Succulents
When selecting a great planter for succulents, you'll want to take into account a combination of factors to guarantee...
-
What Makes a Great Planter for Succulents
When selecting a great planter for succulents, you'll want to take into account a combination of factors to guarantee...
-
What Makes a Great Planter for Succulents
When selecting a great planter for succulents, you'll want to take into account a combination of factors to guarantee...
-
What Makes a Great Planter for Succulents
When selecting a great planter for succulents, you'll want to take into account a combination of factors to guarantee...
-
What Makes a Great Planter for Succulents
When selecting a great planter for succulents, you'll want to take into account a combination of factors to guarantee...
-
What Makes a Great Planter for Succulents
When selecting a great planter for succulents, you'll want to take into account a combination of factors to guarantee...
-
What Makes a Great Planter for Succulents
When selecting a great planter for succulents, you'll want to take into account a combination of factors to guarantee...
-
What Makes a Great Planter for Succulents
When selecting a great planter for succulents, you'll want to take into account a combination of factors to guarantee...
-
What Makes a Great Planter for Succulents
When selecting a great planter for succulents, you'll want to take into account a combination of factors to guarantee...
-
What Makes a Great Planter for Succulents
When selecting a great planter for succulents, you'll want to take into account a combination of factors to guarantee...
-
What Makes a Great Planter for Succulents
When selecting a great planter for succulents, you'll want to take into account a combination of factors to guarantee...
-
What Makes a Great Planter for Succulents
When selecting a great planter for succulents, you'll want to take into account a combination of factors to guarantee...
-
What Makes a Great Planter for Succulents
When selecting a great planter for succulents, you'll want to take into account a combination of factors to guarantee...
-
What Makes a Great Planter for Succulents
When selecting a great planter for succulents, you'll want to take into account a combination of factors to guarantee...
-
What Makes a Great Planter for Succulents
When selecting a great planter for succulents, you'll want to take into account a combination of factors to guarantee...
-
What Makes a Great Planter for Succulents
When selecting a great planter for succulents, you'll want to take into account a combination of factors to guarantee...
-
What Makes a Great Planter for Succulents
When selecting a great planter for succulents, you'll want to take into account a combination of factors to guarantee...
-
What Makes a Great Planter for Succulents
When selecting a great planter for succulents, you'll want to take into account a combination of factors to guarantee...
-
What Makes a Great Planter for Succulents
When selecting a great planter for succulents, you'll want to take into account a combination of factors to guarantee...
-
What Makes a Great Planter for Succulents
When selecting a great planter for succulents, you'll want to take into account a combination of factors to guarantee...
-
What Makes a Great Planter for Succulents
When selecting a great planter for succulents, you'll want to take into account a combination of factors to guarantee...
-
What Makes a Great Planter for Succulents
When selecting a great planter for succulents, you'll want to take into account a combination of factors to guarantee...
-

5 Tips for Thriving Vertical Vegetable Gardens
To thrive in vertical vegetable gardening, you'll want to choose a planter that meets the unique needs of your veggie...
-
5 Tips for Thriving Vertical Vegetable Gardens
To thrive in vertical vegetable gardening, you'll want to choose a planter that meets the unique needs of your veggie...
-
5 Tips for Thriving Vertical Vegetable Gardens
To thrive in vertical vegetable gardening, you'll want to choose a planter that meets the unique needs of your veggie...
-
5 Tips for Thriving Vertical Vegetable Gardens
To thrive in vertical vegetable gardening, you'll want to choose a planter that meets the unique needs of your veggie...
-
5 Tips for Thriving Vertical Vegetable Gardens
To thrive in vertical vegetable gardening, you'll want to choose a planter that meets the unique needs of your veggie...
-
5 Tips for Thriving Vertical Vegetable Gardens
To thrive in vertical vegetable gardening, you'll want to choose a planter that meets the unique needs of your veggie...
-
5 Tips for Thriving Vertical Vegetable Gardens
To thrive in vertical vegetable gardening, you'll want to choose a planter that meets the unique needs of your veggie...
-
5 Tips for Thriving Vertical Vegetable Gardens
To thrive in vertical vegetable gardening, you'll want to choose a planter that meets the unique needs of your veggie...
-
5 Tips for Thriving Vertical Vegetable Gardens
To thrive in vertical vegetable gardening, you'll want to choose a planter that meets the unique needs of your veggie...
-
5 Tips for Thriving Vertical Vegetable Gardens
To thrive in vertical vegetable gardening, you'll want to choose a planter that meets the unique needs of your veggie...
-
5 Tips for Thriving Vertical Vegetable Gardens
To thrive in vertical vegetable gardening, you'll want to choose a planter that meets the unique needs of your veggie...
-
5 Tips for Thriving Vertical Vegetable Gardens
To thrive in vertical vegetable gardening, you'll want to choose a planter that meets the unique needs of your veggie...
-
5 Tips for Thriving Vertical Vegetable Gardens
To thrive in vertical vegetable gardening, you'll want to choose a planter that meets the unique needs of your veggie...
-
5 Tips for Thriving Vertical Vegetable Gardens
To thrive in vertical vegetable gardening, you'll want to choose a planter that meets the unique needs of your veggie...
-
5 Tips for Thriving Vertical Vegetable Gardens
To thrive in vertical vegetable gardening, you'll want to choose a planter that meets the unique needs of your veggie...
-
5 Tips for Thriving Vertical Vegetable Gardens
To thrive in vertical vegetable gardening, you'll want to choose a planter that meets the unique needs of your veggie...
-
5 Tips for Thriving Vertical Vegetable Gardens
To thrive in vertical vegetable gardening, you'll want to choose a planter that meets the unique needs of your veggie...


