What You Need to Build a DIY Planter Wall
You'll need a drill, level, measuring tape, saw, and hammer to get started on your DIY planter wall project. Essential materials include wood planks, brackets, screws, a trellis system, concrete blocks, and mortar. Choose plants that thrive in your local climate and ascertain your containers are durable and have proper drainage. With a solid plan in place, you'll be ready to begin constructing your planter wall, from laying the foundation course to adding the finishing touches with grout and sealant. Now that you have the basics covered, you're just a few steps away from creating a stunning vertical garden that brings life to your outdoor space.
Key Takeaways
• Essential tools include a drill, level, measuring tape, saw, and hammer to build a sturdy DIY planter wall.
• Durable materials like wood planks, brackets, screws, trellis systems, concrete blocks, and mortar are necessary for the project.
• Choose plants that thrive in local climate conditions, with suitable sunlight and maintenance requirements, such as ferns, succulents, and flowering vines.
• Select waterproof containers with proper drainage holes to prevent waterlogged soil and ensure healthy plant growth.
• A solid foundation course with compactable materials like crushed gravel or decomposed granite is crucial for stability and preventing settling.
Gather Essential Tools and Materials
You'll need to assemble a set of essential tools and materials to bring your DIY planter wall project to life. Start by gathering the necessary equipment, including a drill, level, measuring tape, saw, and hammer.
Don't forget to stock up on materials like wood planks, brackets, screws, and a trellis system for added support.
When it comes to plant selection, consider the climate, sunlight, and maintenance requirements for your chosen plants. Look for species that thrive in vertical gardens, such as ferns, succulents, or flowering vines.
You can draw design inspiration from nature, architecture, or online resources to create a unique and visually appealing arrangement.
Take into account the weight and moisture requirements of your plants when selecting a planter or container. Make sure it's durable, waterproof, and has proper drainage holes to prevent waterlogged soil.
With the right tools and materials, you'll be well on your way to creating a stunning DIY planter wall that showcases your creativity and green thumb.
Prepare the Construction Site
With your tools and materials in hand, it's time to clear the area where you'll be building your DIY planter wall, guaranteeing a clean slate for construction.
Begin by removing any debris, vegetation, or obstructions from the site. This will give you a clear view of the area and help you identify any potential issues.
Next, conduct a site assessment to evaluate the terrain, taking note of the slope, drainage, and sunlight patterns. This information will be vital in determining the best layout and design for your planter wall.
Additionally, it's important to perform soil testing to determine the pH level and nutrient content of the soil. This will help you choose the right plants and soil amendments for your planter wall.
You can purchase a DIY soil testing kit or hire a professional to do it for you. By taking the time to prepare the construction site, you'll set yourself up for success and guarantee a sturdy and thriving planter wall.
Lay the Foundation Course
Now that the site is cleared and assessed, it's time to lay the foundation course, a critical step that sets the stage for a sturdy and level planter wall. This course serves as the base for your wall, providing a solid footing that prevents settling and shifting.
Begin by marking the area where you'll lay the foundation course, using a level to ascertain it's perfectly horizontal. Next, excavate the marked area to a depth of about 6-8 inches, depending on the height of your wall.
When it comes to soil selection, opt for a compactable material like crushed gravel or decomposed granite. These materials allow for excellent drainage and won't settle over time, guaranteeing your wall remains stable.
Speaking of drainage, consider installing a French drain or a similar system to direct water away from the foundation course. This is especially important if you're building in an area with heavy rainfall or poor soil drainage.
Construct the Planter Wall Frame
As you move forward with your DIY planter wall project, you'll need to construct a sturdy frame to support your plants.
You'll start by selecting the right materials for the job, considering factors like durability and weight capacity.
Next, you'll assemble the frame and add backing support to guarantee it can hold its shape and withstand the elements.
Frame Material Selection
Selecting the right frame material is essential to constructing a sturdy planter wall that can support the weight of soil, plants, and potential irrigation systems.
You'll want to choose a material that's durable, resistant to rot and corrosion, and can withstand outdoor weather conditions.
When it comes to wood types, consider using pressure-treated lumber, cedar, or redwood, which are naturally resistant to decay and insects. However, keep in mind that pressure-treated wood may leach chemicals into the soil, so it's not ideal for edible plants.
Alternatively, you can opt for metal options like aluminum or steel framing, which are lightweight, corrosion-resistant, and can be powder-coated for added durability. Metal frames are also a great choice if you're looking for a sleek, modern design.
Whichever material you choose, make sure it's suitable for outdoor use and can support the weight of your planter wall.
Take your time to research and select the best material for your project, and you'll be on your way to creating a stunning and functional DIY planter wall.
Assemble the Frame
With your frame material selected, you can begin constructing the planter wall frame by cutting the lumber or metal to the required dimensions, guaranteeing accurate measurements to accommodate the planters and support the weight of the entire structure.
As you assemble the frame, consider your design aesthetics and how the planter wall will fit into your outdoor space. Ascertain the frame is sturdy and level, as any deviations will affect the overall structure and wall maintenance.
Use a level and a miter saw to make precise cuts, and assemble the frame pieces using screws, nails, or welding, depending on your frame material. Make sure the corners are secure and the frame is rigid to support the weight of the planters and soil.
Consider adding a bottom plate to prevent water from seeping behind the planters and to facilitate wall maintenance. As you assemble the frame, double-check your measurements to verify everything fits together seamlessly.
With a solid frame in place, you'll be ready to add the backing support and planters, bringing your DIY planter wall to life.
Add Backing Support
You'll next attach the backing support to the frame, which provides a solid surface for mounting the planters and helps maintain the structural integrity of the wall. This step is essential, as it guarantees your DIY planter wall can support the weight of the planters, soil, and plants.
For a sturdy backing support, use 1/2-inch or 3/4-inch plywood or oriented strand board (OSB). Cut the backing material to fit the frame, leaving a 1/2-inch gap around the edges for easy installation.
When attaching the backing support, consider design considerations such as the spacing and pattern of the planters. Make sure the backing material is securely fastened to the frame using screws or nails, taking care not to compromise the structural integrity of the wall.
Use a level to verify the backing support is properly aligned and even. By adding a solid backing support, you'll create a stable foundation for your DIY planter wall, allowing you to confidently add planters and plants.
Add Concrete Blocks and Mortar
Lay the first course of concrete blocks along the wall's base, guaranteeing they're level and evenly spaced to create a solid foundation for your DIY planter wall.
You can choose from various concrete block types, such as split-face, smooth-face, or glazed blocks, depending on the aesthetic you want to achieve. Make sure to select blocks that are suitable for outdoor use and can withstand the weight of the soil and plants.
Next, prepare the mortar by mixing it according to the manufacturer's instructions. Typically, a general-purpose mortar mix is suitable for most DIY planter walls. Mix the mortar in a wheelbarrow or a large bucket, adding water gradually until you achieve a workable consistency. Avoid over-mixing, as this can weaken the mortar.
Begin applying the mortar to the blocks, spreading it evenly with a trowel. Press each block firmly into place, making sure they're aligned with the previous course. Use a level to guarantee the blocks are straight and plumb.
Continue laying courses of blocks, staggering the joints between each course to create a strong bond. As you work, keep the blocks moist to prevent them from drying out and weakening the mortar.
Finish With Grout and Sealant
Now that your planter wall is built, it's time to fill in the gaps and protect your hard work.
You'll need to grout the wall joints to create a solid, uniform surface, then apply a sealant coat to shield your wall from the elements.
Next, you'll let the grout cure, allowing it to reach its full strength and durability.
Grouting the Wall Joints
With your planter wall's structural integrity secured, it's time to fill the gaps between the joints with grout, ensuring a seamless visual shift and protecting the wall from water damage. You'll want to choose the right grout type for your project, considering factors like color, durability, and water resistance. Sanded grout is ideal for larger joints, while unsanded grout is better suited for smaller gaps.
Before applying grout, make sure the joints are clean and free of debris. Mix the grout according to the manufacturer's instructions, then use a grout float to fill the joints, pressing the grout firmly into the gaps. Use a damp cloth to wipe away excess grout, changing the cloth frequently to avoid re-depositing grout onto the wall.
Proper joint sealing is essential to prevent water from seeping behind the wall. Use a grout sealer or a waterproofing membrane to protect the joints from moisture. Allow the grout to cure according to the manufacturer's instructions before moving on to the next step.
With the grout in place, your planter wall is now ready for the final touches.
Applying Sealant Coat
Apply a sealant coat to your planter wall, guaranteeing a protective barrier against the elements and adding an extra layer of durability to your newly grouted joints.
With various sealant types available, choose one suitable for your project, considering factors like waterproofing, UV resistance, and color retention. For a clear, non-yellowing finish, consider a silane-based sealant.
Before application, verify your grouted joints are completely dry and free of excess material. Use a clean, lint-free cloth or foam brush to apply the sealant, working in small sections to maintain even coverage.
Apply a thin, uniform coat, following the manufacturer's instructions for recommended thickness and drying time. Avoid over-saturating the grout, as this can lead to a sticky or cloudy finish.
Employ careful application techniques to prevent sealant from pooling in the joints or running down the face of the wall. Use a clean, damp cloth to wipe away any excess sealant, and repeat the process as needed until the desired finish is achieved.
Curing the Grout
You'll need to allow the grout and sealant to fully cure, following a strict regimen of temperature, humidity, and time to achieve ideal strength and durability. This critical step guarantees your planter wall can withstand the elements and heavy plant loads. For most grout types, a curing period of 24 to 48 hours is recommended, depending on the specific product and environmental conditions.
During this time, maintain a consistent temperature between 60°F and 80°F (15°C and 27°C) and relative humidity above 50%. Avoid direct sunlight, strong winds, and extreme temperature fluctuations, which can hinder the curing process.
Some grout types, like epoxy-based or acrylic-based grouts, may require specialized curing techniques, such as using a heat gun or UV light to accelerate the process. Always follow the manufacturer's instructions for specific curing requirements.
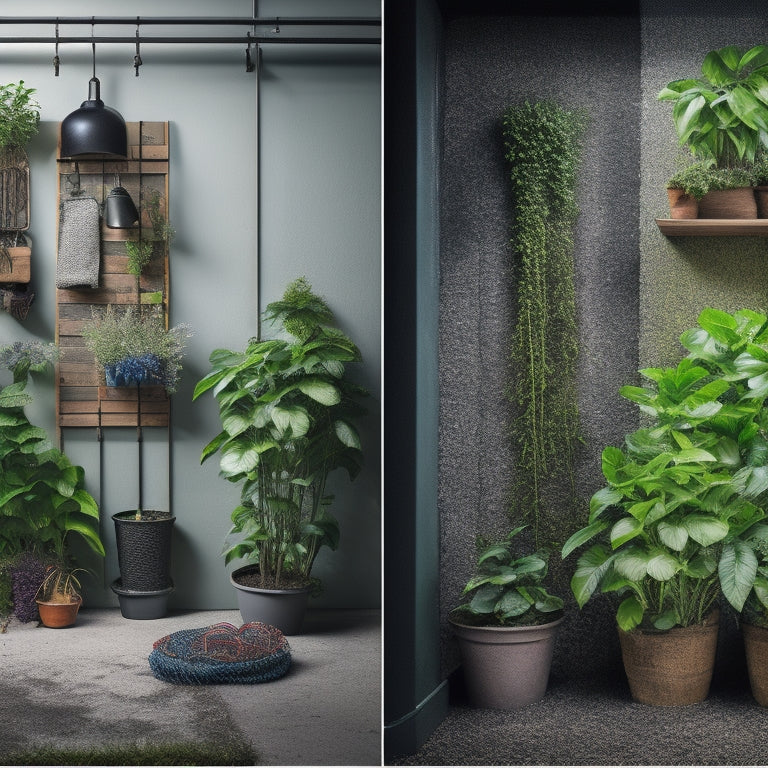
Plant and Decorate the Wall
Now that your planter wall is built and ready, start adding plants and decorative elements to bring it to life.
When it comes to plant selection, consider the lighting conditions, temperature, and humidity levels of your wall's location. Choose plants that thrive in these conditions, such as succulents for dry areas or ferns for shaded spots. Consider a mix of flowering and foliage plants to add visual interest. Don't overcrowd the planters, leaving enough space for growth and air circulation.
For wall decoration, think beyond plants. Add decorative elements like metal or wooden trellises to create a sense of depth. Incorporate natural elements like seashells, pebbles, or moss to add texture and color. You can also hang decorative planters or macramé hangers to add visual interest.
Consider adding a statement piece, like a large planter or a sculpture, to draw the eye to the wall. Remember to balance your decorations with the plants, ensuring the wall doesn't look cluttered.
With careful planning, your DIY planter wall will become a stunning focal point in your outdoor or indoor space.
Frequently Asked Questions
Can I Use a DIY Planter Wall for Indoor Spaces?
You're wondering if a DIY planter wall is suitable for indoor spaces. Absolutely!
Indoor gardening can thrive with a planter wall, especially when space optimization is key. By utilizing vertical space, you'll maximize room for plants while keeping floors and surfaces clear.
Plus, a DIY planter wall can be customized to fit your unique indoor environment, allowing you to create a lush oasis that purifies the air and elevates the ambiance.
How Do I Ensure Good Drainage in My Planter Wall?
As you commence on this ancient art of cultivating life on walls, don't let waterlogged worries dampen your spirits!
To guarantee good drainage in your planter wall, you'll need to incorporate the right drainage materials. Look for solutions like drainage mats, perforated pipes, or even a trellis system to guide excess water away from your plants' roots.
Can I Customize the Size and Shape of My Planter Wall?
You're free to customize your planter wall to fit your unique space and style!
You can experiment with various size options, from compact vertical gardens to sprawling horizontal installations.
Plus, shape variations are endless - think geometric patterns, curved lines, or even a living wall that mirrors your home's architecture.
Are Planter Walls Suitable for All Types of Plants?
Like a master gardener, you're wondering if planter walls are a one-size-fits-all solution for all types of plants. Not quite.
You'll need to evaluate the plant selection and their growth requirements. Some plants thrive in shallow soil, while others need more depth.
Choose plants that match your wall's conditions, and make sure they receive the right amount of sunlight and water.
How Often Should I Water My Planter Wall Plants?
When it comes to watering your planter wall plants, you'll want to establish a consistent watering schedule tailored to your plant selection.
Since plants have varying needs, research the specific requirements of your chosen species.
As a general rule, water your plants when the top inch of soil feels dry to the touch.
Avoid overwatering, which can lead to root rot, and underwatering, which can cause wilt.
Conclusion
You've finally reached the pinnacle of your DIY planter wall project! Now that you've built it, it's time to reap what you've sown.
Stand back, admire your handiwork, and take pride in knowing you've created a living masterpiece.
Your planter wall isn't just a beautiful addition to your outdoor space, but a proof of your determination and creativity.
You've broken new ground, and now it's time to sit back, relax, and watch your garden grow!
Related Posts
-
Why Succulents Thrive in DIY Concrete Planters
You've likely noticed that succulents seem to flourish in DIY concrete planters, and it's not just a coincidence - th...
-
Why Succulents Thrive in DIY Concrete Planters
You've likely noticed that succulents seem to flourish in DIY concrete planters, and it's not just a coincidence - th...
-
Why Succulents Thrive in DIY Concrete Planters
You've likely noticed that succulents seem to flourish in DIY concrete planters, and it's not just a coincidence - th...
-
Why Succulents Thrive in DIY Concrete Planters
You've likely noticed that succulents seem to flourish in DIY concrete planters, and it's not just a coincidence - th...
-
Why Succulents Thrive in DIY Concrete Planters
You've likely noticed that succulents seem to flourish in DIY concrete planters, and it's not just a coincidence - th...
-
Why Succulents Thrive in DIY Concrete Planters
You've likely noticed that succulents seem to flourish in DIY concrete planters, and it's not just a coincidence - th...
-
Why Succulents Thrive in DIY Concrete Planters
You've likely noticed that succulents seem to flourish in DIY concrete planters, and it's not just a coincidence - th...
-
Why Succulents Thrive in DIY Concrete Planters
You've likely noticed that succulents seem to flourish in DIY concrete planters, and it's not just a coincidence - th...
-
Why Succulents Thrive in DIY Concrete Planters
You've likely noticed that succulents seem to flourish in DIY concrete planters, and it's not just a coincidence - th...
-
Why Succulents Thrive in DIY Concrete Planters
You've likely noticed that succulents seem to flourish in DIY concrete planters, and it's not just a coincidence - th...
-
Why Succulents Thrive in DIY Concrete Planters
You've likely noticed that succulents seem to flourish in DIY concrete planters, and it's not just a coincidence - th...
-
Why Succulents Thrive in DIY Concrete Planters
You've likely noticed that succulents seem to flourish in DIY concrete planters, and it's not just a coincidence - th...
-
Why Succulents Thrive in DIY Concrete Planters
You've likely noticed that succulents seem to flourish in DIY concrete planters, and it's not just a coincidence - th...
-
Why Succulents Thrive in DIY Concrete Planters
You've likely noticed that succulents seem to flourish in DIY concrete planters, and it's not just a coincidence - th...
-
Why Succulents Thrive in DIY Concrete Planters
You've likely noticed that succulents seem to flourish in DIY concrete planters, and it's not just a coincidence - th...
-
Why Succulents Thrive in DIY Concrete Planters
You've likely noticed that succulents seem to flourish in DIY concrete planters, and it's not just a coincidence - th...
-
Why Succulents Thrive in DIY Concrete Planters
You've likely noticed that succulents seem to flourish in DIY concrete planters, and it's not just a coincidence - th...
-

What Depth Is Best for My Planter
When selecting a planter, consider the root depth requirements of your chosen plant species, as this dictates the min...
-
What Depth Is Best for My Planter
When selecting a planter, consider the root depth requirements of your chosen plant species, as this dictates the min...
-
What Depth Is Best for My Planter
When selecting a planter, consider the root depth requirements of your chosen plant species, as this dictates the min...
-
What Depth Is Best for My Planter
When selecting a planter, consider the root depth requirements of your chosen plant species, as this dictates the min...
-
What Depth Is Best for My Planter
When selecting a planter, consider the root depth requirements of your chosen plant species, as this dictates the min...
-
What Depth Is Best for My Planter
When selecting a planter, consider the root depth requirements of your chosen plant species, as this dictates the min...
-
What Depth Is Best for My Planter
When selecting a planter, consider the root depth requirements of your chosen plant species, as this dictates the min...
-
What Depth Is Best for My Planter
When selecting a planter, consider the root depth requirements of your chosen plant species, as this dictates the min...
-
What Depth Is Best for My Planter
When selecting a planter, consider the root depth requirements of your chosen plant species, as this dictates the min...
-
What Depth Is Best for My Planter
When selecting a planter, consider the root depth requirements of your chosen plant species, as this dictates the min...
-
What Depth Is Best for My Planter
When selecting a planter, consider the root depth requirements of your chosen plant species, as this dictates the min...
-
What Depth Is Best for My Planter
When selecting a planter, consider the root depth requirements of your chosen plant species, as this dictates the min...
-
What Depth Is Best for My Planter
When selecting a planter, consider the root depth requirements of your chosen plant species, as this dictates the min...
-
What Depth Is Best for My Planter
When selecting a planter, consider the root depth requirements of your chosen plant species, as this dictates the min...
-
What Depth Is Best for My Planter
When selecting a planter, consider the root depth requirements of your chosen plant species, as this dictates the min...
-
What Depth Is Best for My Planter
When selecting a planter, consider the root depth requirements of your chosen plant species, as this dictates the min...
-
What Depth Is Best for My Planter
When selecting a planter, consider the root depth requirements of your chosen plant species, as this dictates the min...
-
What Depth Is Best for My Planter
When selecting a planter, consider the root depth requirements of your chosen plant species, as this dictates the min...
-
What Depth Is Best for My Planter
When selecting a planter, consider the root depth requirements of your chosen plant species, as this dictates the min...
-
What Depth Is Best for My Planter
When selecting a planter, consider the root depth requirements of your chosen plant species, as this dictates the min...
-
What Depth Is Best for My Planter
When selecting a planter, consider the root depth requirements of your chosen plant species, as this dictates the min...
-

5 Tips for Shaded Area Gardening Success
To turn your shaded areas into thriving gardens, start by selecting shade-tolerant crops like leafy greens and herbs,...
-
5 Tips for Shaded Area Gardening Success
To turn your shaded areas into thriving gardens, start by selecting shade-tolerant crops like leafy greens and herbs,...
-
5 Tips for Shaded Area Gardening Success
To turn your shaded areas into thriving gardens, start by selecting shade-tolerant crops like leafy greens and herbs,...
-
5 Tips for Shaded Area Gardening Success
To turn your shaded areas into thriving gardens, start by selecting shade-tolerant crops like leafy greens and herbs,...
-
5 Tips for Shaded Area Gardening Success
To turn your shaded areas into thriving gardens, start by selecting shade-tolerant crops like leafy greens and herbs,...
-
5 Tips for Shaded Area Gardening Success
To turn your shaded areas into thriving gardens, start by selecting shade-tolerant crops like leafy greens and herbs,...
-
5 Tips for Shaded Area Gardening Success
To turn your shaded areas into thriving gardens, start by selecting shade-tolerant crops like leafy greens and herbs,...
-
5 Tips for Shaded Area Gardening Success
To turn your shaded areas into thriving gardens, start by selecting shade-tolerant crops like leafy greens and herbs,...
-
5 Tips for Shaded Area Gardening Success
To turn your shaded areas into thriving gardens, start by selecting shade-tolerant crops like leafy greens and herbs,...
-
5 Tips for Shaded Area Gardening Success
To turn your shaded areas into thriving gardens, start by selecting shade-tolerant crops like leafy greens and herbs,...
-
5 Tips for Shaded Area Gardening Success
To turn your shaded areas into thriving gardens, start by selecting shade-tolerant crops like leafy greens and herbs,...
-
5 Tips for Shaded Area Gardening Success
To turn your shaded areas into thriving gardens, start by selecting shade-tolerant crops like leafy greens and herbs,...
-
5 Tips for Shaded Area Gardening Success
To turn your shaded areas into thriving gardens, start by selecting shade-tolerant crops like leafy greens and herbs,...
-
5 Tips for Shaded Area Gardening Success
To turn your shaded areas into thriving gardens, start by selecting shade-tolerant crops like leafy greens and herbs,...
-
5 Tips for Shaded Area Gardening Success
To turn your shaded areas into thriving gardens, start by selecting shade-tolerant crops like leafy greens and herbs,...
-
5 Tips for Shaded Area Gardening Success
To turn your shaded areas into thriving gardens, start by selecting shade-tolerant crops like leafy greens and herbs,...
-
5 Tips for Shaded Area Gardening Success
To turn your shaded areas into thriving gardens, start by selecting shade-tolerant crops like leafy greens and herbs,...
-
5 Tips for Shaded Area Gardening Success
To turn your shaded areas into thriving gardens, start by selecting shade-tolerant crops like leafy greens and herbs,...
-
5 Tips for Shaded Area Gardening Success
To turn your shaded areas into thriving gardens, start by selecting shade-tolerant crops like leafy greens and herbs,...
-
5 Tips for Shaded Area Gardening Success
To turn your shaded areas into thriving gardens, start by selecting shade-tolerant crops like leafy greens and herbs,...


