
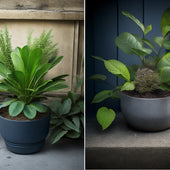
Preventing Soil Settlement in DIY Planters
To prevent soil settlement in your DIY planters, you'll want to focus on selecting a well-balanced soil mix with good drainage, aeration, and water retention. Compacting the soil properly is also essential to eliminate air pockets and maintain even density. Incorporating organic matter like compost or peat moss can enhance soil structure and fertility. Additionally, guarantee your planter has proper drainage holes and a level base to prevent waterlogging and settlement. By following these guidelines, you'll be well on your way to creating a stable foundation for your plants; now, take the next step to optimize your DIY planter's performance.
Key Takeaways
• Use a well-draining soil mix with 20-30% organic matter to prevent waterlogging and settlement in DIY planters.
• Compact soil properly to eliminate air pockets and ensure even density, but avoid over-compaction.
• Incorporate drainage holes and a layer of coarse aggregate like gravel to prevent water accumulation and settlement.
• Monitor and maintain optimal soil moisture levels to prevent over-saturation and settlement.
• Regularly loosen soil to improve drainage efficiency, air circulation, and prevent settlement in DIY planters.
Choosing the Right Soil Mix
By selecting a soil mix specifically designed for container gardens, you guarantee your DIY planter's foundation is stable and resistant to settlement.
A well-structured soil mix is essential, as it affects the overall performance of your planter. Look for a mix with a balanced soil texture, comprising a blend of sand, silt, and clay. This will guarantee good drainage, aeration, and water-holding capacity.
Additionally, opt for a mix rich in organic matter, such as compost or peat moss, which improves soil structure and fertility. Organic matter also helps retain moisture, reducing the need for frequent watering.
A soil mix with a pH between 6.0 and 7.0 is ideal for most plants. Be wary of mixes containing fillers like perlite or vermiculite, as they can compromise soil quality.
Compacting Soil Properly Matters
With your well-structured soil mix in place, you're now ready to guarantee it's properly compacted to prevent settlement and create a stable base for your plants.
Compacting soil properly matters, as it eliminates air pockets and assures the soil is evenly dense. This is vital, as air pockets can lead to settlement and waterlogging.
To achieve peak compaction, use a combination of soil compaction techniques. Start by gently tamping down the soil with your hands or a trowel, working in small sections.
Next, use a hand tamper or plate compactor to apply gentle to moderate pressure. Be cautious not to over-compact, as this can damage the soil structure.
Soil moisture control is also essential, as excess moisture can hinder compaction. Ascertain the soil is at the right moisture level by checking its consistency – it should be damp but not waterlogged.
Cinder Block Planter Soil Requirements
When constructing a cinder block planter, you'll need to select a soil mix that's specifically formulated to meet the unique demands of this type of container. Cinder block planters require a well-draining soil mix to prevent waterlogged soil, which can lead to settlement and structural issues.
| Soil Property | Ideal Range | Why It Matters |
|---|---|---|
| Organic Matter | 20-30% | Supports healthy microbial activity and improves drainage |
| Particle Size | 1-5 mm | Allows for peak water infiltration and aeration |
| pH Level | 6.0-7.0 | Supports plant growth and nutrient availability |
| Water Holding Capacity | 30-40% | Prevents waterlogging and guarantees consistent moisture levels |
| Compaction Resistance | High | Resists settling and maintains planter structure |
When selecting a soil mix, consider the type of cinder block you're using, as well as the planter's aesthetics. For example, if you're using a decorative cinder block with large holes, you may need a soil mix with larger particle sizes to prevent washout. By choosing the right soil mix, you'll guarantee your cinder block planter remains stable and healthy, while also maintaining its visual appeal.
Drainage Holes Are a Must
You must incorporate drainage holes into your cinder block planter design to prevent water accumulation, which can cause soil settlement and compromise the structure's integrity.
Without proper drainage, water can collect in the planter, putting pressure on the cinder blocks and leading to settling or even collapse.
To guarantee effective drainage, you'll want to create a drainage system that allows excess water to escape. This can be achieved by drilling holes in the bottom of the planter, spaced evenly apart to facilitate water flow.
The size and number of holes will depend on the planter's size and elevation, but a good rule of thumb is to aim for at least 1/4 inch holes spaced 2-3 inches apart.
Additionally, consider adding a layer of coarse aggregate, such as gravel or crushed stone, to the bottom of the planter to enhance drainage further.
Adding Soil Amendments Wisely
Proper soil composition is key to preventing settlement, and strategically adding soil amendments can make all the difference in creating a stable and thriving environment for your plants.
When selecting organic amendments, you'll want to focus on those that improve soil structure and fertility without disrupting the natural pH balance. Peat moss, compost, and well-rotted manure are all excellent options, as they increase the soil's water-holding capacity and provide essential nutrients for your plants.
However, it's essential to add these amendments wisely. Over-amending can lead to an imbalance in soil pH, which can be detrimental to your plants' health.
To avoid this, start by testing your soil's pH level using a reliable pH meter. Based on the results, you can then add amendments specifically designed for pH balancing. For instance, if your soil is too alkaline, you may need to add elemental sulfur or peat moss to lower the pH. Conversely, if your soil is too acidic, you can add lime to raise the pH.
Leveling the Planter Base
Making certain your planter base is level is a critical step in preventing soil settlement, as even a slight inclination can cause the soil to shift and settle unevenly.
To achieve a level base, you'll need to select the right base materials and employ effective leveling techniques. Start by choosing a planter base made from a durable, stable material, such as concrete or recycled plastic. Avoid using soft or uneven materials like wood or gravel, as they can shift over time.
Next, position your planter on a firm, level surface. Check the planter's base using a spirit level or a leveling app on your smartphone. If the base is uneven, adjust the planter's position or add shims to level it out. For planters with adjustable feet, simply screw or unscrew the feet to achieve a level surface.
Watering Techniques to Avoid
Overwatering, which occurs when water pools on the surface or flows out of the planter's drainage holes, can cause soil settlement by displacing soil particles and creating air pockets. This can lead to a range of problems, including reduced plant growth, increased risk of root rot, and compromised structural integrity. To avoid these overwatering consequences, it is crucial to adopt sound watering techniques.
Here are some common mistakes to avoid:
| Watering Technique | Why it's a Problem | Better Alternative |
|---|---|---|
| Watering too frequently | Leads to waterlogged soil and root rot | Water only when the top inch of soil feels dry |
| Watering in excess | Causes water to pool on the surface | Water in moderation, avoiding excess runoff |
| Not checking drainage | Fails to account for poor drainage | Regularly inspect drainage holes to make certain they're clear |
| Ignoring soil type | Fails to account for soil's moisture retention | Choose a potting mix with suitable moisture retention techniques |
| Watering at the wrong time | Can exacerbate overwatering | Water in the morning to allow excess water to evaporate |
Regular Soil Maintenance Tips
By incorporating regular soil maintenance into your DIY planter care routine, you can prevent soil settlement and create a healthy environment for your plants to thrive.
Start by checking the soil pH regularly to guarantee it's within the ideal range for your plants. Most plants prefer a slightly acidic to neutral soil pH, between 6.0 and 7.0. If your soil pH is off, adjust it by adding lime to raise it or elemental sulfur or aluminum sulfate to lower it.
Next, add organic matter to your soil regularly. This can include compost, well-rotted manure, or peat moss. Organic matter helps improve soil structure, increases the water-holding capacity, and provides nutrients for your plants. Aim to add a 2-inch layer of organic matter to your planter every 2-3 months.
Regularly aerating your soil is also essential. Use a fork or spade to gently loosen the top 6-8 inches of soil, improving drainage and air circulation. This will help prevent waterlogging and reduce the risk of soil settlement.
Frequently Asked Questions
Can I Use Soil From My Garden in My DIY Planter?
When deciding whether to use soil from your garden in your DIY planter, you're not just considering convenience - you're also weighing the pros and cons of soil quality.
Garden soil can harbor pests and diseases that might spread to your new plants. You'll need to confirm it's free of contaminants and has the right pH balance for your plants.
If you're unsure, it's better to opt for a high-quality potting mix specifically designed for container gardens. This will provide ideal growing conditions and built-in pest control.
How Often Should I Rotate My Planter for Even Growth?
You're finally asking the question that'll make or break your DIY planter game: how often to rotate that bad boy for even growth.
Let's get real, you didn't think those plants would magically align themselves, did you? To avoid wonky growth patterns, you should rotate your planter every 2-3 days, or whenever you remember to water it (no judgment).
This guarantees consistent plant rotation and, subsequently, balanced growth. Now, go forth and rotate like your plants' lives depend on it!
Will Adding Rocks to the Bottom Help With Drainage?
When adding rocks to the bottom of your planter, you're creating a layer that aids in drainage.
This rock layering allows excess water to flow through, reducing waterlogged soil.
The drainage benefits are significant, as it prevents root rot and guarantees healthy plant growth.
Can I Plant Seeds Directly Into My DIY Planter?
Are you ready to bring new life to your DIY planter? You're wondering if you can plant seeds directly into it. The answer is yes, but it's essential to contemplate seed germination techniques and planter depth considerations.
Make sure your planter is at least 6-8 inches deep to accommodate roots. Then, create a conducive environment for germination by providing adequate moisture, warmth, and light.
With the right conditions, your seeds will sprout, and your planter will thrive.
Do I Need to Seal My Planter to Prevent Water Damage?
When building a planter, you'll want to take into account sealing it to prevent water damage.
The type of planter materials you use will impact water retention. For example, wood planters can rot if not sealed, while metal ones can rust.
Sealing your planter with a waterproof coating or liner will help prevent water from seeping in and causing damage.
This step is essential to guarantee your planter lasts and remains functional.
Conclusion
You've laid the groundwork for a thriving DIY planter by following these expert tips.
Now, don't let your hard work come crumbling down - literally. Remember, an ounce of prevention is worth a pound of cure when it comes to preventing soil settlement.
By choosing the right soil mix, compacting properly, and adding amendments wisely, you'll be on solid ground.
Stay vigilant with regular maintenance, and your planter will be the envy of the neighborhood.
Related Posts
-
What's the Ideal Timeline for a Concrete Planter Reno
You'll need to allocate around 6-12 weeks for a concrete planter renovation, broken down into seven distinct phases t...
-
What's the Ideal Timeline for a Concrete Planter Reno
You'll need to allocate around 6-12 weeks for a concrete planter renovation, broken down into seven distinct phases t...
-
What's the Ideal Timeline for a Concrete Planter Reno
You'll need to allocate around 6-12 weeks for a concrete planter renovation, broken down into seven distinct phases t...
-
What's the Ideal Timeline for a Concrete Planter Reno
You'll need to allocate around 6-12 weeks for a concrete planter renovation, broken down into seven distinct phases t...
-
What's the Ideal Timeline for a Concrete Planter Reno
You'll need to allocate around 6-12 weeks for a concrete planter renovation, broken down into seven distinct phases t...
-
What's the Ideal Timeline for a Concrete Planter Reno
You'll need to allocate around 6-12 weeks for a concrete planter renovation, broken down into seven distinct phases t...
-
What's the Ideal Timeline for a Concrete Planter Reno
You'll need to allocate around 6-12 weeks for a concrete planter renovation, broken down into seven distinct phases t...
-
What's the Ideal Timeline for a Concrete Planter Reno
You'll need to allocate around 6-12 weeks for a concrete planter renovation, broken down into seven distinct phases t...
-
What's the Ideal Timeline for a Concrete Planter Reno
You'll need to allocate around 6-12 weeks for a concrete planter renovation, broken down into seven distinct phases t...
-
What's the Ideal Timeline for a Concrete Planter Reno
You'll need to allocate around 6-12 weeks for a concrete planter renovation, broken down into seven distinct phases t...
-
What's the Ideal Timeline for a Concrete Planter Reno
You'll need to allocate around 6-12 weeks for a concrete planter renovation, broken down into seven distinct phases t...
-
What's the Ideal Timeline for a Concrete Planter Reno
You'll need to allocate around 6-12 weeks for a concrete planter renovation, broken down into seven distinct phases t...
-
What's the Ideal Timeline for a Concrete Planter Reno
You'll need to allocate around 6-12 weeks for a concrete planter renovation, broken down into seven distinct phases t...
-
What's the Ideal Timeline for a Concrete Planter Reno
You'll need to allocate around 6-12 weeks for a concrete planter renovation, broken down into seven distinct phases t...
-
What's the Ideal Timeline for a Concrete Planter Reno
You'll need to allocate around 6-12 weeks for a concrete planter renovation, broken down into seven distinct phases t...
-
What's the Ideal Timeline for a Concrete Planter Reno
You'll need to allocate around 6-12 weeks for a concrete planter renovation, broken down into seven distinct phases t...
-
What's the Ideal Timeline for a Concrete Planter Reno
You'll need to allocate around 6-12 weeks for a concrete planter renovation, broken down into seven distinct phases t...
-
What's the Ideal Timeline for a Concrete Planter Reno
You'll need to allocate around 6-12 weeks for a concrete planter renovation, broken down into seven distinct phases t...
-
What's the Ideal Timeline for a Concrete Planter Reno
You'll need to allocate around 6-12 weeks for a concrete planter renovation, broken down into seven distinct phases t...
-
What's the Ideal Timeline for a Concrete Planter Reno
You'll need to allocate around 6-12 weeks for a concrete planter renovation, broken down into seven distinct phases t...
-
What's the Ideal Timeline for a Concrete Planter Reno
You'll need to allocate around 6-12 weeks for a concrete planter renovation, broken down into seven distinct phases t...
-
3 Best Space-Saving Gardening Ideas for Urban Renters
You can turn even the smallest urban space into a lush oasis by utilizing clever space-saving gardening ideas. Maximi...
-
3 Best Space-Saving Gardening Ideas for Urban Renters
You can turn even the smallest urban space into a lush oasis by utilizing clever space-saving gardening ideas. Maximi...
-
3 Best Space-Saving Gardening Ideas for Urban Renters
You can turn even the smallest urban space into a lush oasis by utilizing clever space-saving gardening ideas. Maximi...
-
3 Best Space-Saving Gardening Ideas for Urban Renters
You can turn even the smallest urban space into a lush oasis by utilizing clever space-saving gardening ideas. Maximi...
-
3 Best Space-Saving Gardening Ideas for Urban Renters
You can turn even the smallest urban space into a lush oasis by utilizing clever space-saving gardening ideas. Maximi...
-
3 Best Space-Saving Gardening Ideas for Urban Renters
You can turn even the smallest urban space into a lush oasis by utilizing clever space-saving gardening ideas. Maximi...
-
3 Best Space-Saving Gardening Ideas for Urban Renters
You can turn even the smallest urban space into a lush oasis by utilizing clever space-saving gardening ideas. Maximi...
-
3 Best Space-Saving Gardening Ideas for Urban Renters
You can turn even the smallest urban space into a lush oasis by utilizing clever space-saving gardening ideas. Maximi...
-
3 Best Space-Saving Gardening Ideas for Urban Renters
You can turn even the smallest urban space into a lush oasis by utilizing clever space-saving gardening ideas. Maximi...
-
3 Best Space-Saving Gardening Ideas for Urban Renters
You can turn even the smallest urban space into a lush oasis by utilizing clever space-saving gardening ideas. Maximi...
-
3 Best Space-Saving Gardening Ideas for Urban Renters
You can turn even the smallest urban space into a lush oasis by utilizing clever space-saving gardening ideas. Maximi...
-
3 Best Space-Saving Gardening Ideas for Urban Renters
You can turn even the smallest urban space into a lush oasis by utilizing clever space-saving gardening ideas. Maximi...
-
3 Best Space-Saving Gardening Ideas for Urban Renters
You can turn even the smallest urban space into a lush oasis by utilizing clever space-saving gardening ideas. Maximi...
-
3 Best Space-Saving Gardening Ideas for Urban Renters
You can turn even the smallest urban space into a lush oasis by utilizing clever space-saving gardening ideas. Maximi...
-
What Materials Do You Need for a DIY Planter
You'll need a combination of structural components, soil and compost, drainage materials, and decorative elements to ...
-
What Materials Do You Need for a DIY Planter
You'll need a combination of structural components, soil and compost, drainage materials, and decorative elements to ...
-
What Materials Do You Need for a DIY Planter
You'll need a combination of structural components, soil and compost, drainage materials, and decorative elements to ...
-
What Materials Do You Need for a DIY Planter
You'll need a combination of structural components, soil and compost, drainage materials, and decorative elements to ...
-
What Materials Do You Need for a DIY Planter
You'll need a combination of structural components, soil and compost, drainage materials, and decorative elements to ...
-
What Materials Do You Need for a DIY Planter
You'll need a combination of structural components, soil and compost, drainage materials, and decorative elements to ...
-
What Materials Do You Need for a DIY Planter
You'll need a combination of structural components, soil and compost, drainage materials, and decorative elements to ...
-
What Materials Do You Need for a DIY Planter
You'll need a combination of structural components, soil and compost, drainage materials, and decorative elements to ...
-
What Materials Do You Need for a DIY Planter
You'll need a combination of structural components, soil and compost, drainage materials, and decorative elements to ...
-
What Materials Do You Need for a DIY Planter
You'll need a combination of structural components, soil and compost, drainage materials, and decorative elements to ...
-
What Materials Do You Need for a DIY Planter
You'll need a combination of structural components, soil and compost, drainage materials, and decorative elements to ...
-
What Materials Do You Need for a DIY Planter
You'll need a combination of structural components, soil and compost, drainage materials, and decorative elements to ...
-
What Materials Do You Need for a DIY Planter
You'll need a combination of structural components, soil and compost, drainage materials, and decorative elements to ...
-
What Materials Do You Need for a DIY Planter
You'll need a combination of structural components, soil and compost, drainage materials, and decorative elements to ...
-
What Materials Do You Need for a DIY Planter
You'll need a combination of structural components, soil and compost, drainage materials, and decorative elements to ...
-
What Materials Do You Need for a DIY Planter
You'll need a combination of structural components, soil and compost, drainage materials, and decorative elements to ...
-
What Materials Do You Need for a DIY Planter
You'll need a combination of structural components, soil and compost, drainage materials, and decorative elements to ...
-
What Materials Do You Need for a DIY Planter
You'll need a combination of structural components, soil and compost, drainage materials, and decorative elements to ...
-
What Materials Do You Need for a DIY Planter
You'll need a combination of structural components, soil and compost, drainage materials, and decorative elements to ...
-
What Materials Do You Need for a DIY Planter
You'll need a combination of structural components, soil and compost, drainage materials, and decorative elements to ...
-
What Materials Do You Need for a DIY Planter
You'll need a combination of structural components, soil and compost, drainage materials, and decorative elements to ...
-
What Materials Do You Need for a DIY Planter
You'll need a combination of structural components, soil and compost, drainage materials, and decorative elements to ...
-
What Materials Do You Need for a DIY Planter
You'll need a combination of structural components, soil and compost, drainage materials, and decorative elements to ...
-
What Materials Do You Need for a DIY Planter
You'll need a combination of structural components, soil and compost, drainage materials, and decorative elements to ...
-
What Materials Do You Need for a DIY Planter
You'll need a combination of structural components, soil and compost, drainage materials, and decorative elements to ...
-
What Materials Do You Need for a DIY Planter
You'll need a combination of structural components, soil and compost, drainage materials, and decorative elements to ...
-
What Materials Do You Need for a DIY Planter
You'll need a combination of structural components, soil and compost, drainage materials, and decorative elements to ...
-
What Materials Do You Need for a DIY Planter
You'll need a combination of structural components, soil and compost, drainage materials, and decorative elements to ...
-
What Materials Do You Need for a DIY Planter
You'll need a combination of structural components, soil and compost, drainage materials, and decorative elements to ...
-
What Materials Do You Need for a DIY Planter
You'll need a combination of structural components, soil and compost, drainage materials, and decorative elements to ...


