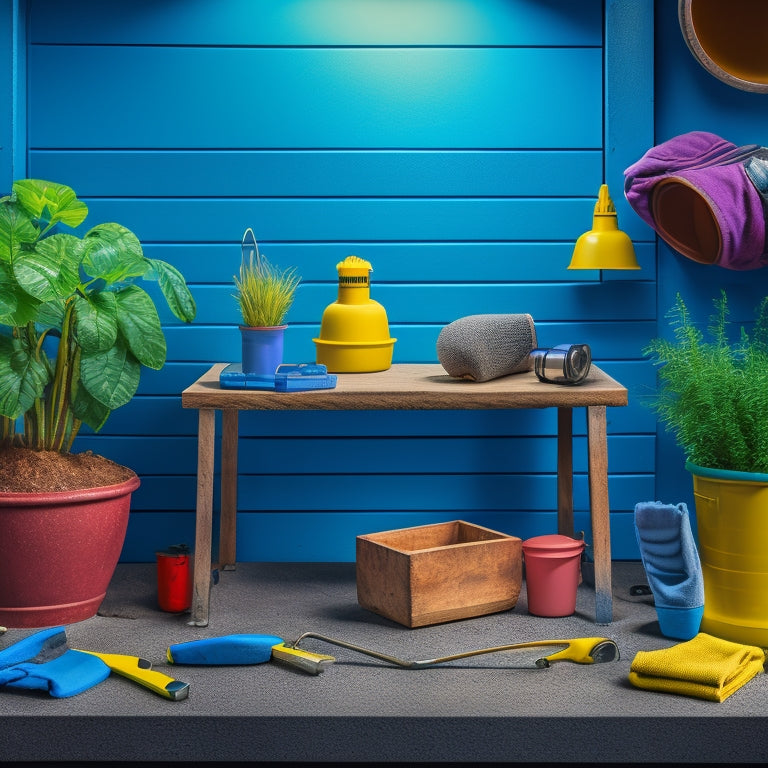
Essential Tools for Block Planter Construction Success
You'll need a solid foundation of essential tools to achieve block planter construction success. Start with measuring and marking tools like a high-quality tape measure and chalk line for precise cuts and assemblies. Heavy-duty lifting and moving equipment, such as pulley systems and forklifts, will simplify the process. Additionally, concrete mixing and pouring tools, like mixing buckets and screed boards, are vital for a smooth finish. Don't forget cinder block cutting and shaping tools, safety gear, leveling and alignment tools, and finishing and decorative tools. With these must-haves, you'll be well on your way to building a sturdy and visually appealing planter, and by exploring these essential tools further, you'll uncover the secrets to a truly professional-looking finish.
Key Takeaways
• Accurate measuring and marking tools, such as measuring tapes and chalk lines, ensure precise cuts and assemblies in block planter construction.
• Heavy-duty lifting and moving equipment, including pulley systems and forklifts, simplify the handling of massive concrete blocks and materials.
• Concrete mixing and pouring tools, like mixing buckets and screed boards, promote efficient and high-quality concrete production for the planter.
• Cinder block cutting and shaping tools, including masonry saws and shaping chisels, enable precise cuts and smooth finishes for the planter's blocks.
• Safety gear and protective equipment, such as hard hats and respirator masks, are crucial for preventing injuries and ensuring a safe working environment.
Essential Measuring and Marking Tools
You'll need a set of essential measuring and marking tools to guarantee accurate cuts and assemblies throughout your block planter construction project.
A high-quality measuring tape is a must-have, allowing you to take precise measurements of your blocks, lumber, and other materials. Look for a tape that's durable, easy to read, and has a sturdy hook that won't slip off during use.
A chalk line is another critical tool in your measuring and marking arsenal. This simple yet effective tool enables you to create straight, accurate lines on your blocks and lumber, ensuring that your cuts are precise and your assemblies are square.
When choosing a chalk line, opt for one with a robust reel and a fine, consistent line that won't smudge or fade easily.
Heavy-Duty Lifting and Moving Equipment
When constructing block planters, you'll need to move and lift heavy materials, which requires the right heavy-duty equipment.
You'll soon realize that pulley systems are a must-have to simplify the lifting process, especially when dealing with massive concrete blocks.
Additionally, forklifts and pallet jacks will become your go-to tools for efficiently moving materials around the construction site.
Pulley Systems Required
To safely construct and maneuver large block planters, a heavy-duty pulley system is essential for efficient lifting and moving of massive concrete blocks.
You'll need to select the right pulley system type for your specific needs, whether it's a manual or motorized system. Manual systems are cost-effective and suitable for smaller projects, while motorized systems provide greater lifting capacity and speed for larger, more complex projects.
When choosing a pulley system, consider the weight and size of the blocks you'll be lifting.
You'll also need to decide on the block lifting technique that works best for your project. Will you use a single-point lift or a multi-point lift? Do you need a system with adjustable lifting heights or a fixed lifting height?
Answering these questions will help you select the right pulley system for your block planter construction project.
Forklifts and Pallet Jacks
Beyond pulley systems, forklifts and pallet jacks provide the heavy-duty lifting and moving power you need to efficiently handle massive concrete blocks, especially when working with larger, heavier blocks that require more muscle to maneuver.
As you operate these machines, it's vital to prioritize forklift safety to avoid accidents and injuries. Make certain you're trained to operate the forklift correctly, and always follow the manufacturer's guidelines. Regularly inspect the forklift for any damage or wear, and perform routine maintenance tasks to keep it in good working condition.
In addition to forklifts, pallet jacks are indispensable for moving blocks around your construction site. To get the most out of your pallet jack, you need to perform regular pallet jack maintenance. Check the hydraulic system, wheels, and chains regularly to verify they're functioning properly.
Lubricate moving parts and keep the pallet jack clean to prevent rust and corrosion. By maintaining your pallet jack, you'll reduce downtime and increase productivity.
With the right heavy-duty lifting and moving equipment, you'll be able to handle even the largest concrete blocks with ease and confidence.
Concrete Mixing and Pouring Tools
As you prepare to construct your block planter, you'll need to focus on concrete mixing and pouring tools to guarantee a strong and durable foundation.
You'll need to gather essential mixing bucket tools, such as a mixing stick and bucket liners, to efficiently combine your concrete mixture.
Mixing Bucket Essentials
You'll need a sturdy mixing bucket that can withstand the rigors of concrete mixing and pouring. When it comes to mixing techniques, a reliable bucket is vital. You'll want to take into account bucket types that are specifically designed for concrete mixing, such as heavy-duty plastic or steel buckets with reinforced handles. A bucket with a non-slip bottom and a pouring spout will make the mixing and pouring process more efficient.
A mixing bucket with a capacity of at least 5 gallons is recommended, as it will allow you to mix the right amount of concrete for your block planter construction project. Look for a bucket with measurement markings to guarantee accurate mixing ratios. Additionally, think about a bucket with a mixing grid or mixing fins to help break down aggregate and improve concrete consistency.
Remember to choose a bucket that's easy to clean and resistant to corrosion. A well-maintained mixing bucket is vital for achieving consistent results and guaranteeing the longevity of your tools.
Concrete Pouring Techniques
With the right mixing bucket in hand, it's time to focus on the concrete pouring techniques and tools that will help you achieve a smooth, even pour.
To guarantee a successful pour, you'll need to take into account pouring temperature considerations. Ideal temperatures for pouring concrete range from 50°F to 90°F (10°C to 32°C). Avoid pouring in direct sunlight or during extreme weather conditions.
When pouring, use a screed board or tamping tool to remove air pockets and achieve a smooth finish. Vibrate the concrete gently to remove any remaining air bubbles. For larger pours, think about using a concrete pump or conveyor belt to reduce labor and increase efficiency.
After pouring, focus on concrete curing methods to prevent premature drying and promote proper strength development. Apply a concrete curing compound or keep the concrete consistently moist for the first 24 hours. Monitor the temperature and humidity levels to guarantee peak curing conditions.
Cinder Block Cutting and Shaping Tools
Cutting and shaping cinder blocks to fit your block planter design requires the right tools, specifically a masonry saw or a circular saw with a masonry blade, to make precise cuts and achieve a clean finish. A masonry saw, also known as a cinder block saw, is designed specifically for cutting through dense materials like concrete and cinder blocks. Alternatively, you can use a circular saw with a masonry blade, which is a more versatile option.
When it comes to shaping cinder blocks, you'll need some essential tools to achieve the desired shape and fit. Here are some must-haves:
-
Shaping chisels: used to remove small amounts of material and create a rough shape
-
Pointing trowels: used to apply and smooth out mortar
-
Jointers: used to create a smooth, even surface
- Edgers: used to create clean edges and corners
With these tools, you'll be able to cut and shape your cinder blocks with precision and accuracy, ensuring a professional-looking finish for your block planter.
Remember to always follow safety guidelines when working with power tools and to wear protective gear to avoid injury.
Safety Gear and Protective Equipment
Your safety gear and protective equipment are essential components of your block planter construction arsenal, as they shield you from the hazards associated with power tools and masonry materials.
You'll need protective gloves to prevent cuts and abrasions from sharp edges and rough surfaces.
Safety goggles will protect your eyes from flying debris and dust, while hard hats will safeguard your head from falling objects or debris.
When working with power tools or handling hazardous materials, don a respirator mask to prevent inhalation of harmful particles.
Steel toed boots are a must-have to prevent foot injuries from heavy objects or tools.
Don't forget ear protection to prevent permanent hearing damage from loud machinery or tools.
Leveling and Alignment Tools Required
You'll need a set of leveling and alignment tools to make certain your block planter is built on a perfectly horizontal plane and its walls are plumb, guaranteeing a sturdy and visually appealing structure.
Without these tools, you risk constructing a planter that's uneven, lopsided, or even worse, collapses under its own weight.
To confirm accuracy and precision, you'll need the following essential tools:
-
Laser levels to project a level line or plane across your workspace, ensuring your blocks are aligned correctly.
-
Alignment stakes to mark the position of your blocks and keep them in place while you lay the next course.
-
A spirit level to check the horizontal and vertical alignment of individual blocks and courses.
- A string line to create a straight reference line for laying blocks and checking their alignment.
Finishing and Decorative Tool Essentials
Finishing and Decorative Tool Essentials
With the structural integrity of your block planter guaranteed, it's time to focus on the aesthetic appeal, and that's where finishing and decorative tool essentials come into play. You've got the foundation right, now it's time to add the finishing touches that'll make your planter stand out.
To achieve the desired decorative finishes and surface treatments, you'll need the following tools:
| Tool | Description |
|---|---|
| Sandpaper | For smoothing out rough surfaces and preparing for painting or staining |
| Paintbrushes | For applying paint or stain to achieve desired colors and textures |
| Sealant Applicator | For applying sealants to protect your planter from the elements |
| Grout Float | For applying grout between blocks for a clean, finished look |
| Putty Knife | For filling gaps and holes with putty or filler |
These tools will help you achieve a professional-looking finish that complements your block planter's design. Remember, the right tools can make all the difference in the world. By incorporating these finishing and decorative tool essentials into your construction process, you'll be able to achieve a high-quality finish that'll make your planter stand out.
Frequently Asked Questions
What Is the Ideal Block Planter Size for a Small Backyard?
When deciding on the ideal block planter size for your small backyard, you'll want to contemplate optimal dimensions that balance aesthetics with space considerations.
Aim for a planter that's at least 4-6 inches deep to accommodate root growth, and 12-18 inches wide to fit comfortably in a corner or against a wall.
This size range will provide ample space for plants to thrive without overwhelming your outdoor space.
Can I Use a Block Planter as a Retaining Wall?
You're thinking of building a block planter that's not just a pretty face, but a sturdy retaining wall too? That's a bold move!
While it's technically possible, you'll need to prioritize block planter stability above aesthetics. A retaining wall design requires careful consideration of soil pressure, drainage, and structural integrity.
Make certain you're prepared to put in the engineering legwork to guarantee your block planter doesn't topple under the weight of its own ambition.
How Often Should I Water Plants in a Block Planter?
You'll want to water your plants in a block planter when the top 2-3 inches of soil feel dry to the touch.
Check the soil daily, especially during hot weather. The key is to find the right watering frequency, as block planters tend to dry out faster than traditional planters.
Look for signs of moisture retention, like a slight softening of the soil or a faint sheen.
Water thoroughly, but avoid overwatering, which can lead to root rot and other issues.
Are Block Planters Suitable for Rooftop Gardens?
'Measure twice, cut once' is a wise adage to keep in mind when considering block planters for your rooftop garden.
You're wise to wonder if they're suitable for this purpose. Block planters offer benefits like improved drainage and aeration, making them ideal for rooftops.
However, rooftop garden considerations like weight, wind resistance, and waterproofing must be addressed.
You'll need to guarantee your block planter is designed and constructed with these factors in mind to ensure a thriving garden.
Can I Build a Block Planter With Used or Recycled Blocks?
You're considering building a block planter with used or recycled blocks. That's a great idea!
You can definitely repurpose recycled materials to create a unique planter.
Just keep in mind that you'll need to inspect the blocks for damage and clean them thoroughly before construction.
Additionally, be prepared for potential block maintenance issues down the line, as recycled blocks may be more prone to weathering.
Conclusion
As you stand back to admire your newly constructed block planter, you'll appreciate the importance of having the right tools for the job.
The theory that 'a craftsman is only as good as their tools' holds true in this case. Without essential measuring and marking tools, heavy-duty lifting equipment, and specialized concrete and cinder block tools, your project would be plagued by mistakes, inefficiencies, and safety risks.
By investing in these critical tools, you've guaranteed a sturdy, well-built planter that will thrive for years to come.
Related Posts
-
Best Tools for Creating Block Planters at Home
When creating a block planter at home, you'll need a range of essential tools to guarantee a safe and successful proj...
-
Best Tools for Creating Block Planters at Home
When creating a block planter at home, you'll need a range of essential tools to guarantee a safe and successful proj...
-
Best Tools for Creating Block Planters at Home
When creating a block planter at home, you'll need a range of essential tools to guarantee a safe and successful proj...
-
Best Tools for Creating Block Planters at Home
When creating a block planter at home, you'll need a range of essential tools to guarantee a safe and successful proj...
-
Best Tools for Creating Block Planters at Home
When creating a block planter at home, you'll need a range of essential tools to guarantee a safe and successful proj...
-
Best Tools for Creating Block Planters at Home
When creating a block planter at home, you'll need a range of essential tools to guarantee a safe and successful proj...
-
Best Tools for Creating Block Planters at Home
When creating a block planter at home, you'll need a range of essential tools to guarantee a safe and successful proj...
-
Best Tools for Creating Block Planters at Home
When creating a block planter at home, you'll need a range of essential tools to guarantee a safe and successful proj...
-
Best Tools for Creating Block Planters at Home
When creating a block planter at home, you'll need a range of essential tools to guarantee a safe and successful proj...
-
Best Tools for Creating Block Planters at Home
When creating a block planter at home, you'll need a range of essential tools to guarantee a safe and successful proj...
-
Best Tools for Creating Block Planters at Home
When creating a block planter at home, you'll need a range of essential tools to guarantee a safe and successful proj...
-
Best Tools for Creating Block Planters at Home
When creating a block planter at home, you'll need a range of essential tools to guarantee a safe and successful proj...
-
Best Tools for Creating Block Planters at Home
When creating a block planter at home, you'll need a range of essential tools to guarantee a safe and successful proj...
-
Best Tools for Creating Block Planters at Home
When creating a block planter at home, you'll need a range of essential tools to guarantee a safe and successful proj...
-
Best Tools for Creating Block Planters at Home
When creating a block planter at home, you'll need a range of essential tools to guarantee a safe and successful proj...
-
Best Tools for Creating Block Planters at Home
When creating a block planter at home, you'll need a range of essential tools to guarantee a safe and successful proj...
-
Best Tools for Creating Block Planters at Home
When creating a block planter at home, you'll need a range of essential tools to guarantee a safe and successful proj...
-
Best Tools for Creating Block Planters at Home
When creating a block planter at home, you'll need a range of essential tools to guarantee a safe and successful proj...
-
Best Tools for Creating Block Planters at Home
When creating a block planter at home, you'll need a range of essential tools to guarantee a safe and successful proj...
-
Best Tools for Creating Block Planters at Home
When creating a block planter at home, you'll need a range of essential tools to guarantee a safe and successful proj...
-
Best Tools for Creating Block Planters at Home
When creating a block planter at home, you'll need a range of essential tools to guarantee a safe and successful proj...
-
Best Tools for Creating Block Planters at Home
When creating a block planter at home, you'll need a range of essential tools to guarantee a safe and successful proj...
-
Best Tools for Creating Block Planters at Home
When creating a block planter at home, you'll need a range of essential tools to guarantee a safe and successful proj...
-
Best Tools for Creating Block Planters at Home
When creating a block planter at home, you'll need a range of essential tools to guarantee a safe and successful proj...
-
Best Tools for Creating Block Planters at Home
When creating a block planter at home, you'll need a range of essential tools to guarantee a safe and successful proj...
-
Best Tools for Creating Block Planters at Home
When creating a block planter at home, you'll need a range of essential tools to guarantee a safe and successful proj...
-
Best Tools for Creating Block Planters at Home
When creating a block planter at home, you'll need a range of essential tools to guarantee a safe and successful proj...
-
Best Tools for Creating Block Planters at Home
When creating a block planter at home, you'll need a range of essential tools to guarantee a safe and successful proj...
-
Best Tools for Creating Block Planters at Home
When creating a block planter at home, you'll need a range of essential tools to guarantee a safe and successful proj...
-
Best Tools for Creating Block Planters at Home
When creating a block planter at home, you'll need a range of essential tools to guarantee a safe and successful proj...
-
Best Tools for Creating Block Planters at Home
When creating a block planter at home, you'll need a range of essential tools to guarantee a safe and successful proj...
-
Best Tools for Creating Block Planters at Home
When creating a block planter at home, you'll need a range of essential tools to guarantee a safe and successful proj...
-
Best Tools for Creating Block Planters at Home
When creating a block planter at home, you'll need a range of essential tools to guarantee a safe and successful proj...
-
Best Tools for Creating Block Planters at Home
When creating a block planter at home, you'll need a range of essential tools to guarantee a safe and successful proj...
-
Best Tools for Creating Block Planters at Home
When creating a block planter at home, you'll need a range of essential tools to guarantee a safe and successful proj...
-

10 Best Shade Garden Planters Using Concrete Blocks
You're about to discover the perfect way to add industrial chic to your shade garden while ensuring healthy plant gro...
-
10 Best Shade Garden Planters Using Concrete Blocks
You're about to discover the perfect way to add industrial chic to your shade garden while ensuring healthy plant gro...
-
10 Best Shade Garden Planters Using Concrete Blocks
You're about to discover the perfect way to add industrial chic to your shade garden while ensuring healthy plant gro...
-
10 Best Shade Garden Planters Using Concrete Blocks
You're about to discover the perfect way to add industrial chic to your shade garden while ensuring healthy plant gro...
-
10 Best Shade Garden Planters Using Concrete Blocks
You're about to discover the perfect way to add industrial chic to your shade garden while ensuring healthy plant gro...
-
10 Best Shade Garden Planters Using Concrete Blocks
You're about to discover the perfect way to add industrial chic to your shade garden while ensuring healthy plant gro...
-
10 Best Shade Garden Planters Using Concrete Blocks
You're about to discover the perfect way to add industrial chic to your shade garden while ensuring healthy plant gro...
-
10 Best Shade Garden Planters Using Concrete Blocks
You're about to discover the perfect way to add industrial chic to your shade garden while ensuring healthy plant gro...
-
10 Best Shade Garden Planters Using Concrete Blocks
You're about to discover the perfect way to add industrial chic to your shade garden while ensuring healthy plant gro...
-
10 Best Shade Garden Planters Using Concrete Blocks
You're about to discover the perfect way to add industrial chic to your shade garden while ensuring healthy plant gro...
-
10 Best Shade Garden Planters Using Concrete Blocks
You're about to discover the perfect way to add industrial chic to your shade garden while ensuring healthy plant gro...
-
10 Best Shade Garden Planters Using Concrete Blocks
You're about to discover the perfect way to add industrial chic to your shade garden while ensuring healthy plant gro...
-
10 Best Shade Garden Planters Using Concrete Blocks
You're about to discover the perfect way to add industrial chic to your shade garden while ensuring healthy plant gro...
-
10 Best Shade Garden Planters Using Concrete Blocks
You're about to discover the perfect way to add industrial chic to your shade garden while ensuring healthy plant gro...
-
10 Best Shade Garden Planters Using Concrete Blocks
You're about to discover the perfect way to add industrial chic to your shade garden while ensuring healthy plant gro...
-
10 Best Shade Garden Planters Using Concrete Blocks
You're about to discover the perfect way to add industrial chic to your shade garden while ensuring healthy plant gro...
-
10 Best Shade Garden Planters Using Concrete Blocks
You're about to discover the perfect way to add industrial chic to your shade garden while ensuring healthy plant gro...
-
10 Best Shade Garden Planters Using Concrete Blocks
You're about to discover the perfect way to add industrial chic to your shade garden while ensuring healthy plant gro...
-
10 Best Shade Garden Planters Using Concrete Blocks
You're about to discover the perfect way to add industrial chic to your shade garden while ensuring healthy plant gro...
-
10 Best Shade Garden Planters Using Concrete Blocks
You're about to discover the perfect way to add industrial chic to your shade garden while ensuring healthy plant gro...
-
10 Best Shade Garden Planters Using Concrete Blocks
You're about to discover the perfect way to add industrial chic to your shade garden while ensuring healthy plant gro...
-
10 Best Shade Garden Planters Using Concrete Blocks
You're about to discover the perfect way to add industrial chic to your shade garden while ensuring healthy plant gro...
-
10 Best Shade Garden Planters Using Concrete Blocks
You're about to discover the perfect way to add industrial chic to your shade garden while ensuring healthy plant gro...
-
10 Best Shade Garden Planters Using Concrete Blocks
You're about to discover the perfect way to add industrial chic to your shade garden while ensuring healthy plant gro...
-
10 Best Shade Garden Planters Using Concrete Blocks
You're about to discover the perfect way to add industrial chic to your shade garden while ensuring healthy plant gro...
-
10 Best Shade Garden Planters Using Concrete Blocks
You're about to discover the perfect way to add industrial chic to your shade garden while ensuring healthy plant gro...
-
10 Best Shade Garden Planters Using Concrete Blocks
You're about to discover the perfect way to add industrial chic to your shade garden while ensuring healthy plant gro...
-
10 Best Shade Garden Planters Using Concrete Blocks
You're about to discover the perfect way to add industrial chic to your shade garden while ensuring healthy plant gro...
-
10 Best Shade Garden Planters Using Concrete Blocks
You're about to discover the perfect way to add industrial chic to your shade garden while ensuring healthy plant gro...
-
10 Best Shade Garden Planters Using Concrete Blocks
You're about to discover the perfect way to add industrial chic to your shade garden while ensuring healthy plant gro...
-
10 Best Shade Garden Planters Using Concrete Blocks
You're about to discover the perfect way to add industrial chic to your shade garden while ensuring healthy plant gro...
-
10 Best Shade Garden Planters Using Concrete Blocks
You're about to discover the perfect way to add industrial chic to your shade garden while ensuring healthy plant gro...
-
10 Best Shade Garden Planters Using Concrete Blocks
You're about to discover the perfect way to add industrial chic to your shade garden while ensuring healthy plant gro...
-
10 Best Shade Garden Planters Using Concrete Blocks
You're about to discover the perfect way to add industrial chic to your shade garden while ensuring healthy plant gro...
-
10 Best Shade Garden Planters Using Concrete Blocks
You're about to discover the perfect way to add industrial chic to your shade garden while ensuring healthy plant gro...
-
What Makes Concrete Planters Perfect for Succulents
You've found that concrete planters offer the perfect combination of durability, drainage, and design versatility to ...
-
What Makes Concrete Planters Perfect for Succulents
You've found that concrete planters offer the perfect combination of durability, drainage, and design versatility to ...
-
What Makes Concrete Planters Perfect for Succulents
You've found that concrete planters offer the perfect combination of durability, drainage, and design versatility to ...
-
What Makes Concrete Planters Perfect for Succulents
You've found that concrete planters offer the perfect combination of durability, drainage, and design versatility to ...
-
What Makes Concrete Planters Perfect for Succulents
You've found that concrete planters offer the perfect combination of durability, drainage, and design versatility to ...
-
What Makes Concrete Planters Perfect for Succulents
You've found that concrete planters offer the perfect combination of durability, drainage, and design versatility to ...
-
What Makes Concrete Planters Perfect for Succulents
You've found that concrete planters offer the perfect combination of durability, drainage, and design versatility to ...
-
What Makes Concrete Planters Perfect for Succulents
You've found that concrete planters offer the perfect combination of durability, drainage, and design versatility to ...
-
What Makes Concrete Planters Perfect for Succulents
You've found that concrete planters offer the perfect combination of durability, drainage, and design versatility to ...
-
What Makes Concrete Planters Perfect for Succulents
You've found that concrete planters offer the perfect combination of durability, drainage, and design versatility to ...
-
What Makes Concrete Planters Perfect for Succulents
You've found that concrete planters offer the perfect combination of durability, drainage, and design versatility to ...
-
What Makes Concrete Planters Perfect for Succulents
You've found that concrete planters offer the perfect combination of durability, drainage, and design versatility to ...
-
What Makes Concrete Planters Perfect for Succulents
You've found that concrete planters offer the perfect combination of durability, drainage, and design versatility to ...
-
What Makes Concrete Planters Perfect for Succulents
You've found that concrete planters offer the perfect combination of durability, drainage, and design versatility to ...
-
What Makes Concrete Planters Perfect for Succulents
You've found that concrete planters offer the perfect combination of durability, drainage, and design versatility to ...
-
What Makes Concrete Planters Perfect for Succulents
You've found that concrete planters offer the perfect combination of durability, drainage, and design versatility to ...
-
What Makes Concrete Planters Perfect for Succulents
You've found that concrete planters offer the perfect combination of durability, drainage, and design versatility to ...
-
What Makes Concrete Planters Perfect for Succulents
You've found that concrete planters offer the perfect combination of durability, drainage, and design versatility to ...
-
What Makes Concrete Planters Perfect for Succulents
You've found that concrete planters offer the perfect combination of durability, drainage, and design versatility to ...
-
What Makes Concrete Planters Perfect for Succulents
You've found that concrete planters offer the perfect combination of durability, drainage, and design versatility to ...
-
What Makes Concrete Planters Perfect for Succulents
You've found that concrete planters offer the perfect combination of durability, drainage, and design versatility to ...
-
What Makes Concrete Planters Perfect for Succulents
You've found that concrete planters offer the perfect combination of durability, drainage, and design versatility to ...
-
What Makes Concrete Planters Perfect for Succulents
You've found that concrete planters offer the perfect combination of durability, drainage, and design versatility to ...
-
What Makes Concrete Planters Perfect for Succulents
You've found that concrete planters offer the perfect combination of durability, drainage, and design versatility to ...
-
What Makes Concrete Planters Perfect for Succulents
You've found that concrete planters offer the perfect combination of durability, drainage, and design versatility to ...
-
What Makes Concrete Planters Perfect for Succulents
You've found that concrete planters offer the perfect combination of durability, drainage, and design versatility to ...
-
What Makes Concrete Planters Perfect for Succulents
You've found that concrete planters offer the perfect combination of durability, drainage, and design versatility to ...
-
What Makes Concrete Planters Perfect for Succulents
You've found that concrete planters offer the perfect combination of durability, drainage, and design versatility to ...
-
What Makes Concrete Planters Perfect for Succulents
You've found that concrete planters offer the perfect combination of durability, drainage, and design versatility to ...
-
What Makes Concrete Planters Perfect for Succulents
You've found that concrete planters offer the perfect combination of durability, drainage, and design versatility to ...
-
What Makes Concrete Planters Perfect for Succulents
You've found that concrete planters offer the perfect combination of durability, drainage, and design versatility to ...
-
What Makes Concrete Planters Perfect for Succulents
You've found that concrete planters offer the perfect combination of durability, drainage, and design versatility to ...
-
What Makes Concrete Planters Perfect for Succulents
You've found that concrete planters offer the perfect combination of durability, drainage, and design versatility to ...
-
What Makes Concrete Planters Perfect for Succulents
You've found that concrete planters offer the perfect combination of durability, drainage, and design versatility to ...
-
What Makes Concrete Planters Perfect for Succulents
You've found that concrete planters offer the perfect combination of durability, drainage, and design versatility to ...
-
What Makes Concrete Planters Perfect for Succulents
You've found that concrete planters offer the perfect combination of durability, drainage, and design versatility to ...
-
What Makes Concrete Planters Perfect for Succulents
You've found that concrete planters offer the perfect combination of durability, drainage, and design versatility to ...


