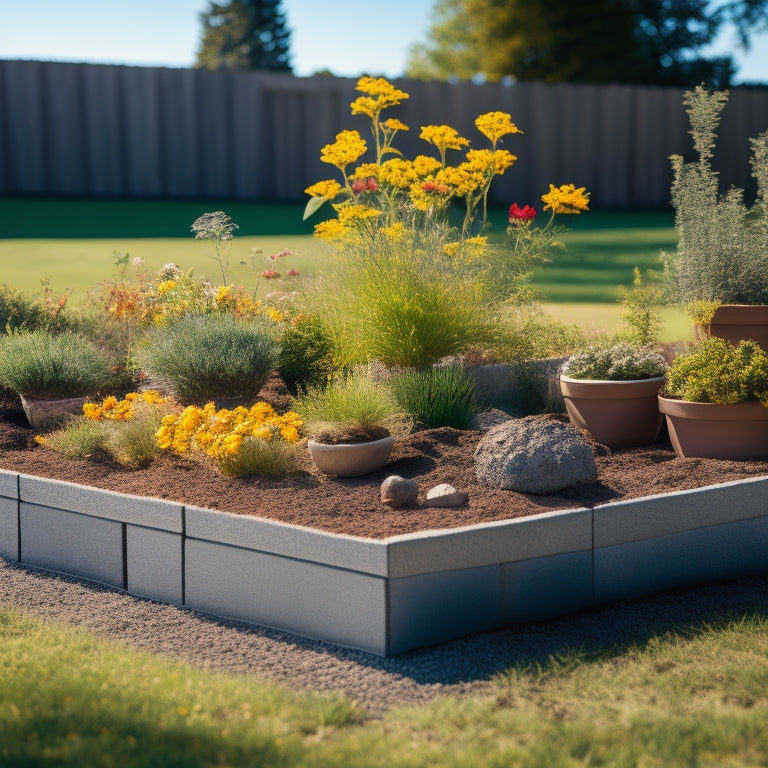
Build Long Planter Boxes With Concrete Blocks
You're about to create a stunning long planter box using concrete blocks, a durable and versatile material that can support heavy shrubs or trees while adding a touch of elegance to your outdoor space. Start by gathering materials, including concrete blocks, sand, gravel, waterproof lining, and soil. Prepare the site by evaluating the terrain, checking for underground utilities, and clearing the area of debris. Lay the first course of blocks, ensuring they're level and staggered for strength and visual interest. As you stack the blocks, leave gaps for drainage and add mortar and grout for stability. Now, you're ready to take your planter box to the next level - and that's just the beginning.
Key Takeaways
• Identify a suitable location for the planter box, considering factors like drainage, sunlight, and wind direction.
• Prepare the site by clearing debris, marking utility lines, and eliminating unwanted vegetation.
• Lay the first course of concrete blocks, ensuring they're level, plumb, and staggered for strength and visual appeal.
• Add subsequent courses of blocks, leaving gaps for drainage, and use mortar and grout to bond and fill gaps.
• Finish the top course with decorative blocks or stones, and add drainage holes and a waterproof lining to prevent waterlogging.
Gather Necessary Materials
Gather all the necessary materials, including long planter boxes, concrete blocks, sand, gravel, waterproof lining, soil, plants, and decorative elements, to guarantee a sturdy and visually appealing structure.
When selecting material types, consider the durability and weight capacity of the concrete blocks, as well as the type of plants you'll be using. For instance, if you're planning to plant heavy shrubs or trees, you'll need stronger blocks that can support the weight.
Choose the right tool selection for the job, including a level, trowel, shovel, and wheelbarrow. These tools will help you prepare the site, lay the blocks, and add the soil and plants.
Don't forget to select a high-quality waterproof lining to prevent water from seeping into the soil and causing erosion. Additionally, consider the aesthetic appeal of the planter boxes and choose decorative elements that complement the surrounding area.
With all the necessary materials and tools, you'll be well on your way to building a beautiful and functional long planter box with concrete blocks.
Prepare the Building Site
Now that you have all the necessary materials, it's time to prepare the building site for your long planter box project.
You'll need to assess the site to identify any potential obstacles or challenges, taking note of the terrain, drainage, and existing features that may impact your project.
Site Assessment Needed
Evaluating your building site before constructing long planter boxes with concrete blocks is essential to confirm a level, stable, and well-drained foundation. You'll want to conduct a thorough site evaluation to identify any potential issues that could impact your project.
Start by observing the natural slope of your yard. Look for any areas where water tends to collect or flow, as this can affect drainage. Take note of any nearby trees or other structures that could interfere with your planter boxes.
Next, perform a soil analysis to determine the type of soil you're working with. This will help you choose the right materials and construction methods for your project. Check for any underground utilities or obstructions that could affect your construction plans.
You should also consider the amount of sunlight your planter boxes will receive, as well as any wind or weather patterns that could impact their stability.
Clear the Area
With the site assessment complete, remove any debris, vegetation, or obstructions from the area where you'll be building your long planter boxes with concrete blocks. This step is essential to guarantee a smooth construction process and a successful landscape design.
Clearing the area will give you a clean slate to work with, allowing you to visualize your planter boxes and make any necessary adjustments before laying the foundation. Take note of any underground utilities, such as irrigation systems or electrical cables, and mark their locations to avoid damaging them during construction.
Next, remove any unwanted vegetation, including weeds, grass, or small plants. This will prevent any roots from interfering with your planter boxes' foundation and make soil selection easier.
Lay the First Course
Now that your building site is prepared, you'll start laying the first course of concrete blocks.
To guarantee a sturdy and visually appealing planter box, you'll need to develop a block placement strategy that considers the overall design and takes into account the blocks' texture and color.
As you begin, remember to pay close attention to leveling the course, as any inconsistencies will affect the entire structure.
Block Placement Strategy
You'll begin constructing your long planter box by laying the first course of concrete blocks, which serves as the foundation of your structure.
As you place each block, consider your block design and how it will impact your planting strategy. For a visually appealing planter, stagger the blocks to create a running bond pattern, which adds strength and visual interest.
Start by placing a block at one end of the planter, then add subsequent blocks, overlapping each by about one-third. This will create a strong foundation and prevent the planter from shifting over time.
As you lay each block, make certain it's aligned with the one below it, guaranteeing a level and plumb structure. Take your time, and work methodically to guarantee each block is perfectly placed.
With a solid foundation in place, you'll be ready to add the next course of blocks and begin building your planter box.
Leveling the Course
As you prepare to lay the first course of concrete blocks, confirm the ground is even and firm, free from any obstructions or debris that could disrupt the planter's stability.
Leveling the course is essential, as it guarantees the planter box remains upright and secure. To achieve this, employ the following leveling techniques:
-
Check for slope: Assess the ground's slope and adjust the block placement accordingly. A slight slope can be beneficial for drainage, but excessive incline can compromise the planter's stability.
-
Use a spirit level: Verify the ground's levelness using a spirit level, making adjustments as needed to achieve a perfectly horizontal surface.
-
Compact the ground: Compact the soil or gravel to create a solid base, preventing settling or shifting of the blocks over time.
- Lay a leveling course: If necessary, lay a leveling course of sand or gravel to create a uniform surface, guaranteeing the blocks sit evenly.
Add Drainage and Weep Holes
To prevent waterlogged soil and guarantee healthy plant growth, create a drainage system by drilling weep holes in the bottom of your long planter box, spaced about 6-8 inches apart. This essential step guarantees excess water can escape, reducing the risk of root rot and promoting aeration.
When it comes to weep hole placement, consider the following guidelines:
| Weep Hole Placement | Drainage Solutions |
|---|---|
| 6-8 inches apart | Prevents waterlogging, promotes aeration |
| Near the bottom of the box | Ensures gravity-assisted drainage |
| Avoid areas with heavy foot traffic | Reduces damage and maintenance |
| Drill multiple holes for large boxes | Increases drainage efficiency |
| Use a 1/2 inch drill bit for ideal flow | Allows for smooth water exit |
Stack the Concrete Blocks
With your drainage system in place, begin stacking the concrete blocks, guaranteeing a level foundation by starting with a course of blocks that spans the entire length of your planter box.
As you stack, keep in mind the block aesthetics you want to achieve and how they'll impact your planter design. Make sure to stagger the blocks to create a strong and stable structure.
Here are some key considerations to keep in mind as you stack:
-
Leveling: Check your level frequently to guarantee the blocks are stacked evenly and the planter box remains level.
-
Alignment: Make sure the blocks are aligned properly to maintain the planter box's shape and structure.
-
Gaps: Leave small gaps between blocks for drainage and to accommodate any slight shifting of the blocks over time.
- Pattern: Consider the pattern you want to create with your blocks - a running bond pattern can add visual interest to your planter design.
As you continue stacking, focus on maintaining a consistent pattern and guaranteeing the blocks fit snugly together. This will help you achieve a sturdy and visually appealing planter box.
Add Mortar and Grout
You'll now apply a layer of mortar to the concrete blocks, guaranteeing a strong bond between them and creating a solid foundation for your planter box's walls.
Use a type S mortar mix, which is ideal for outdoor projects, and follow the manufacturer's instructions for mixing. Apply the mortar to the blocks using a trowel, spreading it evenly and wiping off excess with a damp cloth. Make sure to fill the gaps between the blocks completely, as this will guarantee a strong and stable structure.
Once the mortar has set, it's time to apply grout to the joints. Mix the grout according to the manufacturer's instructions and apply it to the joints using a grout float. Press the grout firmly into the joints, making sure to fill them completely.
Use a damp cloth to wipe away excess grout from the surface of the blocks. Allow the grout to set for the recommended amount of time before proceeding to the next step.
A well-applied layer of mortar and grout will provide a solid foundation for your planter box's walls, guaranteeing they remain stable and secure over time.
Finish the Top Course
Now that your planter box's walls have a solid foundation, lay the final course of concrete blocks, guaranteeing they're level and evenly spaced. This top course will be the most visible part of your planter box, so take your time to get it right.
To achieve a professional finish, use top finishing techniques such as:
-
Capping: Use a concrete block cap or a decorative stone to add a visually appealing finish.
-
Pointing: Fill the gaps between blocks with a matching mortar color to create a seamless look.
-
Grouting: Apply a grout that complements the color of your blocks to add texture and interest.
- Sealing: Apply a sealant to protect your blocks from the elements and enhance their color.
These decorative options won't only enhance the appearance of your planter box but also provide an added layer of protection.
Make sure to follow the manufacturer's instructions for each finishing technique to guarantee a long-lasting and durable finish.
With these final touches, your planter box is ready to be filled with soil and plants.
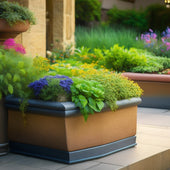
Add Soil and Plants
After carefully finishing the top course of your planter box, turn your attention to filling it with a well-draining soil mix specifically designed for container gardens, taking care to leave enough space at the top for the plants' root systems.
When it comes to soil selection, opt for a mix that's formulated to retain moisture but drain excess water quickly, preventing waterlogged soil that can be detrimental to plant health.
Now, it's time to choose your plants. Select varieties that thrive in containers and have similar growing conditions, such as full sun or partial shade.
Consider a mix of plants with varying textures, colors, and heights to create visual interest. Plant them at the same depth as they were in their pots, and space them according to their mature sizes.
Water the soil gently but thoroughly after planting, and keep the soil consistently moist during the first few weeks after planting.
As your plants grow, you'll enjoy a beautiful, thriving container garden that adds beauty and functionality to your outdoor space.
Seal and Protect the Planter
To guarantee your planter box withstands the elements and maintains its structural integrity, apply a coat of waterproofing sealant to the concrete blocks, paying particular attention to the joints and corners where water may seep in. This vital step will prevent water from penetrating the blocks and causing damage.
Here are some essential waterproofing methods to keep in mind:
-
Silane-based sealers: These provide excellent protection against water and salt damage, making them ideal for planters exposed to harsh weather conditions.
-
Acrylic coatings: These offer a breathable, non-yellowing finish that won't alter the appearance of your planter box.
-
Epoxy-based coatings: These provide a strong, durable barrier against water and are suitable for planters subject to heavy use.
- Siloxane-based sealers: These offer long-lasting protection against water and stains, making them a popular choice for outdoor planters.
Remember to follow the manufacturer's instructions when applying your chosen sealant, and make sure the planter box is completely dry before applying a protective coating.
Frequently Asked Questions
Can I Use a Different Type of Block for a Unique Look?
You're looking to add some personality to your planter box with alternative materials.
Absolutely, you can use different types of blocks to achieve a unique look!
Consider using blocks with varied textures, colors, or block designs to create visual interest.
For instance, you could opt for glazed blocks, split-face blocks, or even reclaimed stone blocks to add an eclectic touch.
Just guarantee the blocks you choose are durable and suitable for outdoor use.
How Do I Prevent Weeds From Growing up Through the Planter?
Don't you wish you could simply enjoy your beautiful planter without the hassle of weeds ruining the show?
To prevent those pesky weeds from growing up through your planter, you'll want to install a weed barrier, a porous material that allows water and air to reach your plants while keeping weeds at bay.
During soil maintenance, make sure to remove any debris and aerate the soil regularly to prevent weeds from taking root.
Can I Add a Trellis or Other Decorative Element?
You're thinking of adding a trellis or decorative element to elevate your planter's visual appeal. Absolutely, you can!
Consider a trellis design that complements your planter's style, providing support for decorative climbing plants.
Choose a material that matches or contrasts with your concrete blocks for a cohesive look.
Make certain the trellis is sturdy enough to support the weight of the plants and securely attach it to the planter to prevent it from toppling over.
What if I Don't Have a Level Ground to Build On?
You're not on solid ground, literally! When dealing with uneven terrain, you'll need to level the playing field.
Start by evaluating the slope and identifying areas where water might collect. For Uneven Terrain Solutions, consider grading the land or installing a retaining wall.
Don't forget Drainage Considerations, like adding a French drain or sloping the planter box slightly to prevent waterlogged soil.
With a solid foundation, you'll be ready to build your planter box and add those decorative elements you're dreaming of!
How Often Should I Water My Plants in the Planter?
When creating a watering schedule for your plants, you'll want to take into account the soil's moisture retention.
Check the soil daily, and water when the top 2-3 inches feel dry. Aim for about 1-2 inches of water per week, either from rain or irrigation.
Adjust this based on weather conditions, plant type, and soil composition.
You can also monitor moisture levels by observing your plants' leaves and stems - if they're droopy, it's time to water!
Conclusion
You've successfully built a long planter box using concrete blocks!
Now, imagine filling it with a lush mix of succulents and flowering plants, like the ones in the award-winning garden at the 2019 Chelsea Flower Show.
With proper care, your planter will thrive, and the concrete blocks will weather beautifully, blending seamlessly into your outdoor space.
Related Posts
-

Why Choose Cinder for Your Rooftop Garden Planters
You choose cinder for your rooftop garden planters because they offer a unique combination of durability, versatility...
-
Why Choose Cinder for Your Rooftop Garden Planters
You choose cinder for your rooftop garden planters because they offer a unique combination of durability, versatility...
-
Why Choose Cinder for Your Rooftop Garden Planters
You choose cinder for your rooftop garden planters because they offer a unique combination of durability, versatility...
-
Why Choose Cinder for Your Rooftop Garden Planters
You choose cinder for your rooftop garden planters because they offer a unique combination of durability, versatility...
-
Why Choose Cinder for Your Rooftop Garden Planters
You choose cinder for your rooftop garden planters because they offer a unique combination of durability, versatility...
-
Why Choose Cinder for Your Rooftop Garden Planters
You choose cinder for your rooftop garden planters because they offer a unique combination of durability, versatility...
-
Why Choose Cinder for Your Rooftop Garden Planters
You choose cinder for your rooftop garden planters because they offer a unique combination of durability, versatility...
-
Why Choose Cinder for Your Rooftop Garden Planters
You choose cinder for your rooftop garden planters because they offer a unique combination of durability, versatility...
-
Why Choose Cinder for Your Rooftop Garden Planters
You choose cinder for your rooftop garden planters because they offer a unique combination of durability, versatility...
-
Why Choose Cinder for Your Rooftop Garden Planters
You choose cinder for your rooftop garden planters because they offer a unique combination of durability, versatility...
-
Why Choose Cinder for Your Rooftop Garden Planters
You choose cinder for your rooftop garden planters because they offer a unique combination of durability, versatility...
-
Why Choose Cinder for Your Rooftop Garden Planters
You choose cinder for your rooftop garden planters because they offer a unique combination of durability, versatility...
-
Why Choose Cinder for Your Rooftop Garden Planters
You choose cinder for your rooftop garden planters because they offer a unique combination of durability, versatility...
-
Why Choose Cinder for Your Rooftop Garden Planters
You choose cinder for your rooftop garden planters because they offer a unique combination of durability, versatility...
-
Why Choose Cinder for Your Rooftop Garden Planters
You choose cinder for your rooftop garden planters because they offer a unique combination of durability, versatility...
-
Why Choose Cinder for Your Rooftop Garden Planters
You choose cinder for your rooftop garden planters because they offer a unique combination of durability, versatility...
-
Why Choose Cinder for Your Rooftop Garden Planters
You choose cinder for your rooftop garden planters because they offer a unique combination of durability, versatility...
-
Why Choose Cinder for Your Rooftop Garden Planters
You choose cinder for your rooftop garden planters because they offer a unique combination of durability, versatility...
-
Why Choose Cinder for Your Rooftop Garden Planters
You choose cinder for your rooftop garden planters because they offer a unique combination of durability, versatility...
-
Why Choose Cinder for Your Rooftop Garden Planters
You choose cinder for your rooftop garden planters because they offer a unique combination of durability, versatility...
-
Why Choose Cinder for Your Rooftop Garden Planters
You choose cinder for your rooftop garden planters because they offer a unique combination of durability, versatility...
-
Why Choose Cinder for Your Rooftop Garden Planters
You choose cinder for your rooftop garden planters because they offer a unique combination of durability, versatility...
-
Why Choose Cinder for Your Rooftop Garden Planters
You choose cinder for your rooftop garden planters because they offer a unique combination of durability, versatility...
-
Why Choose Cinder for Your Rooftop Garden Planters
You choose cinder for your rooftop garden planters because they offer a unique combination of durability, versatility...
-
Why Choose Cinder for Your Rooftop Garden Planters
You choose cinder for your rooftop garden planters because they offer a unique combination of durability, versatility...
-
Why Choose Cinder for Your Rooftop Garden Planters
You choose cinder for your rooftop garden planters because they offer a unique combination of durability, versatility...
-
Why Choose Cinder for Your Rooftop Garden Planters
You choose cinder for your rooftop garden planters because they offer a unique combination of durability, versatility...
-
Why Choose Cinder for Your Rooftop Garden Planters
You choose cinder for your rooftop garden planters because they offer a unique combination of durability, versatility...
-
5 Essential Drainage Tips for Block Planters
When using block planters, you'll want to guarantee effective drainage to prevent waterlogging and root rot. Start by...
-
5 Essential Drainage Tips for Block Planters
When using block planters, you'll want to guarantee effective drainage to prevent waterlogging and root rot. Start by...
-
5 Essential Drainage Tips for Block Planters
When using block planters, you'll want to guarantee effective drainage to prevent waterlogging and root rot. Start by...
-
5 Essential Drainage Tips for Block Planters
When using block planters, you'll want to guarantee effective drainage to prevent waterlogging and root rot. Start by...
-
5 Essential Drainage Tips for Block Planters
When using block planters, you'll want to guarantee effective drainage to prevent waterlogging and root rot. Start by...
-
5 Essential Drainage Tips for Block Planters
When using block planters, you'll want to guarantee effective drainage to prevent waterlogging and root rot. Start by...
-
5 Essential Drainage Tips for Block Planters
When using block planters, you'll want to guarantee effective drainage to prevent waterlogging and root rot. Start by...
-
5 Essential Drainage Tips for Block Planters
When using block planters, you'll want to guarantee effective drainage to prevent waterlogging and root rot. Start by...
-
5 Essential Drainage Tips for Block Planters
When using block planters, you'll want to guarantee effective drainage to prevent waterlogging and root rot. Start by...
-
5 Essential Drainage Tips for Block Planters
When using block planters, you'll want to guarantee effective drainage to prevent waterlogging and root rot. Start by...
-
5 Essential Drainage Tips for Block Planters
When using block planters, you'll want to guarantee effective drainage to prevent waterlogging and root rot. Start by...
-
5 Essential Drainage Tips for Block Planters
When using block planters, you'll want to guarantee effective drainage to prevent waterlogging and root rot. Start by...
-
5 Essential Drainage Tips for Block Planters
When using block planters, you'll want to guarantee effective drainage to prevent waterlogging and root rot. Start by...
-
5 Essential Drainage Tips for Block Planters
When using block planters, you'll want to guarantee effective drainage to prevent waterlogging and root rot. Start by...
-
5 Essential Drainage Tips for Block Planters
When using block planters, you'll want to guarantee effective drainage to prevent waterlogging and root rot. Start by...
-
5 Essential Drainage Tips for Block Planters
When using block planters, you'll want to guarantee effective drainage to prevent waterlogging and root rot. Start by...
-
5 Essential Drainage Tips for Block Planters
When using block planters, you'll want to guarantee effective drainage to prevent waterlogging and root rot. Start by...
-
5 Essential Drainage Tips for Block Planters
When using block planters, you'll want to guarantee effective drainage to prevent waterlogging and root rot. Start by...
-
Why Invest in Specialized Planter Tools
You'll greatly boost your gardening success and yields by leveraging specialized planter tools that cater to the uniq...
-
Why Invest in Specialized Planter Tools
You'll greatly boost your gardening success and yields by leveraging specialized planter tools that cater to the uniq...
-
Why Invest in Specialized Planter Tools
You'll greatly boost your gardening success and yields by leveraging specialized planter tools that cater to the uniq...
-
Why Invest in Specialized Planter Tools
You'll greatly boost your gardening success and yields by leveraging specialized planter tools that cater to the uniq...
-
Why Invest in Specialized Planter Tools
You'll greatly boost your gardening success and yields by leveraging specialized planter tools that cater to the uniq...
-
Why Invest in Specialized Planter Tools
You'll greatly boost your gardening success and yields by leveraging specialized planter tools that cater to the uniq...
-
Why Invest in Specialized Planter Tools
You'll greatly boost your gardening success and yields by leveraging specialized planter tools that cater to the uniq...
-
Why Invest in Specialized Planter Tools
You'll greatly boost your gardening success and yields by leveraging specialized planter tools that cater to the uniq...
-
Why Invest in Specialized Planter Tools
You'll greatly boost your gardening success and yields by leveraging specialized planter tools that cater to the uniq...
-
Why Invest in Specialized Planter Tools
You'll greatly boost your gardening success and yields by leveraging specialized planter tools that cater to the uniq...
-
Why Invest in Specialized Planter Tools
You'll greatly boost your gardening success and yields by leveraging specialized planter tools that cater to the uniq...
-
Why Invest in Specialized Planter Tools
You'll greatly boost your gardening success and yields by leveraging specialized planter tools that cater to the uniq...
-
Why Invest in Specialized Planter Tools
You'll greatly boost your gardening success and yields by leveraging specialized planter tools that cater to the uniq...
-
Why Invest in Specialized Planter Tools
You'll greatly boost your gardening success and yields by leveraging specialized planter tools that cater to the uniq...
-
Why Invest in Specialized Planter Tools
You'll greatly boost your gardening success and yields by leveraging specialized planter tools that cater to the uniq...
-
Why Invest in Specialized Planter Tools
You'll greatly boost your gardening success and yields by leveraging specialized planter tools that cater to the uniq...
-
Why Invest in Specialized Planter Tools
You'll greatly boost your gardening success and yields by leveraging specialized planter tools that cater to the uniq...
-
Why Invest in Specialized Planter Tools
You'll greatly boost your gardening success and yields by leveraging specialized planter tools that cater to the uniq...
-
Why Invest in Specialized Planter Tools
You'll greatly boost your gardening success and yields by leveraging specialized planter tools that cater to the uniq...
-
Why Invest in Specialized Planter Tools
You'll greatly boost your gardening success and yields by leveraging specialized planter tools that cater to the uniq...
-
Why Invest in Specialized Planter Tools
You'll greatly boost your gardening success and yields by leveraging specialized planter tools that cater to the uniq...
-
Why Invest in Specialized Planter Tools
You'll greatly boost your gardening success and yields by leveraging specialized planter tools that cater to the uniq...
-
Why Invest in Specialized Planter Tools
You'll greatly boost your gardening success and yields by leveraging specialized planter tools that cater to the uniq...
-
Why Invest in Specialized Planter Tools
You'll greatly boost your gardening success and yields by leveraging specialized planter tools that cater to the uniq...
-
Why Invest in Specialized Planter Tools
You'll greatly boost your gardening success and yields by leveraging specialized planter tools that cater to the uniq...


