7 Thrifty Ways to Decorate Cinder Block Planters
You can breathe new life into plain cinder block planters with these 7 budget-friendly DIY ideas. Add a splash of color with vibrant paint, or create a mosaic masterpiece with broken tiles. Nature-inspired decals and twine-wrapped twigs bring an organic touch, while upcycled materials and chalk paint stencils offer endless design possibilities. For a more rustic look, try combining twine and twigs, or create a succulent oasis with small stones and pebbles. With a little creativity, your cinder block planters can transform into stunning garden accents that reflect your unique style - and the best part? The possibilities are endless when you get creative!
Key Takeaways
• Use colorful paint and primer to transform drab cinder block planters into vibrant garden accents on a budget.
• Apply chalk paint and stencil designs to add personalization and texture to planters, updating them seasonally with new patterns and colors.
• Repurpose broken tiles into mosaic masterpieces, securing them with strong outdoor adhesives for a unique and budget-friendly look.
• Add a touch of elegance with glass fragment accents, combining them with mosaic borders or using them to create an ombre effect.
• Embellish planters with natural materials like twine and twigs for a rustic, organic feel that complements plants and adds visual interest.
Painted Personality on a Budget
With a few coats of colorful paint, you can transform drab cinder block planters into vibrant, one-of-a-kind garden accents that reflect your unique personality. This budget-friendly technique is perfect for those who want to add a pop of color to their outdoor space without breaking the bank.
Start by selecting vibrant colors that match your garden's theme or your personal style. You can choose a single bold hue or mix and match different shades for a unique ombre effect.
Use a primer to guarantee the paint adheres well to the cinder block surface, and apply thin coats to avoid drips and unevenness. For added texture and visual interest, experiment with different painting techniques, such as stripes, polka dots, or abstract designs.
With a little creativity, you can turn ordinary planters into extraordinary garden features that showcase your personality and style. Plus, this DIY project is easy on the wallet, making it an excellent option for those on a tight budget.
Mosaic Magic With Broken Tiles
Take your cinder block planters to the next level by repurposing broken tiles into vibrant mosaics that add a touch of whimsy and elegance to your outdoor space.
With a little creativity, you can transform discarded tiles into a stunning work of art that complements your plants and adds visual interest to your garden or patio. Experiment with different tile color combinations to create a unique look that reflects your personal style. For a bold statement, try pairing bright blues and yellows with neutral whites and grays. For a more subtle approach, opt for a monochromatic scheme featuring varying shades of a single color.
When it comes to adhesive techniques, you have a few options. You can use a strong outdoor adhesive, such as epoxy or polyurethane, to attach the tiles to the planter. Alternatively, you can use a hot glue gun to create a more textured, dimensional look.
Whichever method you choose, be sure to follow the manufacturer's instructions and apply the adhesive in a well-ventilated area. With a little patience and practice, you'll be creating mosaic masterpieces in no time!
Nature-Inspired Decals and Stickers
You can add a touch of the great outdoors to your cinder block planters with nature-inspired decals and stickers that evoke the beauty of flowers, leaves, and trees. These decorative elements are easy to apply and can instantly transform your planters into stunning displays of natural charm.
Choose decals featuring nature motifs such as butterflies, birds, or insects to create a whimsical look. For a seasonal touch, opt for stickers that reflect the current time of year, like snowflakes for winter or sunflowers for summer.
You can also mix and match different designs to create a unique look that reflects your personal style. Consider combining floral patterns with leafy accents or pairing birds with branches. The possibilities are endless, and the best part is that you can easily remove and replace the decals as the seasons change or your decor evolves.
With nature-inspired decals and stickers, you can add a touch of elegance and sophistication to your cinder block planters without breaking the bank. Get creative and have fun experimenting with different designs to find the perfect look for your outdoor space.
Twine and Twigs Embellishments
As you explore the world of twine and twigs embellishments, you'll discover a multitude of creative ways to elevate your cinder block planters.
By wrapping twine around the blocks in intricate designs, you can add a touch of rustic charm to your outdoor space.
Meanwhile, incorporating twig accents can introduce a whimsical, organic feel that complements your plants perfectly.
Twine Wrap Designs
Cinder block planters transform into rustic masterpieces when wrapped with twine and adorned with twigs, creating a charming contrast between rough-hewn concrete and natural, earthy elements.
You can achieve this look by simply wrapping twine around the planter in a pattern that suits your style. Try a simple spiral design or get creative with crisscross patterns or chevrons. To add an extra touch, incorporate decorative knots at intervals to break up the twine's linear flow.
You can also experiment with different twine colors or textures to match your outdoor decor. As you wrap, make sure to leave some space between the twine strands to allow for plant growth and air circulation.
Twig Accent Ideas
Five to seven carefully placed twigs can transform your twine-wrapped cinder block planter into a stunning focal point, adding a touch of organic elegance to your outdoor space.
You can create natural twig arrangements by selecting twigs of varying sizes and textures, then arranging them in a visually appealing pattern. Experiment with different shapes and forms to create a unique look that complements your planter's design.
To take your twig accent to the next level, try creating rustic twig frames around your planter's openings. Simply gather a few sturdy twigs and weave them into a frame shape, securing them with twine or wire. This adds a charming, whimsical touch to your planter and creates a beautiful contrast with the rough, industrial texture of the cinder blocks.
You can also use twigs to create a decorative border around the planter's edges or add a few sprigs of greenery, like eucalyptus or ferns, to bring in a pop of color and freshness.
With a little creativity, you can turn your cinder block planter into a beautiful, one-of-a-kind masterpiece.
Upcycled Material Mosaic Borders
As you start creating your upcycled material mosaic borders, you'll want to gather an assortment of broken tile pieces in various shapes, sizes, and colors to add visual interest to your design.
Next, experiment with different mosaic pattern designs to determine the layout that best complements your planter's style.
To take your mosaic to the next level, consider incorporating glass fragment accents to catch the light and add an extra touch of elegance.
Broken Tile Pieces
Using broken tile pieces to create a mosaic border adds a touch of elegance to your cinder block planters while reducing waste and embracing an eco-friendly approach to decoration.
When collecting broken tile pieces, consider the color combination ideas you want to achieve. You can mix and match different shapes, sizes, and hues to create a unique look that reflects your personal style.
To guarantee a strong bond between the tile pieces and the cinder block, follow some essential tile adhesive tips. First, clean the surface of the planter thoroughly to remove any dirt or debris. Next, apply a thin layer of tile adhesive to the back of each tile piece, pressing it firmly onto the planter. Make sure to leave a small gap between each piece for grout.
Allow the adhesive to dry completely before grouting the gaps. With a little creativity and patience, you'll create a stunning mosaic border that will elevate your cinder block planters from ordinary to extraordinary.
Mosaic Pattern Designs
Create a visually appealing mosaic pattern design by arranging your upcycled tile pieces into a cohesive layout, considering the overall aesthetic you want to achieve and the style of your outdoor space.
Think about the colors and textures you're working with and how they'll complement each other. You can create a stunning mosaic border using broken tile pieces, glass fragments, and other upcycled materials.
To add visual interest, incorporate colorful glass pieces into your design. These can be arranged in geometric shapes, such as triangles, squares, or circles, to create a playful and modern look.
You can also use glass pieces in a gradient effect, shifting from one color to another to create a beautiful ombre effect.
Consider creating a focal point in your design, such as a centerpiece or a statement piece, to draw the eye to a specific area of the planter.
With a little creativity, you can create a unique and eye-catching mosaic pattern that will elevate your cinder block planter from ordinary to extraordinary.
Glass Fragment Accents
You can add an extra layer of sophistication to your mosaic pattern design by incorporating glass fragment accents into your upcycled material mosaic borders, which will catch the light and add depth to your cinder block planter.
This technique allows you to create a stunning visual effect, reminiscent of intricate glass art. By combining colorful shards of glass with other upcycled materials, you'll achieve a unique, eye-catching design that elevates your planter from ordinary to extraordinary.
Here are some tips to keep in mind when working with glass fragment accents:
-
Use a variety of glass colors and shapes to create a dynamic, multi-dimensional effect.
-
Experiment with different adhesive techniques to guarantee the glass fragments adhere securely to your planter.
-
Consider adding a clear coat of sealant to protect the glass and enhance its sparkle.
-
Don't be afraid to mix and match different materials, such as glass, ceramic, and stone, to create a truly one-of-a-kind design.
-
Take your time and work carefully, as handling small glass fragments can be delicate and time-consuming.
Stencil Designs With Chalk Paint
Two coats of chalk paint later, your cinder block planter is ready to receive a personalized touch with a stencil design that adds a dash of elegance to your garden or patio.
You can choose from various stencil techniques to create intricate patterns, bold designs, or whimsical motifs that reflect your personal style. Start by selecting a stencil design that resonates with your garden's theme or your personal taste. Place the stencil on the planter, making sure it's centered and secure.
Using a small brush, gently apply a thin layer of chalk paint over the stencil, working from the outside in. Remove the stencil carefully to avoid smudging the design. If necessary, touch up any imperfections with a small brush.
To add depth and dimension, you can layer multiple stencil designs or experiment with different chalk paint colors. With stencil designs, the possibilities are endless, and you can easily update your planter's look as the seasons change.
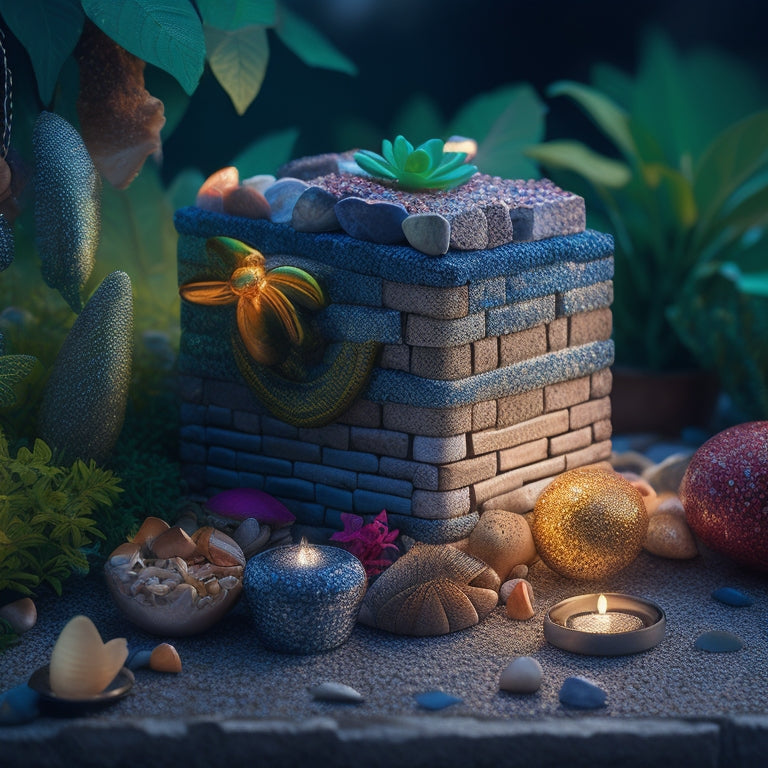
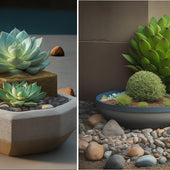
Succulent-Friendly Rock Landscaping
Rocky landscapes, carefully crafted with an assortment of small stones and pebbles, provide an ideal backdrop for showcasing succulents in your cinder block planter. As you design your succulent arrangement, consider the unique needs of these plants. You'll want to choose a succulent selection that thrives in well-draining environments, as cinder block planters can be prone to waterlogging.
To create a thriving rock landscape, keep the following tips in mind:
-
Select a variety of rocks and pebbles in different textures and colors to add visual interest.
-
Incorporate drainage solutions, such as adding a layer of small rocks or broken pottery at the bottom of the planter.
-
Leave enough space between rocks for soil and roots to spread out.
-
Choose succulents with varying heights and shapes to create a visually appealing arrangement.
-
Don't overcrowd the planter, as this can lead to root rot and other problems.
Frequently Asked Questions
How Do I Seal Cinder Block Planters to Prevent Water Damage?
When working with cinder block planters, you'll want to prioritize sealing them to prevent water damage.
To do this, you'll need to apply effective waterproofing techniques. Start by cleaning the blocks thoroughly, then choose a suitable sealing product, such as a silane-based or acrylic sealer.
Follow the manufacturer's instructions for application, guaranteeing a uniform coat. Allow the sealer to dry completely before planting to make certain your cinder block planter remains protected and durable.
Can I Use Cinder Block Planters for Indoor Decorative Purposes?
You can definitely use cinder block planters for indoor decorative purposes!
They add a unique touch to your indoor gardening setup, and with some creativity, can enhance the aesthetic appeal of your space.
Since you've already sealed them to prevent water damage, you can focus on choosing plants that thrive in indoor conditions and arranging them in a way that complements your home's style.
Are Cinder Block Planters Suitable for All Types of Plants?
You're wondering if cinder block planters are suitable for all types of plants? Think of a million different plant species, each with its unique needs!
While cinder block planters can work for many plants, they're not a one-size-fits-all solution.
Factors like drainage, sunlight, and soil quality affect plant growth, so it's crucial to take into account these factors when choosing plants for your cinder block planter.
Can I Paint Cinder Block Planters With Regular Latex Paint?
When painting cinder block planters with regular latex paint, you'll want to take into account a few key factors.
First, choose a paint specifically designed for outdoor use to guarantee durability.
Next, prepare the surface by cleaning and lightly sanding the blocks to create a rough texture for the paint to adhere to.
Finally, use techniques like priming and layering to achieve a long-lasting, chip-resistant finish.
With the right approach, your painted planters will thrive outdoors.
How Often Should I Clean and Maintain Cinder Block Planters?
You'll want to clean your cinder block planters regularly to keep them looking their best. Aim to clean them every 1-2 months, or more often if you notice dirt and debris building up.
Start by gently scrubbing away dirt with a soft brush and mild soap. Then, rinse thoroughly and let them dry completely to prevent water spots.
Conclusion
As you tend to your cinder block planters, remember that creativity is the gardener that nurtures growth.
With each thrifty touch, your planters transform into vibrant blooms of self-expression.
Like a master weaver, you've intertwined threads of personality, whimsy, and resourcefulness, crafting a tapestry that's uniquely yours.
Now, as you step back to admire your handiwork, the cinder block walls that once confined have become a canvas that celebrates your ingenuity.
Related Posts
-
Irrigation System Design Ideas for Concrete Planters
As you design an irrigation system for your concrete planters, you'll need to balance drainage, moisture retention, a...
-
Irrigation System Design Ideas for Concrete Planters
As you design an irrigation system for your concrete planters, you'll need to balance drainage, moisture retention, a...
-
Irrigation System Design Ideas for Concrete Planters
As you design an irrigation system for your concrete planters, you'll need to balance drainage, moisture retention, a...
-
Irrigation System Design Ideas for Concrete Planters
As you design an irrigation system for your concrete planters, you'll need to balance drainage, moisture retention, a...
-
Irrigation System Design Ideas for Concrete Planters
As you design an irrigation system for your concrete planters, you'll need to balance drainage, moisture retention, a...
-
Irrigation System Design Ideas for Concrete Planters
As you design an irrigation system for your concrete planters, you'll need to balance drainage, moisture retention, a...
-
Irrigation System Design Ideas for Concrete Planters
As you design an irrigation system for your concrete planters, you'll need to balance drainage, moisture retention, a...
-
Irrigation System Design Ideas for Concrete Planters
As you design an irrigation system for your concrete planters, you'll need to balance drainage, moisture retention, a...
-
Irrigation System Design Ideas for Concrete Planters
As you design an irrigation system for your concrete planters, you'll need to balance drainage, moisture retention, a...
-
Irrigation System Design Ideas for Concrete Planters
As you design an irrigation system for your concrete planters, you'll need to balance drainage, moisture retention, a...
-
Irrigation System Design Ideas for Concrete Planters
As you design an irrigation system for your concrete planters, you'll need to balance drainage, moisture retention, a...
-
Irrigation System Design Ideas for Concrete Planters
As you design an irrigation system for your concrete planters, you'll need to balance drainage, moisture retention, a...
-
Irrigation System Design Ideas for Concrete Planters
As you design an irrigation system for your concrete planters, you'll need to balance drainage, moisture retention, a...
-
Irrigation System Design Ideas for Concrete Planters
As you design an irrigation system for your concrete planters, you'll need to balance drainage, moisture retention, a...
-
Irrigation System Design Ideas for Concrete Planters
As you design an irrigation system for your concrete planters, you'll need to balance drainage, moisture retention, a...
-
Irrigation System Design Ideas for Concrete Planters
As you design an irrigation system for your concrete planters, you'll need to balance drainage, moisture retention, a...
-
Irrigation System Design Ideas for Concrete Planters
As you design an irrigation system for your concrete planters, you'll need to balance drainage, moisture retention, a...
-
Irrigation System Design Ideas for Concrete Planters
As you design an irrigation system for your concrete planters, you'll need to balance drainage, moisture retention, a...
-
Irrigation System Design Ideas for Concrete Planters
As you design an irrigation system for your concrete planters, you'll need to balance drainage, moisture retention, a...
-
Irrigation System Design Ideas for Concrete Planters
As you design an irrigation system for your concrete planters, you'll need to balance drainage, moisture retention, a...
-
Irrigation System Design Ideas for Concrete Planters
As you design an irrigation system for your concrete planters, you'll need to balance drainage, moisture retention, a...
-
Irrigation System Design Ideas for Concrete Planters
As you design an irrigation system for your concrete planters, you'll need to balance drainage, moisture retention, a...
-
Irrigation System Design Ideas for Concrete Planters
As you design an irrigation system for your concrete planters, you'll need to balance drainage, moisture retention, a...
-
Irrigation System Design Ideas for Concrete Planters
As you design an irrigation system for your concrete planters, you'll need to balance drainage, moisture retention, a...
-
Irrigation System Design Ideas for Concrete Planters
As you design an irrigation system for your concrete planters, you'll need to balance drainage, moisture retention, a...
-
Irrigation System Design Ideas for Concrete Planters
As you design an irrigation system for your concrete planters, you'll need to balance drainage, moisture retention, a...
-
Irrigation System Design Ideas for Concrete Planters
As you design an irrigation system for your concrete planters, you'll need to balance drainage, moisture retention, a...
-
Irrigation System Design Ideas for Concrete Planters
As you design an irrigation system for your concrete planters, you'll need to balance drainage, moisture retention, a...
-
Irrigation System Design Ideas for Concrete Planters
As you design an irrigation system for your concrete planters, you'll need to balance drainage, moisture retention, a...
-
Irrigation System Design Ideas for Concrete Planters
As you design an irrigation system for your concrete planters, you'll need to balance drainage, moisture retention, a...
-
Irrigation System Design Ideas for Concrete Planters
As you design an irrigation system for your concrete planters, you'll need to balance drainage, moisture retention, a...
-

Measuring Blocks for Tiered Planters Made Easy
When building a tiered planter, you'll need to take precise measurements of each cinder block's length, width, and he...
-
Measuring Blocks for Tiered Planters Made Easy
When building a tiered planter, you'll need to take precise measurements of each cinder block's length, width, and he...
-
Measuring Blocks for Tiered Planters Made Easy
When building a tiered planter, you'll need to take precise measurements of each cinder block's length, width, and he...
-
Measuring Blocks for Tiered Planters Made Easy
When building a tiered planter, you'll need to take precise measurements of each cinder block's length, width, and he...
-
Measuring Blocks for Tiered Planters Made Easy
When building a tiered planter, you'll need to take precise measurements of each cinder block's length, width, and he...
-
Measuring Blocks for Tiered Planters Made Easy
When building a tiered planter, you'll need to take precise measurements of each cinder block's length, width, and he...
-
Measuring Blocks for Tiered Planters Made Easy
When building a tiered planter, you'll need to take precise measurements of each cinder block's length, width, and he...
-
Measuring Blocks for Tiered Planters Made Easy
When building a tiered planter, you'll need to take precise measurements of each cinder block's length, width, and he...
-
Measuring Blocks for Tiered Planters Made Easy
When building a tiered planter, you'll need to take precise measurements of each cinder block's length, width, and he...
-
Measuring Blocks for Tiered Planters Made Easy
When building a tiered planter, you'll need to take precise measurements of each cinder block's length, width, and he...
-
Measuring Blocks for Tiered Planters Made Easy
When building a tiered planter, you'll need to take precise measurements of each cinder block's length, width, and he...
-
Measuring Blocks for Tiered Planters Made Easy
When building a tiered planter, you'll need to take precise measurements of each cinder block's length, width, and he...
-
Measuring Blocks for Tiered Planters Made Easy
When building a tiered planter, you'll need to take precise measurements of each cinder block's length, width, and he...
-
Measuring Blocks for Tiered Planters Made Easy
When building a tiered planter, you'll need to take precise measurements of each cinder block's length, width, and he...
-
Measuring Blocks for Tiered Planters Made Easy
When building a tiered planter, you'll need to take precise measurements of each cinder block's length, width, and he...
-
Measuring Blocks for Tiered Planters Made Easy
When building a tiered planter, you'll need to take precise measurements of each cinder block's length, width, and he...
-
Measuring Blocks for Tiered Planters Made Easy
When building a tiered planter, you'll need to take precise measurements of each cinder block's length, width, and he...
-
Measuring Blocks for Tiered Planters Made Easy
When building a tiered planter, you'll need to take precise measurements of each cinder block's length, width, and he...
-
Measuring Blocks for Tiered Planters Made Easy
When building a tiered planter, you'll need to take precise measurements of each cinder block's length, width, and he...
-
Measuring Blocks for Tiered Planters Made Easy
When building a tiered planter, you'll need to take precise measurements of each cinder block's length, width, and he...
-
Measuring Blocks for Tiered Planters Made Easy
When building a tiered planter, you'll need to take precise measurements of each cinder block's length, width, and he...
-
Measuring Blocks for Tiered Planters Made Easy
When building a tiered planter, you'll need to take precise measurements of each cinder block's length, width, and he...
-
Measuring Blocks for Tiered Planters Made Easy
When building a tiered planter, you'll need to take precise measurements of each cinder block's length, width, and he...
-
Measuring Blocks for Tiered Planters Made Easy
When building a tiered planter, you'll need to take precise measurements of each cinder block's length, width, and he...
-
Measuring Blocks for Tiered Planters Made Easy
When building a tiered planter, you'll need to take precise measurements of each cinder block's length, width, and he...
-
Measuring Blocks for Tiered Planters Made Easy
When building a tiered planter, you'll need to take precise measurements of each cinder block's length, width, and he...
-
Measuring Blocks for Tiered Planters Made Easy
When building a tiered planter, you'll need to take precise measurements of each cinder block's length, width, and he...
-
Succulent-Friendly Drainage Solutions for Block Planters
You can create a succulent-friendly drainage system in your cinder block planters by drilling holes in the bottom of ...
-
Succulent-Friendly Drainage Solutions for Block Planters
You can create a succulent-friendly drainage system in your cinder block planters by drilling holes in the bottom of ...
-
Succulent-Friendly Drainage Solutions for Block Planters
You can create a succulent-friendly drainage system in your cinder block planters by drilling holes in the bottom of ...
-
Succulent-Friendly Drainage Solutions for Block Planters
You can create a succulent-friendly drainage system in your cinder block planters by drilling holes in the bottom of ...
-
Succulent-Friendly Drainage Solutions for Block Planters
You can create a succulent-friendly drainage system in your cinder block planters by drilling holes in the bottom of ...
-
Succulent-Friendly Drainage Solutions for Block Planters
You can create a succulent-friendly drainage system in your cinder block planters by drilling holes in the bottom of ...
-
Succulent-Friendly Drainage Solutions for Block Planters
You can create a succulent-friendly drainage system in your cinder block planters by drilling holes in the bottom of ...
-
Succulent-Friendly Drainage Solutions for Block Planters
You can create a succulent-friendly drainage system in your cinder block planters by drilling holes in the bottom of ...
-
Succulent-Friendly Drainage Solutions for Block Planters
You can create a succulent-friendly drainage system in your cinder block planters by drilling holes in the bottom of ...
-
Succulent-Friendly Drainage Solutions for Block Planters
You can create a succulent-friendly drainage system in your cinder block planters by drilling holes in the bottom of ...
-
Succulent-Friendly Drainage Solutions for Block Planters
You can create a succulent-friendly drainage system in your cinder block planters by drilling holes in the bottom of ...
-
Succulent-Friendly Drainage Solutions for Block Planters
You can create a succulent-friendly drainage system in your cinder block planters by drilling holes in the bottom of ...
-
Succulent-Friendly Drainage Solutions for Block Planters
You can create a succulent-friendly drainage system in your cinder block planters by drilling holes in the bottom of ...
-
Succulent-Friendly Drainage Solutions for Block Planters
You can create a succulent-friendly drainage system in your cinder block planters by drilling holes in the bottom of ...
-
Succulent-Friendly Drainage Solutions for Block Planters
You can create a succulent-friendly drainage system in your cinder block planters by drilling holes in the bottom of ...


