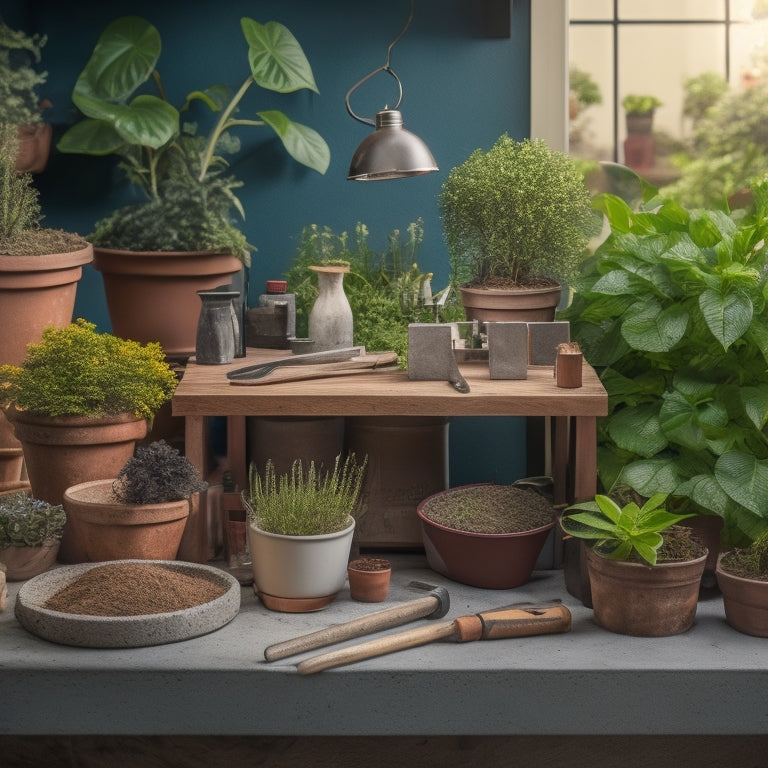
7 Must-Have Tools for DIY Block Planters
To create a sturdy and visually appealing DIY block planter, you'll need seven essential tools. First, a tamping tool guarantees a solid base by packing soil or gravel tightly. A leveling device then assures perfectly aligned blocks. You'll also need drill bits specifically designed for cinder blocks, as well as safety gear to protect yourself from debris and dust. A measuring tape helps you make accurate cuts, while a mixing bucket allows you to accurately mix and apply mortar. Finally, a grout tool helps you achieve a professional finish. With these must-have tools in your arsenal, you'll be well on your way to creating a beautiful and long-lasting planter - and that's just the foundation for a successful project.
Key Takeaways
• A tamping tool is essential for securing soil or gravel and ensuring base stability in DIY block planters.
• A leveling device, such as a laser level or spirit level, ensures blocks are straight and even, preventing structural issues.
• High-quality drill bits, specifically designed for cinder blocks, are necessary for effective drilling and compatibility with drill and block type.
• Safety gear, including sturdy gloves, protective goggles, and dust masks, is crucial for protecting yourself from injuries and debris during the drilling process.
• A measuring tape with clear markings is necessary for accurate measurements and symmetrical structures in DIY block planters.
Tamping Tool for Solid Base
When creating a solid base for your block planter, you'll need a tamping tool to secure the soil or gravel. This essential tool helps you achieve base stability, which is critical for the overall structure of your planter.
Without proper tamping, the soil or gravel can shift, causing your blocks to become uneven or even collapse.
To master tamping techniques, start by filling the base of your planter with the recommended amount of soil or gravel. Then, use your tamping tool to apply gentle, consistent pressure, working in small sections to confirm everything is packed tightly.
Be careful not to over-tamp, as this can compact the material too much, making it difficult for water to drain.
Leveling Device for Perfect Alignment
Get perfect alignment for your block planter by using a leveling device, which guarantees your blocks are straight and even, preventing structural issues down the line. This essential tool secures your planter's foundation is solid, allowing you to build with confidence.
When choosing a leveling device, consider the type of surface you're working on and the weight of your blocks. You can opt for a laser level, spirit level, or a digital level, depending on your specific needs.
To achieve precise alignment, use leveling strategies such as checking the level in multiple directions, using a reference point, and making adjustments incrementally. Alignment techniques like these will help you avoid common mistakes and secure your planter's stability.
Remember, a level foundation is vital for a sturdy structure, so don't skip this step. With a leveling device and the right techniques, you'll be able to create a beautiful and functional block planter that will last for years to come.
Drill Bits for Cinder Block
You'll need a high-quality drill bit specifically designed for cinder blocks to make accurate holes for anchoring your planter's reinforcement or irrigation system. Cinder blocks come in different types, including standard, half-high, and slump blocks, each requiring a drill bit that can effectively penetrate their unique composition.
When selecting a drill bit, consider the materials used in its construction. Carbide-tipped drill bits are ideal for cinder blocks, as they provide excellent durability and resistance to wear. They can efficiently drill through the block's aggregate material and concrete mixture.
For more aggressive drilling, you can opt for diamond-coated drill bits. These bits feature a diamond-coated edge that efficiently cuts through cinder blocks, making them perfect for large or complex projects. However, they can be more expensive than carbide-tipped bits.
Regardless of the drill bit material you choose, make sure it's compatible with your drill and suited for the specific type of cinder block you're working with.
Safety Gear for Protection
As you prepare to drill into cinder blocks, don't forget to prioritize your safety by wearing appropriate gear to protect yourself from debris and potential hazards. You're about to create a beautiful planter, but not at the cost of your well-being.
Invest in a pair of sturdy gloves to shield your hands from sharp edges and flying particles. These gloves will provide a secure grip, allowing you to maintain control while drilling.
Next, guarantee eye safety by wearing protective goggles or glasses. When drilling into cinder blocks, tiny particles can fly everywhere, and you don't want them getting in your eyes. These goggles will give you peace of mind, allowing you to focus on the task at hand.
Additionally, consider wearing a dust mask to prevent inhalation of dust and debris. Don't underestimate the importance of safety gear – it's better to be safe than sorry.
Measuring Tape for Accurate Cuts
When building a block planter, you'll need to make precise cuts to guarantee a sturdy and visually appealing structure.
You'll be relying on your measuring tape to guide your saw, so it's essential that you take accurate readings every time.
Precise Measurements Matter
With every cut, precise measurements make all the difference in ensuring your block planters turn out symmetrical and sturdy. You can't afford to eyeball it when working with blocks, as even the slightest miscalculation can throw off the entire structure.
That's why mastering measurement techniques is vital for a successful DIY project. You'll need reliable measurement tools to get the job done. A high-quality measuring tape is essential for taking accurate readings.
Look for one with clear markings and a sturdy design that can withstand the demands of your project. When taking measurements, make sure to hold the tape level and straight, avoiding any twists or angles that could skew your readings.
Cut Accurately Every Time
You'll achieve precise cuts every time by using your measuring tape to mark exact block lengths, ensuring that your planter's components fit together seamlessly. This vital step sets the stage for a successful DIY block planter project.
To get it right, choose the correct saw type for your blocks - a miter saw or circular saw work well for most materials. Next, employ effective cutting techniques to minimize errors. For instance, use a slow and steady motion when cutting, and always cut outside the marked line to account for saw blade width.
When marking your blocks, use a fine-tip marker to create a clear, precise line. Hold the measuring tape firmly in place, ensuring it's straight and level, to avoid deviations. Take your time, and double-check your measurements before making the cut.
By following these steps, you'll eliminate costly mistakes and achieve professional-looking results. Remember, accuracy is key to building a sturdy and visually appealing planter.
With your measuring tape and saw, you're one step closer to creating a beautiful DIY block planter that will showcase your green thumb.
Mixing Bucket for Mortar
A sturdy mixing bucket is essential for combining mortar, as it allows you to accurately measure and mix the correct proportions of cement, sand, and water. This guarantees a consistent mortar consistency, which is critical for a strong and durable bond between the blocks. Without a mixing bucket, you risk compromising the structural integrity of your planter.
To achieve the perfect mix, you'll need to master various mixing techniques. Here are some tips to get you started:
| Mixing Technique | Description | Benefits |
|---|---|---|
| Slump Test | Measure the flow of mortar by lifting the trowel | Guarantees correct consistency |
| Fold and Press | Fold the mortar mix onto itself, then press down | Eliminates air pockets |
| Scrape and Turn | Scrape the sides of the bucket, then turn the mix | Guarantees thorough mixing |
| Rest and Repeat | Let the mix rest, then re-mix and re-apply | Achieves ideal consistency |
| Visual Inspection | Visually inspect the mix for uniformity | Guarantees a consistent finish |
Grout Tool for Finishing Touches
Once you've built your block planter, a grout tool becomes essential for applying and finishing the grout between the blocks. This tool helps you achieve a professional-looking finish by allowing you to spread, smooth, and remove excess grout.
With the right grout tool, you can choose from various grout types, such as sanded, unsanded, or epoxy-based, each suited for specific block materials and environmental conditions.
When selecting a grout tool, consider the type of grout you're using and the finishing techniques you want to achieve. A rubber grout float is ideal for spreading and smoothing grout, while a grout scraper or old toothbrush can help remove excess grout from crevices.
For more intricate designs, a grout pick or awl can be used to create patterns or textures. By mastering the use of a grout tool, you'll be able to achieve a flawless, well-finished block planter that showcases your DIY skills.
Remember to clean your grout tool regularly to prevent grout from hardening and to maintain its effectiveness. With practice, you'll develop the finishing techniques that will make your block planter stand out.
Frequently Asked Questions
Can I Use a Regular Hammer Instead of a Tamping Tool?
Can you get away with using a regular hammer instead of a tamping tool? While it's technically possible, you'll sacrifice efficiency.
A hammer can compact the soil and gravel, but it won't provide the same level of precision and control as a tamping tool. You'll need to apply more force, which can be tiring and may lead to uneven compaction.
If you want to achieve professional-looking results, it's worth investing in a dedicated tamping tool.
How Do I Clean and Maintain My Drill Bits?
You're the master chef of your workshop, and your drill bits are the secret ingredients.
To keep them sharp and effective, you'll want to clean and maintain them regularly. Use a soft-bristled brush to sweep away debris.
Then soak the bits in a gentle cleaning solution like soap and water or a citrus-based solvent.
Dry them thoroughly to prevent rust, and store them in a designated case to keep them organized and within reach.
What Type of Safety Gear Is Recommended for DIY Projects?
When working on DIY projects, you're taking control of your creations, but don't forget to prioritize your safety.
You'll want to wear safety goggles to protect your eyes from debris and dust. Additionally, invest in a good pair of work gloves to shield your hands from cuts, abrasions, and splinters.
These essentials will give you peace of mind, allowing you to focus on bringing your vision to life.
Can I Use a Regular Bucket Instead of a Mixing Bucket?
Did you know that 75% of DIY enthusiasts prefer using specialized tools for their projects?
When it comes to mixing concrete for your block planters, you might wonder if a regular bucket will do.
While it's tempting to use a bucket alternative, a mixing bucket is specifically designed for efficient mixing techniques. Its shape and size allow for easy rotation and scraping of the mixture, ensuring a consistent blend.
Trust us, investing in a mixing bucket will save you time and effort in the long run.
How Do I Store Leftover Mortar and Grout?
When you're left with excess mortar and grout, you'll want to store them properly to maintain their quality.
You'll need airtight containers for mortar storage techniques, like plastic buckets or bags, to keep them dry and protected from contaminants.
For grout preservation tips, consider using glass jars with tight-fitting lids to prevent moisture absorption.
Always label and date the containers, and store them in a cool, dry place to guarantee they remain usable for your next project.
Conclusion
You've got your DIY block planter vision, and now you're all set with the must-have tools to bring it to life!
But before you start building, take a step back and ask yourself: Are you ready to release your creativity and transform those plain blocks into stunning planters?
With these essential tools by your side, the answer is a resounding yes!
Get ready to create a masterpiece that'll be the envy of your neighbors.
Related Posts
-
10 Essential Tips for Sizing Block Planters Perfectly
When sizing block planters, you need to take into account multiple factors to get it just right. Measure your cinder ...
-
10 Essential Tips for Sizing Block Planters Perfectly
When sizing block planters, you need to take into account multiple factors to get it just right. Measure your cinder ...
-
10 Essential Tips for Sizing Block Planters Perfectly
When sizing block planters, you need to take into account multiple factors to get it just right. Measure your cinder ...
-
10 Essential Tips for Sizing Block Planters Perfectly
When sizing block planters, you need to take into account multiple factors to get it just right. Measure your cinder ...
-
10 Essential Tips for Sizing Block Planters Perfectly
When sizing block planters, you need to take into account multiple factors to get it just right. Measure your cinder ...
-
10 Essential Tips for Sizing Block Planters Perfectly
When sizing block planters, you need to take into account multiple factors to get it just right. Measure your cinder ...
-
10 Essential Tips for Sizing Block Planters Perfectly
When sizing block planters, you need to take into account multiple factors to get it just right. Measure your cinder ...
-
10 Essential Tips for Sizing Block Planters Perfectly
When sizing block planters, you need to take into account multiple factors to get it just right. Measure your cinder ...
-
10 Essential Tips for Sizing Block Planters Perfectly
When sizing block planters, you need to take into account multiple factors to get it just right. Measure your cinder ...
-
10 Essential Tips for Sizing Block Planters Perfectly
When sizing block planters, you need to take into account multiple factors to get it just right. Measure your cinder ...
-
10 Essential Tips for Sizing Block Planters Perfectly
When sizing block planters, you need to take into account multiple factors to get it just right. Measure your cinder ...
-
10 Essential Tips for Sizing Block Planters Perfectly
When sizing block planters, you need to take into account multiple factors to get it just right. Measure your cinder ...
-
10 Essential Tips for Sizing Block Planters Perfectly
When sizing block planters, you need to take into account multiple factors to get it just right. Measure your cinder ...
-
10 Essential Tips for Sizing Block Planters Perfectly
When sizing block planters, you need to take into account multiple factors to get it just right. Measure your cinder ...
-
10 Essential Tips for Sizing Block Planters Perfectly
When sizing block planters, you need to take into account multiple factors to get it just right. Measure your cinder ...
-
10 Essential Tips for Sizing Block Planters Perfectly
When sizing block planters, you need to take into account multiple factors to get it just right. Measure your cinder ...
-
10 Essential Tips for Sizing Block Planters Perfectly
When sizing block planters, you need to take into account multiple factors to get it just right. Measure your cinder ...
-
10 Essential Tips for Sizing Block Planters Perfectly
When sizing block planters, you need to take into account multiple factors to get it just right. Measure your cinder ...
-
10 Essential Tips for Sizing Block Planters Perfectly
When sizing block planters, you need to take into account multiple factors to get it just right. Measure your cinder ...
-
10 Essential Tips for Sizing Block Planters Perfectly
When sizing block planters, you need to take into account multiple factors to get it just right. Measure your cinder ...
-
10 Essential Tips for Sizing Block Planters Perfectly
When sizing block planters, you need to take into account multiple factors to get it just right. Measure your cinder ...
-
10 Essential Tips for Sizing Block Planters Perfectly
When sizing block planters, you need to take into account multiple factors to get it just right. Measure your cinder ...
-
10 Essential Tips for Sizing Block Planters Perfectly
When sizing block planters, you need to take into account multiple factors to get it just right. Measure your cinder ...
-
10 Essential Tips for Sizing Block Planters Perfectly
When sizing block planters, you need to take into account multiple factors to get it just right. Measure your cinder ...
-
10 Essential Tips for Sizing Block Planters Perfectly
When sizing block planters, you need to take into account multiple factors to get it just right. Measure your cinder ...
-
10 Essential Tips for Sizing Block Planters Perfectly
When sizing block planters, you need to take into account multiple factors to get it just right. Measure your cinder ...
-
10 Essential Tips for Sizing Block Planters Perfectly
When sizing block planters, you need to take into account multiple factors to get it just right. Measure your cinder ...
-
10 Essential Tips for Sizing Block Planters Perfectly
When sizing block planters, you need to take into account multiple factors to get it just right. Measure your cinder ...
-
10 Essential Tips for Sizing Block Planters Perfectly
When sizing block planters, you need to take into account multiple factors to get it just right. Measure your cinder ...
-
10 Essential Tips for Sizing Block Planters Perfectly
When sizing block planters, you need to take into account multiple factors to get it just right. Measure your cinder ...
-
10 Essential Tips for Sizing Block Planters Perfectly
When sizing block planters, you need to take into account multiple factors to get it just right. Measure your cinder ...
-
10 Essential Tips for Sizing Block Planters Perfectly
When sizing block planters, you need to take into account multiple factors to get it just right. Measure your cinder ...
-
10 Essential Tips for Sizing Block Planters Perfectly
When sizing block planters, you need to take into account multiple factors to get it just right. Measure your cinder ...
-
10 Essential Tips for Sizing Block Planters Perfectly
When sizing block planters, you need to take into account multiple factors to get it just right. Measure your cinder ...
-
10 Essential Tips for Sizing Block Planters Perfectly
When sizing block planters, you need to take into account multiple factors to get it just right. Measure your cinder ...
-
10 Essential Tips for Sizing Block Planters Perfectly
When sizing block planters, you need to take into account multiple factors to get it just right. Measure your cinder ...
-
10 Essential Tips for Sizing Block Planters Perfectly
When sizing block planters, you need to take into account multiple factors to get it just right. Measure your cinder ...
-
10 Essential Tips for Sizing Block Planters Perfectly
When sizing block planters, you need to take into account multiple factors to get it just right. Measure your cinder ...
-
10 Natural Ways to Clean Your Planters
You can transform your planters from grimy to gleaming with these 10 natural cleaning solutions. Mix baking soda and ...
-
10 Natural Ways to Clean Your Planters
You can transform your planters from grimy to gleaming with these 10 natural cleaning solutions. Mix baking soda and ...
-
10 Natural Ways to Clean Your Planters
You can transform your planters from grimy to gleaming with these 10 natural cleaning solutions. Mix baking soda and ...
-
10 Natural Ways to Clean Your Planters
You can transform your planters from grimy to gleaming with these 10 natural cleaning solutions. Mix baking soda and ...
-
10 Natural Ways to Clean Your Planters
You can transform your planters from grimy to gleaming with these 10 natural cleaning solutions. Mix baking soda and ...
-
10 Natural Ways to Clean Your Planters
You can transform your planters from grimy to gleaming with these 10 natural cleaning solutions. Mix baking soda and ...
-
10 Natural Ways to Clean Your Planters
You can transform your planters from grimy to gleaming with these 10 natural cleaning solutions. Mix baking soda and ...
-
10 Natural Ways to Clean Your Planters
You can transform your planters from grimy to gleaming with these 10 natural cleaning solutions. Mix baking soda and ...
-
10 Natural Ways to Clean Your Planters
You can transform your planters from grimy to gleaming with these 10 natural cleaning solutions. Mix baking soda and ...
-
10 Natural Ways to Clean Your Planters
You can transform your planters from grimy to gleaming with these 10 natural cleaning solutions. Mix baking soda and ...
-
10 Natural Ways to Clean Your Planters
You can transform your planters from grimy to gleaming with these 10 natural cleaning solutions. Mix baking soda and ...
-
10 Natural Ways to Clean Your Planters
You can transform your planters from grimy to gleaming with these 10 natural cleaning solutions. Mix baking soda and ...
-
10 Natural Ways to Clean Your Planters
You can transform your planters from grimy to gleaming with these 10 natural cleaning solutions. Mix baking soda and ...
-
10 Natural Ways to Clean Your Planters
You can transform your planters from grimy to gleaming with these 10 natural cleaning solutions. Mix baking soda and ...
-
10 Natural Ways to Clean Your Planters
You can transform your planters from grimy to gleaming with these 10 natural cleaning solutions. Mix baking soda and ...
-
10 Natural Ways to Clean Your Planters
You can transform your planters from grimy to gleaming with these 10 natural cleaning solutions. Mix baking soda and ...
-
10 Natural Ways to Clean Your Planters
You can transform your planters from grimy to gleaming with these 10 natural cleaning solutions. Mix baking soda and ...
-
10 Natural Ways to Clean Your Planters
You can transform your planters from grimy to gleaming with these 10 natural cleaning solutions. Mix baking soda and ...
-
10 Natural Ways to Clean Your Planters
You can transform your planters from grimy to gleaming with these 10 natural cleaning solutions. Mix baking soda and ...
-
10 Natural Ways to Clean Your Planters
You can transform your planters from grimy to gleaming with these 10 natural cleaning solutions. Mix baking soda and ...
-
10 Natural Ways to Clean Your Planters
You can transform your planters from grimy to gleaming with these 10 natural cleaning solutions. Mix baking soda and ...
-
10 Natural Ways to Clean Your Planters
You can transform your planters from grimy to gleaming with these 10 natural cleaning solutions. Mix baking soda and ...
-
10 Natural Ways to Clean Your Planters
You can transform your planters from grimy to gleaming with these 10 natural cleaning solutions. Mix baking soda and ...
-
10 Natural Ways to Clean Your Planters
You can transform your planters from grimy to gleaming with these 10 natural cleaning solutions. Mix baking soda and ...
-
10 Natural Ways to Clean Your Planters
You can transform your planters from grimy to gleaming with these 10 natural cleaning solutions. Mix baking soda and ...
-
10 Natural Ways to Clean Your Planters
You can transform your planters from grimy to gleaming with these 10 natural cleaning solutions. Mix baking soda and ...
-
10 Natural Ways to Clean Your Planters
You can transform your planters from grimy to gleaming with these 10 natural cleaning solutions. Mix baking soda and ...
-
10 Natural Ways to Clean Your Planters
You can transform your planters from grimy to gleaming with these 10 natural cleaning solutions. Mix baking soda and ...
-
10 Natural Ways to Clean Your Planters
You can transform your planters from grimy to gleaming with these 10 natural cleaning solutions. Mix baking soda and ...
-
10 Natural Ways to Clean Your Planters
You can transform your planters from grimy to gleaming with these 10 natural cleaning solutions. Mix baking soda and ...
-
10 Natural Ways to Clean Your Planters
You can transform your planters from grimy to gleaming with these 10 natural cleaning solutions. Mix baking soda and ...
-
10 Natural Ways to Clean Your Planters
You can transform your planters from grimy to gleaming with these 10 natural cleaning solutions. Mix baking soda and ...
-
10 Natural Ways to Clean Your Planters
You can transform your planters from grimy to gleaming with these 10 natural cleaning solutions. Mix baking soda and ...
-
10 Natural Ways to Clean Your Planters
You can transform your planters from grimy to gleaming with these 10 natural cleaning solutions. Mix baking soda and ...
-
10 Natural Ways to Clean Your Planters
You can transform your planters from grimy to gleaming with these 10 natural cleaning solutions. Mix baking soda and ...
-
What to Seal Your Planters With for Longevity
When sealing your planters for longevity, it's vital to choose a sealant compatible with your planter material - whet...
-
What to Seal Your Planters With for Longevity
When sealing your planters for longevity, it's vital to choose a sealant compatible with your planter material - whet...
-
What to Seal Your Planters With for Longevity
When sealing your planters for longevity, it's vital to choose a sealant compatible with your planter material - whet...
-
What to Seal Your Planters With for Longevity
When sealing your planters for longevity, it's vital to choose a sealant compatible with your planter material - whet...
-
What to Seal Your Planters With for Longevity
When sealing your planters for longevity, it's vital to choose a sealant compatible with your planter material - whet...
-
What to Seal Your Planters With for Longevity
When sealing your planters for longevity, it's vital to choose a sealant compatible with your planter material - whet...
-
What to Seal Your Planters With for Longevity
When sealing your planters for longevity, it's vital to choose a sealant compatible with your planter material - whet...
-
What to Seal Your Planters With for Longevity
When sealing your planters for longevity, it's vital to choose a sealant compatible with your planter material - whet...
-
What to Seal Your Planters With for Longevity
When sealing your planters for longevity, it's vital to choose a sealant compatible with your planter material - whet...
-
What to Seal Your Planters With for Longevity
When sealing your planters for longevity, it's vital to choose a sealant compatible with your planter material - whet...
-
What to Seal Your Planters With for Longevity
When sealing your planters for longevity, it's vital to choose a sealant compatible with your planter material - whet...
-
What to Seal Your Planters With for Longevity
When sealing your planters for longevity, it's vital to choose a sealant compatible with your planter material - whet...
-
What to Seal Your Planters With for Longevity
When sealing your planters for longevity, it's vital to choose a sealant compatible with your planter material - whet...
-
What to Seal Your Planters With for Longevity
When sealing your planters for longevity, it's vital to choose a sealant compatible with your planter material - whet...
-
What to Seal Your Planters With for Longevity
When sealing your planters for longevity, it's vital to choose a sealant compatible with your planter material - whet...
-
What to Seal Your Planters With for Longevity
When sealing your planters for longevity, it's vital to choose a sealant compatible with your planter material - whet...
-
What to Seal Your Planters With for Longevity
When sealing your planters for longevity, it's vital to choose a sealant compatible with your planter material - whet...
-
What to Seal Your Planters With for Longevity
When sealing your planters for longevity, it's vital to choose a sealant compatible with your planter material - whet...
-
What to Seal Your Planters With for Longevity
When sealing your planters for longevity, it's vital to choose a sealant compatible with your planter material - whet...
-
What to Seal Your Planters With for Longevity
When sealing your planters for longevity, it's vital to choose a sealant compatible with your planter material - whet...
-
What to Seal Your Planters With for Longevity
When sealing your planters for longevity, it's vital to choose a sealant compatible with your planter material - whet...
-
What to Seal Your Planters With for Longevity
When sealing your planters for longevity, it's vital to choose a sealant compatible with your planter material - whet...
-
What to Seal Your Planters With for Longevity
When sealing your planters for longevity, it's vital to choose a sealant compatible with your planter material - whet...
-
What to Seal Your Planters With for Longevity
When sealing your planters for longevity, it's vital to choose a sealant compatible with your planter material - whet...
-
What to Seal Your Planters With for Longevity
When sealing your planters for longevity, it's vital to choose a sealant compatible with your planter material - whet...
-
What to Seal Your Planters With for Longevity
When sealing your planters for longevity, it's vital to choose a sealant compatible with your planter material - whet...
-
What to Seal Your Planters With for Longevity
When sealing your planters for longevity, it's vital to choose a sealant compatible with your planter material - whet...
-
What to Seal Your Planters With for Longevity
When sealing your planters for longevity, it's vital to choose a sealant compatible with your planter material - whet...
-
What to Seal Your Planters With for Longevity
When sealing your planters for longevity, it's vital to choose a sealant compatible with your planter material - whet...
-
What to Seal Your Planters With for Longevity
When sealing your planters for longevity, it's vital to choose a sealant compatible with your planter material - whet...
-
What to Seal Your Planters With for Longevity
When sealing your planters for longevity, it's vital to choose a sealant compatible with your planter material - whet...
-
What to Seal Your Planters With for Longevity
When sealing your planters for longevity, it's vital to choose a sealant compatible with your planter material - whet...


