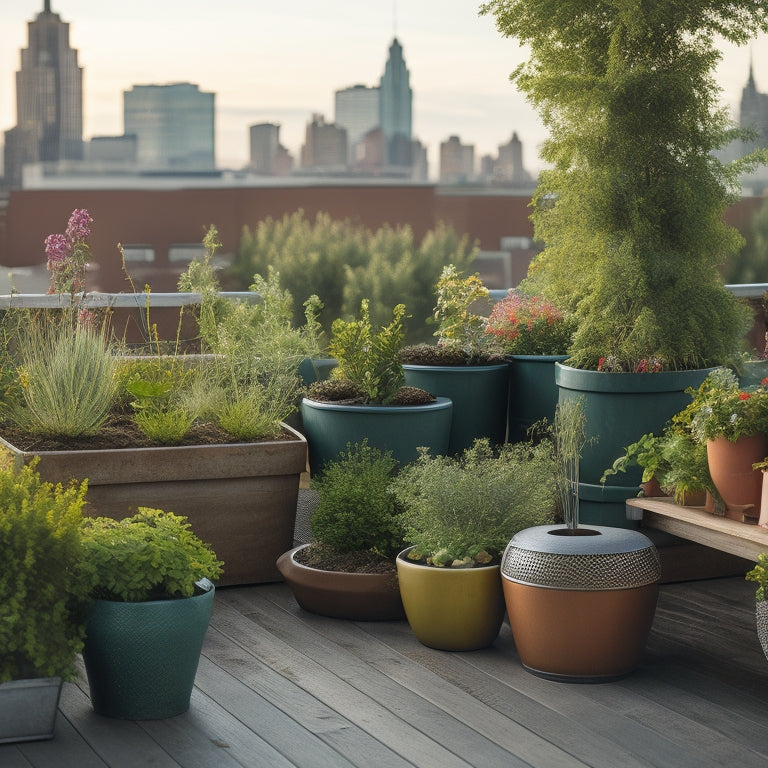
7 Budget-Friendly Rooftop Veggie Garden Design Ideas
You can transform your rooftop into a thriving veggie garden without breaking the bank by utilizing creative, budget-friendly design ideas that maximize space, conserve water, and add visual appeal. Repurpose wooden pallets into garden boxes or create DIY trellises to support climbing veggies like peas and cucumbers. Train vining plants to grow upwards using trellises or arbors, and implement space-saving vertical gardening techniques to increase crop yields. Upcycle old pallets into container gardens, and design pathways that are functional and visually appealing using materials like gravel, stone, or wooden planks. With these budget-friendly ideas, you're just a step away from revealing a lush and productive rooftop garden oasis.
Key Takeaways
• Repurpose wooden pallets to create garden boxes, trellises, and containers for a budget-friendly rooftop veggie garden.
• Utilize vertical gardening techniques, such as trellises and arbors, to maximize space and crop yields.
• Create a self-watering system using recycled plastic bottles or install a drip irrigation system for efficient watering.
• Design pathways with functional and visually appealing materials like gravel, stone, or wooden planks to guide visitors and protect plants.
• Choose space-saving and shade-tolerant plants, and group them according to their shade needs for optimal growth in a rooftop veggie garden.
Repurposed Pallet Garden Boxes
By disassembling and rearranging wooden pallets, you can create a unique and functional garden box that adds a touch of rustic charm to your rooftop veggie garden.
To get started, collect wooden pallets and disassemble them into individual planks. Sand the planks to smooth out rough edges and remove any debris. Next, cut the planks to the desired length and assemble them into a rectangular box shape using wood screws. Make sure the box is sturdy and can hold the weight of the soil and plants.
Once your pallet garden box is built, it's time to prepare it for planting. Drill drainage holes in the bottom of the box to prevent waterlogged soil. Add a layer of landscape fabric to prevent weeds from growing and retain moisture.
Fill the box with a mix of potting soil and compost, and then plant your favorite veggies, such as leafy greens, herbs, or cherry tomatoes. Use a combination of planting techniques, such as companion planting and vertical gardening, to maximize space and yield.
With proper care and maintenance, your repurposed pallet garden box will thrive and provide you with a bountiful harvest.
DIY Trellis for Climbing Veggies
As you plan your rooftop veggie garden, you'll want to create a DIY trellis that efficiently trains vines to grow upward, maximizing space.
By incorporating space-saving designs, you'll be able to make the most of your rooftop's square footage.
With a little creativity, you can craft a trellis that not only supports your climbing veggies but also adds visual interest to your garden.
Train Vines Efficiently
To maximize space and encourage healthy growth, you'll want to train your vining veggies, like peas, cucumbers, and squash, to climb up a sturdy DIY trellis, carefully positioning the structure to receive ideal sunlight and air circulation. By providing vine support, you'll promote vertical growth, allowing your plants to thrive while keeping your rooftop garden organized.
To create an efficient trellis, consider the following key factors:
| Trellis Feature | Benefits |
|---|---|
| Width: 3-4 feet | Provides ample space for vines to grow |
| Material: Wooden or metal | Durable and long-lasting |
| Height: 5-6 feet | Allows for optimal vertical growth |
| Spacing: 6-8 inches | Enables easy harvesting and pruning |
Space-Saving Designs
You can create a space-saving DIY trellis for climbing veggies by repurposing everyday items like wooden latticework, old fencing, or even a section of a metal grid, providing a sturdy framework for your vining vegetables to climb.
This clever hack allows you to maximize your rooftop space while keeping your veggies organized and thriving.
For a more modern look, consider using compact planters with built-in trellises or attach a trellis to the side of a planter. This will create a visually appealing display while keeping your veggies within easy reach.
To take it up a notch, incorporate multi-tiered shelves to create a layered effect. This won't only add depth to your design but also provide more space for your climbing veggies to spread out.
By utilizing vertical space, you can grow more veggies in a smaller area, making the most of your rooftop garden.
With a little creativity, you can create a stunning and productive space-saving design that showcases your green thumb skills.
Space-Saving Vertical Garden
By training vining plants like cucumbers, peas, or tomatoes to grow upwards using trellises or arbors, you can create a space-saving vertical garden that maximizes your rooftop's real estate. This technique allows you to make the most of your available space, while also reaping the benefits of vertical gardening.
One of the main advantages of a vertical garden is that it increases crop yields per square foot, making it an ideal solution for small rooftop spaces. Additionally, vertical planting techniques improve air circulation, reduce soil erosion, and promote healthy root growth.
To get started, choose a sturdy trellis or arbor that can support the weight of your plants. You can use a DIY trellis made from wooden stakes and twine or invest in a more elaborate arbor.
Train your vining plants to grow upwards by gently twining them around the trellis or arbor. As your plants grow, they'll create a lush, verdant display that adds visual interest to your rooftop garden.
With a little creativity and some basic materials, you can create a thriving vertical garden that brings you fresh produce and a sense of community with fellow gardeners.
Upcycled Container Gardens
Five old pallets, stacked and secured on your rooftop, can become a thriving upcycled container garden, providing a unique and space-efficient way to grow a variety of herbs, leafy greens, and flowers. By repurposing these wooden crates, you'll create a functional and visually appealing garden that's perfect for small rooftop spaces.
To get started, disassemble the pallets and attach them to a sturdy base to prevent them from toppling over. Fill the pallets with a mix of potting soil, compost, and perlite for ideal drainage. Plant a mix of herbs, such as basil, mint, and cilantro, alongside leafy greens like kale and spinach.
Consider creating an herb spiral using recycled bottles to add a whimsical touch to your garden. Simply cut the bottles in half, add a layer of small rocks, and plant your herbs.
As you tend to your upcycled container garden, you'll feel a sense of pride and accomplishment, knowing you've created a beautiful and productive space from discarded materials.
Budget-Friendly Irrigation Systems
Set up a self-watering system using recycled plastic bottles, which can be transformed into mini-reservoirs to supply your rooftop veggie garden with a steady flow of water.
Cut the bottom off each bottle and bury it neck-down in the soil near your plants. Fill the bottle with water, and it'll slowly seep into the soil as needed. This DIY irrigation system reduces evaporation and runoff, ensuring your plants receive the right amount of moisture.
For a more efficient approach, consider installing a drip irrigation system. This method delivers water directly to the roots, minimizing waste and promoting healthy growth.
You can purchase a drip irrigation kit or create your own using tubes and emitters. Simply connect the tubes to a water source, such as a rainwater harvesting system, and place the emitters near your plants.
Rooftop Garden Pathway Ideas
As you design your rooftop veggie garden, you'll want to create a pathway that's both functional and visually appealing.
You'll need to contemplate the materials and layout that will guide visitors through your garden while also protecting your plants from foot traffic.
From gravel or stone flooring to wooden plank walkways and mosaic tile accents, you have several options to choose from to create a beautiful and functional pathway.
Gravel or Stone Flooring
By incorporating gravel or stone flooring into your rooftop veggie garden design, you'll create a visually appealing and low-maintenance pathway that allows for efficient water drainage and permeability.
Gravel drainage is a major advantage, as it prevents water from accumulating on the surface, reducing the risk of erosion and plant damage. Plus, gravel's loose structure enables it to shift with foot traffic, minimizing compaction and guaranteeing continued drainage.
Stone flooring, on the other hand, offers a unique aesthetic that can elevate your rooftop garden's style. From rustic river rocks to sleek bluestone, stone's natural beauty adds texture and visual interest to your pathway.
You can also use stone to create a mosaic pattern or incorporate it with other materials, like wood or metal, to create a one-of-a-kind design. When choosing stone, consider the color, texture, and size to ascertain it complements your garden's overall theme.
With proper installation and maintenance, gravel or stone flooring can last for years, providing a durable and attractive pathway for your rooftop veggie garden.
Wooden Plank Walkways
You can create a rustic charm in your rooftop veggie garden by installing wooden plank walkways, which not only provide a natural, earthy aesthetic but also offer a sturdy and slip-resistant surface underfoot. Wooden planks blend seamlessly with planter box aesthetics, creating a cohesive look that's both inviting and functional.
When selecting walkway materials, contemplate the type of wood, plank width, and spacing to achieve the desired look. Here are some options to ponder:
| Wood Type | Description |
|---|---|
| Pressure-Treated Lumber | Affordable, durable, and resistant to rot and insects |
| Cedar | Aromatic, rot-resistant, and naturally insect-repellent |
| Reclaimed Wood | Unique, eco-friendly, and adds a touch of history |
To guarantee a safe and durable walkway, make sure to:
** Use planks that are at least 2 inches thick and 6 inches wide
**Space planks 1-2 inches apart for drainage and airflow
- Secure planks with screws or nails to prevent shifting or rotting
Mosaic Tile Accents
Incorporate a touch of sophistication and personality into your rooftop veggie garden pathway by embedding mosaic tiles, which burst with color and texture, into the surrounding hardscape, creating an eye-catching visual contrast.
You can arrange the tiles in intricate mosaic patterns, such as chevrons or hexagons, to add visual interest to your pathway. Experiment with different color combinations to create a unique look that reflects your personal style. For example, pair bright blues and whites to evoke a Mediterranean feel or combine earthy tones like terracotta and sage to bring warmth to your garden.
When selecting mosaic tiles, consider the color and texture of your surrounding plants and hardscape to guarantee a cohesive look. You can also use mosaic tiles to create a focal point, such as a decorative border or accent wall, to draw attention to a particular area of your garden.
With a little creativity, mosaic tile accents can elevate your rooftop veggie garden from functional to fabulous, making it a space where you'll want to spend hours tending to your plants and enjoying the fruits of your labor.
Utilizing Shade With Tiered Beds
Tiered beds, strategically positioned to maximize shade coverage, can boost your rooftop veggie garden's productivity by creating microclimates that shield heat-sensitive plants from intense sunlight.
By incorporating a tiered arrangement, you'll create a multi-dimensional space that caters to a variety of shade-loving plants. Consider positioning your tiers near structures or walls that cast shade, or use trellises and arbors to create dappled shade patterns. This thoughtful design will allow you to grow a diverse range of crops, from leafy greens to delicate herbs, that thrive in shaded conditions.
As you plan your tiered beds, think about the specific needs of each plant variety. Group plants with similar shade requirements together, and consider the mature size of each plant to guarantee adequate spacing.
With careful planning, your rooftop veggie garden can become a lush oasis, teeming with life and color. By embracing the unique challenges of a rooftop garden, you'll create a haven that not only yields fresh produce but also provides a sense of community and connection to nature.
Frequently Asked Questions
Can I Grow Vegetables on a Rooftop With Heavy Shade?
You're wondering if you can grow veggies on a rooftop with heavy shade, like trying to find a needle in a haystack. Yes, you can! Focus on shade-tolerant vegetables and employ rooftop gardening techniques like vertical trellises and reflective mulch to maximize growth.
Do Rooftop Gardens Require Special Permits or Licenses?
You'll need to research local zoning regulations to determine if rooftop permits are required for your garden. Check with your city's planning department to guarantee compliance, as requirements vary by location and rooftop design.
How Do I Prevent Pests From Damaging My Rooftop Garden?
"A billion hungry pests are waiting to devour your rooftop haven! But don't panic! You'll outsmart them by using companion planting to repel pests naturally and organic pesticides as a last resort, safeguarding your lush oasis."
Are Rooftop Gardens More Prone to Soil Erosion?
You'll want to prioritize soil retention and erosion control in your rooftop garden, as the elevated position and exposed conditions make it more susceptible to soil loss, especially during heavy rainfall or strong winds.
Can I Have a Rooftop Garden in an Area With High Winds?
You can definitely have a rooftop garden in an area with high winds by choosing wind-resistant plants and incorporating sturdy rooftop garden structures, like trellises or raised beds, to securely anchor your garden in place.
Related Posts
-
Best Tools for Creating Block Planters at Home
When creating a block planter at home, you'll need a range of essential tools to guarantee a safe and successful proj...
-
Best Tools for Creating Block Planters at Home
When creating a block planter at home, you'll need a range of essential tools to guarantee a safe and successful proj...
-
Best Tools for Creating Block Planters at Home
When creating a block planter at home, you'll need a range of essential tools to guarantee a safe and successful proj...
-
Best Tools for Creating Block Planters at Home
When creating a block planter at home, you'll need a range of essential tools to guarantee a safe and successful proj...
-
Best Tools for Creating Block Planters at Home
When creating a block planter at home, you'll need a range of essential tools to guarantee a safe and successful proj...
-
Best Tools for Creating Block Planters at Home
When creating a block planter at home, you'll need a range of essential tools to guarantee a safe and successful proj...
-
Best Tools for Creating Block Planters at Home
When creating a block planter at home, you'll need a range of essential tools to guarantee a safe and successful proj...
-
Best Tools for Creating Block Planters at Home
When creating a block planter at home, you'll need a range of essential tools to guarantee a safe and successful proj...
-
Best Tools for Creating Block Planters at Home
When creating a block planter at home, you'll need a range of essential tools to guarantee a safe and successful proj...
-
Best Tools for Creating Block Planters at Home
When creating a block planter at home, you'll need a range of essential tools to guarantee a safe and successful proj...
-
Best Tools for Creating Block Planters at Home
When creating a block planter at home, you'll need a range of essential tools to guarantee a safe and successful proj...
-
Best Tools for Creating Block Planters at Home
When creating a block planter at home, you'll need a range of essential tools to guarantee a safe and successful proj...
-
Best Tools for Creating Block Planters at Home
When creating a block planter at home, you'll need a range of essential tools to guarantee a safe and successful proj...
-
Best Tools for Creating Block Planters at Home
When creating a block planter at home, you'll need a range of essential tools to guarantee a safe and successful proj...
-
Best Tools for Creating Block Planters at Home
When creating a block planter at home, you'll need a range of essential tools to guarantee a safe and successful proj...
-
Best Tools for Creating Block Planters at Home
When creating a block planter at home, you'll need a range of essential tools to guarantee a safe and successful proj...
-
Best Tools for Creating Block Planters at Home
When creating a block planter at home, you'll need a range of essential tools to guarantee a safe and successful proj...
-
Best Tools for Creating Block Planters at Home
When creating a block planter at home, you'll need a range of essential tools to guarantee a safe and successful proj...
-
Best Tools for Creating Block Planters at Home
When creating a block planter at home, you'll need a range of essential tools to guarantee a safe and successful proj...
-
Best Tools for Creating Block Planters at Home
When creating a block planter at home, you'll need a range of essential tools to guarantee a safe and successful proj...
-
Best Tools for Creating Block Planters at Home
When creating a block planter at home, you'll need a range of essential tools to guarantee a safe and successful proj...
-
Best Tools for Creating Block Planters at Home
When creating a block planter at home, you'll need a range of essential tools to guarantee a safe and successful proj...
-
Best Tools for Creating Block Planters at Home
When creating a block planter at home, you'll need a range of essential tools to guarantee a safe and successful proj...
-
Best Tools for Creating Block Planters at Home
When creating a block planter at home, you'll need a range of essential tools to guarantee a safe and successful proj...
-
Best Tools for Creating Block Planters at Home
When creating a block planter at home, you'll need a range of essential tools to guarantee a safe and successful proj...
-
Best Tools for Creating Block Planters at Home
When creating a block planter at home, you'll need a range of essential tools to guarantee a safe and successful proj...
-
Best Tools for Creating Block Planters at Home
When creating a block planter at home, you'll need a range of essential tools to guarantee a safe and successful proj...
-
Best Tools for Creating Block Planters at Home
When creating a block planter at home, you'll need a range of essential tools to guarantee a safe and successful proj...
-
Best Tools for Creating Block Planters at Home
When creating a block planter at home, you'll need a range of essential tools to guarantee a safe and successful proj...
-
Best Tools for Creating Block Planters at Home
When creating a block planter at home, you'll need a range of essential tools to guarantee a safe and successful proj...
-
Best Tools for Creating Block Planters at Home
When creating a block planter at home, you'll need a range of essential tools to guarantee a safe and successful proj...
-
Best Tools for Creating Block Planters at Home
When creating a block planter at home, you'll need a range of essential tools to guarantee a safe and successful proj...
-
Best Tools for Creating Block Planters at Home
When creating a block planter at home, you'll need a range of essential tools to guarantee a safe and successful proj...
-
Best Tools for Creating Block Planters at Home
When creating a block planter at home, you'll need a range of essential tools to guarantee a safe and successful proj...
-
Best Tools for Creating Block Planters at Home
When creating a block planter at home, you'll need a range of essential tools to guarantee a safe and successful proj...
-
Preventing Soil Settlement in DIY Planters
To prevent soil settlement in your DIY planters, you'll want to focus on selecting a well-balanced soil mix with good...
-
Preventing Soil Settlement in DIY Planters
To prevent soil settlement in your DIY planters, you'll want to focus on selecting a well-balanced soil mix with good...
-
Preventing Soil Settlement in DIY Planters
To prevent soil settlement in your DIY planters, you'll want to focus on selecting a well-balanced soil mix with good...
-
Preventing Soil Settlement in DIY Planters
To prevent soil settlement in your DIY planters, you'll want to focus on selecting a well-balanced soil mix with good...
-
Preventing Soil Settlement in DIY Planters
To prevent soil settlement in your DIY planters, you'll want to focus on selecting a well-balanced soil mix with good...
-
Preventing Soil Settlement in DIY Planters
To prevent soil settlement in your DIY planters, you'll want to focus on selecting a well-balanced soil mix with good...
-
Preventing Soil Settlement in DIY Planters
To prevent soil settlement in your DIY planters, you'll want to focus on selecting a well-balanced soil mix with good...
-
Preventing Soil Settlement in DIY Planters
To prevent soil settlement in your DIY planters, you'll want to focus on selecting a well-balanced soil mix with good...
-
Preventing Soil Settlement in DIY Planters
To prevent soil settlement in your DIY planters, you'll want to focus on selecting a well-balanced soil mix with good...
-
Preventing Soil Settlement in DIY Planters
To prevent soil settlement in your DIY planters, you'll want to focus on selecting a well-balanced soil mix with good...
-
Preventing Soil Settlement in DIY Planters
To prevent soil settlement in your DIY planters, you'll want to focus on selecting a well-balanced soil mix with good...
-
Preventing Soil Settlement in DIY Planters
To prevent soil settlement in your DIY planters, you'll want to focus on selecting a well-balanced soil mix with good...
-
Preventing Soil Settlement in DIY Planters
To prevent soil settlement in your DIY planters, you'll want to focus on selecting a well-balanced soil mix with good...
-
Preventing Soil Settlement in DIY Planters
To prevent soil settlement in your DIY planters, you'll want to focus on selecting a well-balanced soil mix with good...
-
Preventing Soil Settlement in DIY Planters
To prevent soil settlement in your DIY planters, you'll want to focus on selecting a well-balanced soil mix with good...
-
Preventing Soil Settlement in DIY Planters
To prevent soil settlement in your DIY planters, you'll want to focus on selecting a well-balanced soil mix with good...
-
Preventing Soil Settlement in DIY Planters
To prevent soil settlement in your DIY planters, you'll want to focus on selecting a well-balanced soil mix with good...
-
Preventing Soil Settlement in DIY Planters
To prevent soil settlement in your DIY planters, you'll want to focus on selecting a well-balanced soil mix with good...
-
Preventing Soil Settlement in DIY Planters
To prevent soil settlement in your DIY planters, you'll want to focus on selecting a well-balanced soil mix with good...
-
Preventing Soil Settlement in DIY Planters
To prevent soil settlement in your DIY planters, you'll want to focus on selecting a well-balanced soil mix with good...
-
Preventing Soil Settlement in DIY Planters
To prevent soil settlement in your DIY planters, you'll want to focus on selecting a well-balanced soil mix with good...
-
Preventing Soil Settlement in DIY Planters
To prevent soil settlement in your DIY planters, you'll want to focus on selecting a well-balanced soil mix with good...
-
Preventing Soil Settlement in DIY Planters
To prevent soil settlement in your DIY planters, you'll want to focus on selecting a well-balanced soil mix with good...
-
Preventing Soil Settlement in DIY Planters
To prevent soil settlement in your DIY planters, you'll want to focus on selecting a well-balanced soil mix with good...
-
3 Best Roof Garden Drainage Solutions for Planters
When designing your roof garden, you'll want to implement a planter drainage system that guarantees water flows freel...
-
3 Best Roof Garden Drainage Solutions for Planters
When designing your roof garden, you'll want to implement a planter drainage system that guarantees water flows freel...
-
3 Best Roof Garden Drainage Solutions for Planters
When designing your roof garden, you'll want to implement a planter drainage system that guarantees water flows freel...
-
3 Best Roof Garden Drainage Solutions for Planters
When designing your roof garden, you'll want to implement a planter drainage system that guarantees water flows freel...
-
3 Best Roof Garden Drainage Solutions for Planters
When designing your roof garden, you'll want to implement a planter drainage system that guarantees water flows freel...
-
3 Best Roof Garden Drainage Solutions for Planters
When designing your roof garden, you'll want to implement a planter drainage system that guarantees water flows freel...
-
3 Best Roof Garden Drainage Solutions for Planters
When designing your roof garden, you'll want to implement a planter drainage system that guarantees water flows freel...
-
3 Best Roof Garden Drainage Solutions for Planters
When designing your roof garden, you'll want to implement a planter drainage system that guarantees water flows freel...
-
3 Best Roof Garden Drainage Solutions for Planters
When designing your roof garden, you'll want to implement a planter drainage system that guarantees water flows freel...
-
3 Best Roof Garden Drainage Solutions for Planters
When designing your roof garden, you'll want to implement a planter drainage system that guarantees water flows freel...
-
3 Best Roof Garden Drainage Solutions for Planters
When designing your roof garden, you'll want to implement a planter drainage system that guarantees water flows freel...
-
3 Best Roof Garden Drainage Solutions for Planters
When designing your roof garden, you'll want to implement a planter drainage system that guarantees water flows freel...
-
3 Best Roof Garden Drainage Solutions for Planters
When designing your roof garden, you'll want to implement a planter drainage system that guarantees water flows freel...


