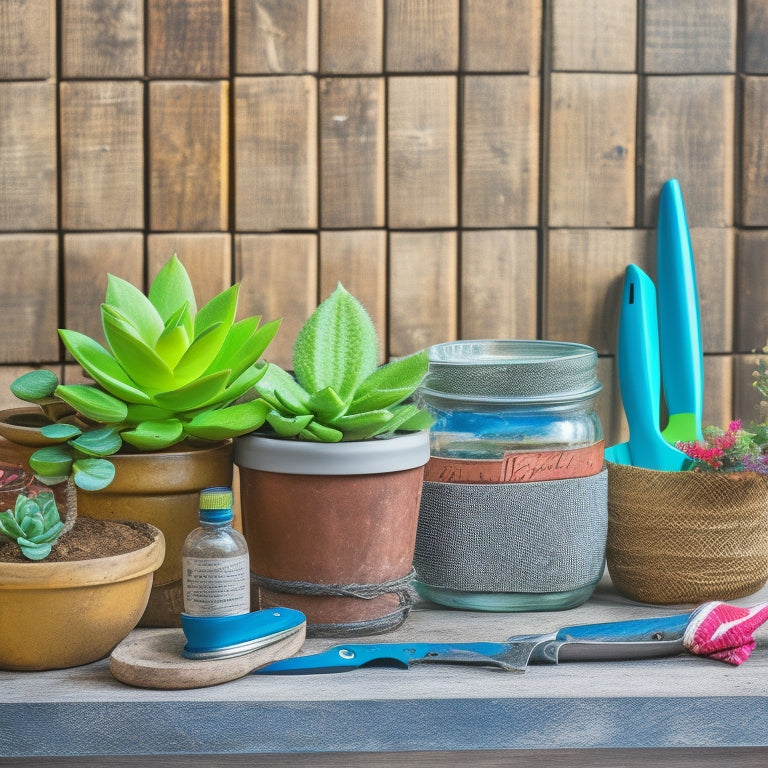
5 Must-Have Tools for DIY Planter Project Success
You'll need a trowel for applying and smoothing mortar, a mixing bucket and stick for preparing it, a level and straightedge for ensuring even planter sides, a pointing trowel and jointer for finishing joints, and practice to master these tool techniques. With these must-haves, you'll be well on your way to creating a sturdy and visually appealing DIY planter. But to avoid common pitfalls, you'll also need to understand how to use them effectively - and that's where the key to a successful project lies.
Key Takeaways
• A high-quality trowel is essential for applying and smoothing mortar to achieve a professional finish.
• A mixing bucket and stick are necessary for preparing mortar with the correct consistency and ratio.
• A level and straightedge ensure the planter's sides are even and straight, guaranteeing structural integrity.
• Protective gear, including gloves, safety goggles, and a face mask, is vital for safeguarding your health and safety.
• A pointing trowel and jointer are necessary for finishing joints and adding a professional touch to the planter.
Essential Masonry Tools for Beginners
To achieve a professional-looking result, you'll need a set of essential masonry tools.
First, you'll need a sturdy trowel, which is used to apply and smooth out mortar. Mastering trowel techniques is vital, as it directly affects the final appearance of your planter. Practice holding the trowel at a 45-degree angle and using a gentle, sweeping motion to spread the mortar evenly.
Next, you'll need a mixing bucket and a mixing stick or trowel to prepare the mortar. Mortar mixing is an art that requires precision, so be certain to follow the manufacturer's instructions and mix the correct ratio of cement, sand, and water.
A level and a straightedge will also come in handy to guarantee your planter's sides are even and straight.
Finally, a pointing trowel and a jointer will help you finish the joints and add a professional touch to your planter.
With these tools and some practice, you'll be well on your way to creating a beautiful, long-lasting masonry planter.
Measuring and Leveling Made Easy
Your planter's success relies heavily on accurate measurements and leveling, so you'll need to equip yourself with the right tools to guarantee a precise and sturdy structure.
A reliable tape measure is a must-have for measuring your planter's dimensions, assuring proper fitment, and avoiding costly mistakes. Invest in a high-quality tape measure with clear, easy-to-read markings and a durable design.
When it comes to leveling, you'll need a range of specialized tools to assure your planter sits perfectly even. A spirit level is essential for determining if your planter is level or plumb. Look for a high-precision level with adjustable vials for accurate readings.
Additionally, consider investing in a laser level, which projects a level line or dot onto your work surface, making it easier to achieve precise alignment. Other leveling tools, such as a torpedo level and a leveling app, can also come in handy.
Safety First: Protective Gear Essentials
Before you begin building your planter, make sure you're equipped with the necessary protective gear to safeguard yourself from potential hazards, including sharp edges, heavy materials, and power tool mishaps. You don't want to risk injuring yourself and compromising the success of your project.
First and foremost, invest in a good pair of protective gloves. These will provide a barrier between your skin and any sharp edges or rough surfaces you may encounter. Look for gloves that offer grip, dexterity, and puncture resistance. They should also be comfortable to wear for extended periods.
Next, don't forget to wear safety goggles to protect your eyes from debris and flying particles. You can opt for goggles with anti-fog coating for clear visibility, even in humid conditions.
Additionally, consider a face mask or respirator to prevent inhaling dust and other airborne particles.
Mixing and Pouring Concrete Accurately
To achieve a strong and durable planter, accurately mixing and pouring concrete is essential, as it directly affects the structure's integrity and longevity.
You'll need to get the concrete consistency just right, as a mix that's too runny won't hold its shape, while one that's too thick won't pour smoothly. To attain the perfect consistency, use a mixing technique called the 'slump test.' This involves creating a small pile of mixed concrete and then using a trowel to create a small indentation in the center. If the concrete slumps slightly but still holds its shape, it's ready to pour.
When pouring, make sure to do so slowly and evenly, working your way from the bottom up. This will help prevent air pockets from forming, which can weaken the structure. Use a level to guarantee the concrete is pouring evenly and a trowel to vibrate the mixture, removing any air bubbles that may form.
Finishing Touches With Power Tools
Finishing Touches With Power Tools
With the concrete poured and set, you'll move on to the finishing touches, employing power tools to refine the planter's edges, smooth its surfaces, and add any desired textures or patterns. This stage requires careful power tool selection to achieve the desired outcome. Consider the task at hand and choose the right tool for the job, whether it's a grinder for rough edges, a sander for smooth surfaces, or a rotary tool for intricate patterns.
| Power Tool | Application |
|---|---|
| Grinder | Refine rough edges, remove excess concrete |
| Sander | Smooth surfaces, remove imperfections |
| Rotary Tool | Add textures, patterns, or engravings |
Proper tool maintenance is also essential to guarantee peak performance and extend the tool's lifespan. Regularly clean and lubricate your power tools, and store them in a dry, secure location. Additionally, always follow the manufacturer's instructions and safety guidelines when operating power tools. By selecting the right tool for the job and maintaining it properly, you'll achieve professional-looking results and take your DIY planter project to the next level.
Frequently Asked Questions
Can I Use a Regular Drill for Mixing Concrete?
When it comes to mixing concrete, you shouldn't use a regular drill. It's not designed for the task and can even be dangerous.
Instead, you'll need a drill specifically designed for mixing, like a hammer drill or a mixing drill, which can handle the thick, heavy mixture.
Additionally, you'll want to employ proper mixing techniques, such as using a slow, controlled pace and avoiding overmixing, to guarantee a strong, consistent concrete.
How Do I Prevent Planter Cracks in Freezing Weather?
When winter approaches, you'll want to make certain your planter can withstand freezing temperatures.
To prevent cracks, you'll need to provide adequate planter insulation. Start by wrapping your planter with a breathable material like burlap or landscape fabric.
Next, apply a thick layer of winter protection using a waterproof sealant or a concrete sealer. This will help prevent water from seeping in and expanding as it freezes, causing cracks.
Are There Any Eco-Friendly Concrete Alternatives Available?
When searching for eco-friendly concrete alternatives, you'll find sustainable materials that cater to your needs.
Consider using recycled aggregates, like reclaimed asphalt pavement or recycled concrete aggregate, which reduce waste and conserve natural resources.
You can also opt for geopolymer concrete, made from industrial by-products, or hempcrete, a composite of hemp fibers and lime.
These alternatives offer a lower carbon footprint and are perfect for your DIY planter project.
Can I Add Color or Texture to My Planter Concrete?
As you dip your hands into the concrete mix, envision a kaleidoscope of hues and a tactile tapestry of textures unfolding before your eyes.
You can add color to your planter concrete by incorporating color additives like oxides, carbonates, or silica-based pigments.
To introduce texture, try techniques like stamping, stenciling, or even embedding materials like pebbles, glass, or fibers.
With these creative liberties, you're in control, crafting a one-of-a-kind masterpiece that's as unique as your vision.
How Long Does It Take for Concrete to Fully Cure Outdoors?
When you're working with concrete outdoors, you'll want to factor in the curing process, which can take anywhere from 24 hours to 28 days, depending on the weather impact.
High temperatures and humidity can speed up the process, while cooler temps and dry air can slow it down.
Keep an eye on the forecast and adjust your timeline accordingly, as you'll want to guarantee your concrete reaches its full strength before putting your planter to use.
Conclusion
With your DIY planter project now in full bloom, you've successfully cultivated a masterpiece.
Your hands, once uncertain, now hold the reins of creativity.
The concrete has set, the plants are thriving, and your outdoor space is transformed.
Stand back and admire your handiwork, for you've sculpted a work of art that's both functional and beautiful.
Your sweat equity has paid off, and your DIY planter project is now a demonstration of your ingenuity and perseverance.
Related Posts
-
Optimal Soil Ph for Planter Boxes Made Easy
You need to optimize your planter box's soil pH to create a thriving environment for your plants, as the ideal pH ran...
-
Optimal Soil Ph for Planter Boxes Made Easy
You need to optimize your planter box's soil pH to create a thriving environment for your plants, as the ideal pH ran...
-
Optimal Soil Ph for Planter Boxes Made Easy
You need to optimize your planter box's soil pH to create a thriving environment for your plants, as the ideal pH ran...
-
Optimal Soil Ph for Planter Boxes Made Easy
You need to optimize your planter box's soil pH to create a thriving environment for your plants, as the ideal pH ran...
-
Optimal Soil Ph for Planter Boxes Made Easy
You need to optimize your planter box's soil pH to create a thriving environment for your plants, as the ideal pH ran...
-
Optimal Soil Ph for Planter Boxes Made Easy
You need to optimize your planter box's soil pH to create a thriving environment for your plants, as the ideal pH ran...
-
Optimal Soil Ph for Planter Boxes Made Easy
You need to optimize your planter box's soil pH to create a thriving environment for your plants, as the ideal pH ran...
-
Optimal Soil Ph for Planter Boxes Made Easy
You need to optimize your planter box's soil pH to create a thriving environment for your plants, as the ideal pH ran...
-
Optimal Soil Ph for Planter Boxes Made Easy
You need to optimize your planter box's soil pH to create a thriving environment for your plants, as the ideal pH ran...
-
Optimal Soil Ph for Planter Boxes Made Easy
You need to optimize your planter box's soil pH to create a thriving environment for your plants, as the ideal pH ran...
-
Optimal Soil Ph for Planter Boxes Made Easy
You need to optimize your planter box's soil pH to create a thriving environment for your plants, as the ideal pH ran...
-
Optimal Soil Ph for Planter Boxes Made Easy
You need to optimize your planter box's soil pH to create a thriving environment for your plants, as the ideal pH ran...
-
Optimal Soil Ph for Planter Boxes Made Easy
You need to optimize your planter box's soil pH to create a thriving environment for your plants, as the ideal pH ran...
-
Optimal Soil Ph for Planter Boxes Made Easy
You need to optimize your planter box's soil pH to create a thriving environment for your plants, as the ideal pH ran...
-
Optimal Soil Ph for Planter Boxes Made Easy
You need to optimize your planter box's soil pH to create a thriving environment for your plants, as the ideal pH ran...
-
Optimal Soil Ph for Planter Boxes Made Easy
You need to optimize your planter box's soil pH to create a thriving environment for your plants, as the ideal pH ran...
-
Optimal Soil Ph for Planter Boxes Made Easy
You need to optimize your planter box's soil pH to create a thriving environment for your plants, as the ideal pH ran...
-
Optimal Soil Ph for Planter Boxes Made Easy
You need to optimize your planter box's soil pH to create a thriving environment for your plants, as the ideal pH ran...
-
Optimal Soil Ph for Planter Boxes Made Easy
You need to optimize your planter box's soil pH to create a thriving environment for your plants, as the ideal pH ran...
-
Optimal Soil Ph for Planter Boxes Made Easy
You need to optimize your planter box's soil pH to create a thriving environment for your plants, as the ideal pH ran...
-
Optimal Soil Ph for Planter Boxes Made Easy
You need to optimize your planter box's soil pH to create a thriving environment for your plants, as the ideal pH ran...
-
Optimal Soil Ph for Planter Boxes Made Easy
You need to optimize your planter box's soil pH to create a thriving environment for your plants, as the ideal pH ran...
-
Optimal Soil Ph for Planter Boxes Made Easy
You need to optimize your planter box's soil pH to create a thriving environment for your plants, as the ideal pH ran...
-
Optimal Soil Ph for Planter Boxes Made Easy
You need to optimize your planter box's soil pH to create a thriving environment for your plants, as the ideal pH ran...
-
Optimal Soil Ph for Planter Boxes Made Easy
You need to optimize your planter box's soil pH to create a thriving environment for your plants, as the ideal pH ran...
-
Optimal Soil Ph for Planter Boxes Made Easy
You need to optimize your planter box's soil pH to create a thriving environment for your plants, as the ideal pH ran...
-
3 Best Space-Saving Gardening Ideas for Urban Renters
You can turn even the smallest urban space into a lush oasis by utilizing clever space-saving gardening ideas. Maximi...
-
3 Best Space-Saving Gardening Ideas for Urban Renters
You can turn even the smallest urban space into a lush oasis by utilizing clever space-saving gardening ideas. Maximi...
-
3 Best Space-Saving Gardening Ideas for Urban Renters
You can turn even the smallest urban space into a lush oasis by utilizing clever space-saving gardening ideas. Maximi...
-
3 Best Space-Saving Gardening Ideas for Urban Renters
You can turn even the smallest urban space into a lush oasis by utilizing clever space-saving gardening ideas. Maximi...
-
3 Best Space-Saving Gardening Ideas for Urban Renters
You can turn even the smallest urban space into a lush oasis by utilizing clever space-saving gardening ideas. Maximi...
-
3 Best Space-Saving Gardening Ideas for Urban Renters
You can turn even the smallest urban space into a lush oasis by utilizing clever space-saving gardening ideas. Maximi...
-
3 Best Space-Saving Gardening Ideas for Urban Renters
You can turn even the smallest urban space into a lush oasis by utilizing clever space-saving gardening ideas. Maximi...
-
3 Best Space-Saving Gardening Ideas for Urban Renters
You can turn even the smallest urban space into a lush oasis by utilizing clever space-saving gardening ideas. Maximi...
-
3 Best Space-Saving Gardening Ideas for Urban Renters
You can turn even the smallest urban space into a lush oasis by utilizing clever space-saving gardening ideas. Maximi...
-
3 Best Space-Saving Gardening Ideas for Urban Renters
You can turn even the smallest urban space into a lush oasis by utilizing clever space-saving gardening ideas. Maximi...
-
3 Best Space-Saving Gardening Ideas for Urban Renters
You can turn even the smallest urban space into a lush oasis by utilizing clever space-saving gardening ideas. Maximi...
-
3 Best Space-Saving Gardening Ideas for Urban Renters
You can turn even the smallest urban space into a lush oasis by utilizing clever space-saving gardening ideas. Maximi...
-
3 Best Space-Saving Gardening Ideas for Urban Renters
You can turn even the smallest urban space into a lush oasis by utilizing clever space-saving gardening ideas. Maximi...
-
3 Best Space-Saving Gardening Ideas for Urban Renters
You can turn even the smallest urban space into a lush oasis by utilizing clever space-saving gardening ideas. Maximi...
-

What to Know Before Upcycling Concrete Planters
When upcycling concrete planters, you'll want to start by evaluating the planter's size, shape, and condition to guar...
-
What to Know Before Upcycling Concrete Planters
When upcycling concrete planters, you'll want to start by evaluating the planter's size, shape, and condition to guar...
-
What to Know Before Upcycling Concrete Planters
When upcycling concrete planters, you'll want to start by evaluating the planter's size, shape, and condition to guar...
-
What to Know Before Upcycling Concrete Planters
When upcycling concrete planters, you'll want to start by evaluating the planter's size, shape, and condition to guar...
-
What to Know Before Upcycling Concrete Planters
When upcycling concrete planters, you'll want to start by evaluating the planter's size, shape, and condition to guar...
-
What to Know Before Upcycling Concrete Planters
When upcycling concrete planters, you'll want to start by evaluating the planter's size, shape, and condition to guar...
-
What to Know Before Upcycling Concrete Planters
When upcycling concrete planters, you'll want to start by evaluating the planter's size, shape, and condition to guar...
-
What to Know Before Upcycling Concrete Planters
When upcycling concrete planters, you'll want to start by evaluating the planter's size, shape, and condition to guar...
-
What to Know Before Upcycling Concrete Planters
When upcycling concrete planters, you'll want to start by evaluating the planter's size, shape, and condition to guar...
-
What to Know Before Upcycling Concrete Planters
When upcycling concrete planters, you'll want to start by evaluating the planter's size, shape, and condition to guar...
-
What to Know Before Upcycling Concrete Planters
When upcycling concrete planters, you'll want to start by evaluating the planter's size, shape, and condition to guar...
-
What to Know Before Upcycling Concrete Planters
When upcycling concrete planters, you'll want to start by evaluating the planter's size, shape, and condition to guar...
-
What to Know Before Upcycling Concrete Planters
When upcycling concrete planters, you'll want to start by evaluating the planter's size, shape, and condition to guar...
-
What to Know Before Upcycling Concrete Planters
When upcycling concrete planters, you'll want to start by evaluating the planter's size, shape, and condition to guar...
-
What to Know Before Upcycling Concrete Planters
When upcycling concrete planters, you'll want to start by evaluating the planter's size, shape, and condition to guar...
-
What to Know Before Upcycling Concrete Planters
When upcycling concrete planters, you'll want to start by evaluating the planter's size, shape, and condition to guar...
-
What to Know Before Upcycling Concrete Planters
When upcycling concrete planters, you'll want to start by evaluating the planter's size, shape, and condition to guar...
-
What to Know Before Upcycling Concrete Planters
When upcycling concrete planters, you'll want to start by evaluating the planter's size, shape, and condition to guar...
-
What to Know Before Upcycling Concrete Planters
When upcycling concrete planters, you'll want to start by evaluating the planter's size, shape, and condition to guar...
-
What to Know Before Upcycling Concrete Planters
When upcycling concrete planters, you'll want to start by evaluating the planter's size, shape, and condition to guar...
-
What to Know Before Upcycling Concrete Planters
When upcycling concrete planters, you'll want to start by evaluating the planter's size, shape, and condition to guar...
-
What to Know Before Upcycling Concrete Planters
When upcycling concrete planters, you'll want to start by evaluating the planter's size, shape, and condition to guar...
-
What to Know Before Upcycling Concrete Planters
When upcycling concrete planters, you'll want to start by evaluating the planter's size, shape, and condition to guar...


