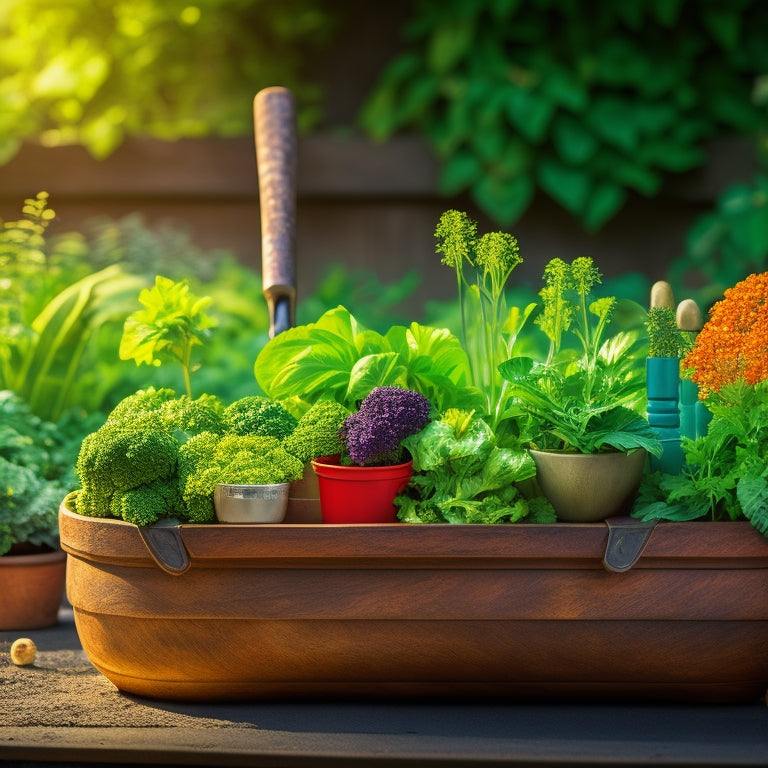
5 Essential Tips for DIY Herb and Veggie Planters
You'll want to select cinder blocks with a smooth surface to prevent water seepage, ensuring they can support the weight of soil, plants, and water. Avoid blocks with cracks or chips, and choose a location with at least 6 hours of direct sunlight, good air circulation, and slight inclines for drainage. Before planting, clean and drill drainage holes in the blocks, adding landscape fabric or mesh for improved drainage. Use well-draining soil and compact seed varieties, developing a watering schedule based on soil type and climate. By following these essential tips, you'll be well on your way to creating thriving herb and veggie planters, and with a few more details, you'll be enjoying a bountiful harvest in no time.
Key Takeaways
• Select smooth, even-surfaced cinder blocks that can support the weight of soil, plants, and water to ensure structural integrity.
• Choose a location with 6+ hours of direct sunlight, good air circulation, and slight inclines for drainage to promote healthy plant growth.
• Prepare cinder blocks for planting by cleaning, drilling drainage holes, and applying waterproof sealant to prevent waterlogging and moisture buildup.
• Use well-draining soil, compact seed varieties, and develop a watering schedule based on soil type, climate, and season to ensure successful container gardening.
• Customize planters with paint, mosaic tiles, decoupage, or concrete stamping to add a personal touch and protect against weather elements.
Choose the Right Cinder Blocks
Select cinder blocks with a smooth, even surface to secure your planter's structural integrity and prevent water from seeping into the blocks. This is vital because rough surfaces can lead to block drainage issues, causing water to collect and compromise the planter's stability.
You'll want to confirm the blocks can support the weight of the soil, plants, and water, so look for ones with a solid weight distribution. Avoid blocks with cracks or chips, as these can further compromise the planter's structure.
When selecting cinder blocks, consider the size and shape you need for your planter. Standard blocks typically measure 8x8x16 inches, but you may need larger or smaller ones depending on your design.
Make sure to choose blocks that fit snugly together to prevent gaps and confirm proper weight distribution. By selecting the right cinder blocks, you'll be able to build a sturdy and functional planter that will support your herbs and veggies for years to come.
Selecting the Perfect Location
Your herb and veggie planter's success hinges on its placement, so consider the sun's trajectory and intensity when deciding where to situate your DIY masterpiece.
Most herbs and veggies require at least six hours of direct sunlight exposure daily, but some may need more or less. Make certain to research the specific sunlight requirements for the plants you're growing.
When selecting a location, also consider drainage considerations. Avoid placing your planter in low-lying areas where water may collect, as this can lead to root rot and other problems.
Instead, opt for a spot with good air circulation and a slight incline to guarantee excess water drains away from the roots.
Additionally, take note of any overhead structures or nearby plants that may cast shade or compete with your planter for resources.
Preparing Cinder Blocks for Planting
You'll typically need to clean and prepare your cinder blocks before using them as planters to guarantee a healthy start for your herbs and veggies.
Start by giving them a good scrub with soap and water to remove any dirt, debris, or residue. This will assure a clean surface for your plants to grow. Once clean, let the blocks dry completely to prevent moisture buildup.
Next, drill drainage holes in the bottom of each block to prevent waterlogged soil. You can also add a layer of landscape fabric or mesh to the bottom of each block to further improve drainage.
For added protection, apply a coat of waterproof sealant to the inside and outside of the blocks. This will help prevent erosion and extend the life of your planters.
With these steps, you'll have well-prepared cinder blocks ready for planting. Remember, proper cinder block preparation and drainage solutions are key to a thriving herb and veggie garden.
Planting and Care Essentials
Five essential factors - soil quality, seed selection, watering schedules, sunlight exposure, and fertilization routines - must be carefully considered when planting and caring for your herbs and veggies in cinder block planters.
You'll want to choose a well-draining soil type that's specifically formulated for containers, as it will help prevent waterlogged soil and root rot.
When selecting seeds, opt for varieties that are compact or dwarf, which are better suited for container growth.
Develop a watering schedule that takes into account the soil type, climate, and time of year. Overwatering is a common mistake, so start with a conservative approach and adjust as needed.
Most herbs and veggies require at least six hours of direct sunlight per day, so position your planters accordingly.
Creative Planter Customization
Its rugged, industrial look makes cinder block a versatile canvas for creative planter customization. You can transform it into a vibrant and eye-catching planter that reflects your personal style. One way to do this is by adding a pop of color with paint. Choose a colorful paint that complements the surroundings and adds a touch of personality to your planter.
Here are some creative customization ideas to get you started:
| Customization Idea | Materials Needed | Difficulty Level |
|---|---|---|
| Painted Patterns | Colorful paint, paintbrushes | Easy |
| Mosaic Tiles | Mosaic tiles, adhesive, grout | Medium |
| Decoupage | Printed images, decoupage glue, varnish | Easy |
| Concrete Stamping | Concrete stamps, ink pads, sealant | Medium |
You can also add unique patterns using stencils or stamps to give your planter a personalized touch. Remember to seal your planter with a waterproof coating to protect it from the elements. With a little creativity, you can turn a plain cinder block into a stunning planter that showcases your herbs and veggies.
Frequently Asked Questions
Can I Use Old or Broken Cinder Blocks for My Planter?
You're considering repurposing old or broken cinder blocks for your planter, but will they hold up?
Cinder blocks are known for their durability, but broken ones mightn't be the best choice. You'll want to inspect them carefully for cracks and damage that could affect their structural integrity.
If they're still sturdy, you can get creative with your planter design, using them as a unique base or incorporating them into a mosaic pattern.
Just be sure to clean and prepare them properly before adding your herbs or veggies.
How Often Should I Water My Herb and Veggie Plants?
As you step out into your backyard, the morning dew glistening on your DIY planter, you wonder: how often should I water my herb and veggie plants?
The answer lies in the soil moisture. Check it daily by sticking your finger into the soil up to the knuckle. If it feels dry, it's time to water.
Aim for a consistent watering frequency of every 2-3 days, adjusting according to weather conditions. This precise control will guarantee your plants thrive.
Will Pests Be a Problem in My DIY Planter?
You'll likely encounter pests in your DIY planter, but don't worry, you're in control.
To maintain a pest-free zone, implement organic solutions like neem oil, diatomaceous earth, or insecticidal soap.
For proactive pest control, inspect your plants regularly, and isolate infested plants to prevent the problem from spreading.
Stay vigilant, and you'll be enjoying a thriving, pest-free harvest in no time.
Can I Move My Planter to a Different Location Later?
The freedom to rearrange your outdoor space!
You're probably wondering, can I move my planter to a different location later? Absolutely! You have the flexibility to relocate your planter to optimize sunlight exposure.
Just be mindful of your plants' specific needs and adjust accordingly.
When you're ready for planter relocation, gently lift and transport it to its new home, taking care not to disrupt the soil or roots.
How Long Will My DIY Planter Last Before It Needs Replacement?
You're wondering how long your DIY planter will last before it needs replacement. The answer depends on the planter materials you've chosen and the environmental factors it's exposed to.
If you've used durable materials like recycled plastic or ceramic, your planter can last for 5-7 years with proper care.
However, if you've opted for wood or fabric, its lifespan will be shorter, around 2-3 years.
Harsh weather conditions, like intense sunlight or heavy rainfall, can also reduce its lifespan.
Conclusion
You've made it! Congratulations on surviving the DIY herb and veggie planter gauntlet.
Pat yourself on the back, take a selfie with your thriving plants, and bask in the envy of your Instagram followers.
But let's get real, you're probably already planning your next DIY project to compensate for the hours you'll spend watering and pruning.
Just remember, cinder blocks don't forgive, and neither will your neighbors when they see your questionable landscaping choices.
Happy planting!
Related Posts
-
How Much Do Concrete Planters Weigh
When creating a concrete planter, you'll need to take into account the weight implications of your design. The type a...
-
How Much Do Concrete Planters Weigh
When creating a concrete planter, you'll need to take into account the weight implications of your design. The type a...
-
How Much Do Concrete Planters Weigh
When creating a concrete planter, you'll need to take into account the weight implications of your design. The type a...
-
How Much Do Concrete Planters Weigh
When creating a concrete planter, you'll need to take into account the weight implications of your design. The type a...
-
How Much Do Concrete Planters Weigh
When creating a concrete planter, you'll need to take into account the weight implications of your design. The type a...
-
How Much Do Concrete Planters Weigh
When creating a concrete planter, you'll need to take into account the weight implications of your design. The type a...
-
How Much Do Concrete Planters Weigh
When creating a concrete planter, you'll need to take into account the weight implications of your design. The type a...
-
How Much Do Concrete Planters Weigh
When creating a concrete planter, you'll need to take into account the weight implications of your design. The type a...
-
How Much Do Concrete Planters Weigh
When creating a concrete planter, you'll need to take into account the weight implications of your design. The type a...
-
How Much Do Concrete Planters Weigh
When creating a concrete planter, you'll need to take into account the weight implications of your design. The type a...
-
How Much Do Concrete Planters Weigh
When creating a concrete planter, you'll need to take into account the weight implications of your design. The type a...
-
How Much Do Concrete Planters Weigh
When creating a concrete planter, you'll need to take into account the weight implications of your design. The type a...
-
How Much Do Concrete Planters Weigh
When creating a concrete planter, you'll need to take into account the weight implications of your design. The type a...
-
How Much Do Concrete Planters Weigh
When creating a concrete planter, you'll need to take into account the weight implications of your design. The type a...
-
How Much Do Concrete Planters Weigh
When creating a concrete planter, you'll need to take into account the weight implications of your design. The type a...
-
How Much Do Concrete Planters Weigh
When creating a concrete planter, you'll need to take into account the weight implications of your design. The type a...
-
How Much Do Concrete Planters Weigh
When creating a concrete planter, you'll need to take into account the weight implications of your design. The type a...
-
How Much Do Concrete Planters Weigh
When creating a concrete planter, you'll need to take into account the weight implications of your design. The type a...
-
How Much Do Concrete Planters Weigh
When creating a concrete planter, you'll need to take into account the weight implications of your design. The type a...
-
How Much Do Concrete Planters Weigh
When creating a concrete planter, you'll need to take into account the weight implications of your design. The type a...
-
How Much Do Concrete Planters Weigh
When creating a concrete planter, you'll need to take into account the weight implications of your design. The type a...
-
How Much Do Concrete Planters Weigh
When creating a concrete planter, you'll need to take into account the weight implications of your design. The type a...
-
How Much Do Concrete Planters Weigh
When creating a concrete planter, you'll need to take into account the weight implications of your design. The type a...
-
How Much Do Concrete Planters Weigh
When creating a concrete planter, you'll need to take into account the weight implications of your design. The type a...
-
How Much Do Concrete Planters Weigh
When creating a concrete planter, you'll need to take into account the weight implications of your design. The type a...
-
How Much Do Concrete Planters Weigh
When creating a concrete planter, you'll need to take into account the weight implications of your design. The type a...
-
How Much Do Concrete Planters Weigh
When creating a concrete planter, you'll need to take into account the weight implications of your design. The type a...
-
How Much Do Concrete Planters Weigh
When creating a concrete planter, you'll need to take into account the weight implications of your design. The type a...
-
How Much Do Concrete Planters Weigh
When creating a concrete planter, you'll need to take into account the weight implications of your design. The type a...
-
Why Urban Gardens Need Better Planter Drainage Systems
When you neglect to install a well-designed drainage system in your urban garden, you're fundamentally sentencing you...
-
Why Urban Gardens Need Better Planter Drainage Systems
When you neglect to install a well-designed drainage system in your urban garden, you're fundamentally sentencing you...
-
Why Urban Gardens Need Better Planter Drainage Systems
When you neglect to install a well-designed drainage system in your urban garden, you're fundamentally sentencing you...
-
Why Urban Gardens Need Better Planter Drainage Systems
When you neglect to install a well-designed drainage system in your urban garden, you're fundamentally sentencing you...
-
Why Urban Gardens Need Better Planter Drainage Systems
When you neglect to install a well-designed drainage system in your urban garden, you're fundamentally sentencing you...
-
Why Urban Gardens Need Better Planter Drainage Systems
When you neglect to install a well-designed drainage system in your urban garden, you're fundamentally sentencing you...
-
Why Urban Gardens Need Better Planter Drainage Systems
When you neglect to install a well-designed drainage system in your urban garden, you're fundamentally sentencing you...
-
Why Urban Gardens Need Better Planter Drainage Systems
When you neglect to install a well-designed drainage system in your urban garden, you're fundamentally sentencing you...
-
Why Urban Gardens Need Better Planter Drainage Systems
When you neglect to install a well-designed drainage system in your urban garden, you're fundamentally sentencing you...
-
Why Urban Gardens Need Better Planter Drainage Systems
When you neglect to install a well-designed drainage system in your urban garden, you're fundamentally sentencing you...
-
Why Urban Gardens Need Better Planter Drainage Systems
When you neglect to install a well-designed drainage system in your urban garden, you're fundamentally sentencing you...
-
Why Urban Gardens Need Better Planter Drainage Systems
When you neglect to install a well-designed drainage system in your urban garden, you're fundamentally sentencing you...
-
Why Urban Gardens Need Better Planter Drainage Systems
When you neglect to install a well-designed drainage system in your urban garden, you're fundamentally sentencing you...
-
Why Urban Gardens Need Better Planter Drainage Systems
When you neglect to install a well-designed drainage system in your urban garden, you're fundamentally sentencing you...
-
Why Urban Gardens Need Better Planter Drainage Systems
When you neglect to install a well-designed drainage system in your urban garden, you're fundamentally sentencing you...
-
Why Urban Gardens Need Better Planter Drainage Systems
When you neglect to install a well-designed drainage system in your urban garden, you're fundamentally sentencing you...
-
Why Urban Gardens Need Better Planter Drainage Systems
When you neglect to install a well-designed drainage system in your urban garden, you're fundamentally sentencing you...
-
Why Urban Gardens Need Better Planter Drainage Systems
When you neglect to install a well-designed drainage system in your urban garden, you're fundamentally sentencing you...
-
Why Urban Gardens Need Better Planter Drainage Systems
When you neglect to install a well-designed drainage system in your urban garden, you're fundamentally sentencing you...
-
Why Urban Gardens Need Better Planter Drainage Systems
When you neglect to install a well-designed drainage system in your urban garden, you're fundamentally sentencing you...
-
Why Urban Gardens Need Better Planter Drainage Systems
When you neglect to install a well-designed drainage system in your urban garden, you're fundamentally sentencing you...
-
Why Urban Gardens Need Better Planter Drainage Systems
When you neglect to install a well-designed drainage system in your urban garden, you're fundamentally sentencing you...
-
Why Urban Gardens Need Better Planter Drainage Systems
When you neglect to install a well-designed drainage system in your urban garden, you're fundamentally sentencing you...
-
Why Urban Gardens Need Better Planter Drainage Systems
When you neglect to install a well-designed drainage system in your urban garden, you're fundamentally sentencing you...
-
Why Urban Gardens Need Better Planter Drainage Systems
When you neglect to install a well-designed drainage system in your urban garden, you're fundamentally sentencing you...
-
Why Urban Gardens Need Better Planter Drainage Systems
When you neglect to install a well-designed drainage system in your urban garden, you're fundamentally sentencing you...
-
Why Urban Gardens Need Better Planter Drainage Systems
When you neglect to install a well-designed drainage system in your urban garden, you're fundamentally sentencing you...
-
Why Urban Gardens Need Better Planter Drainage Systems
When you neglect to install a well-designed drainage system in your urban garden, you're fundamentally sentencing you...
-
Succulent-Friendly Drainage Solutions for Block Planters
You can create a succulent-friendly drainage system in your cinder block planters by drilling holes in the bottom of ...
-
Succulent-Friendly Drainage Solutions for Block Planters
You can create a succulent-friendly drainage system in your cinder block planters by drilling holes in the bottom of ...
-
Succulent-Friendly Drainage Solutions for Block Planters
You can create a succulent-friendly drainage system in your cinder block planters by drilling holes in the bottom of ...
-
Succulent-Friendly Drainage Solutions for Block Planters
You can create a succulent-friendly drainage system in your cinder block planters by drilling holes in the bottom of ...
-
Succulent-Friendly Drainage Solutions for Block Planters
You can create a succulent-friendly drainage system in your cinder block planters by drilling holes in the bottom of ...
-
Succulent-Friendly Drainage Solutions for Block Planters
You can create a succulent-friendly drainage system in your cinder block planters by drilling holes in the bottom of ...
-
Succulent-Friendly Drainage Solutions for Block Planters
You can create a succulent-friendly drainage system in your cinder block planters by drilling holes in the bottom of ...
-
Succulent-Friendly Drainage Solutions for Block Planters
You can create a succulent-friendly drainage system in your cinder block planters by drilling holes in the bottom of ...
-
Succulent-Friendly Drainage Solutions for Block Planters
You can create a succulent-friendly drainage system in your cinder block planters by drilling holes in the bottom of ...
-
Succulent-Friendly Drainage Solutions for Block Planters
You can create a succulent-friendly drainage system in your cinder block planters by drilling holes in the bottom of ...
-
Succulent-Friendly Drainage Solutions for Block Planters
You can create a succulent-friendly drainage system in your cinder block planters by drilling holes in the bottom of ...
-
Succulent-Friendly Drainage Solutions for Block Planters
You can create a succulent-friendly drainage system in your cinder block planters by drilling holes in the bottom of ...
-
Succulent-Friendly Drainage Solutions for Block Planters
You can create a succulent-friendly drainage system in your cinder block planters by drilling holes in the bottom of ...
-
Succulent-Friendly Drainage Solutions for Block Planters
You can create a succulent-friendly drainage system in your cinder block planters by drilling holes in the bottom of ...
-
Succulent-Friendly Drainage Solutions for Block Planters
You can create a succulent-friendly drainage system in your cinder block planters by drilling holes in the bottom of ...


