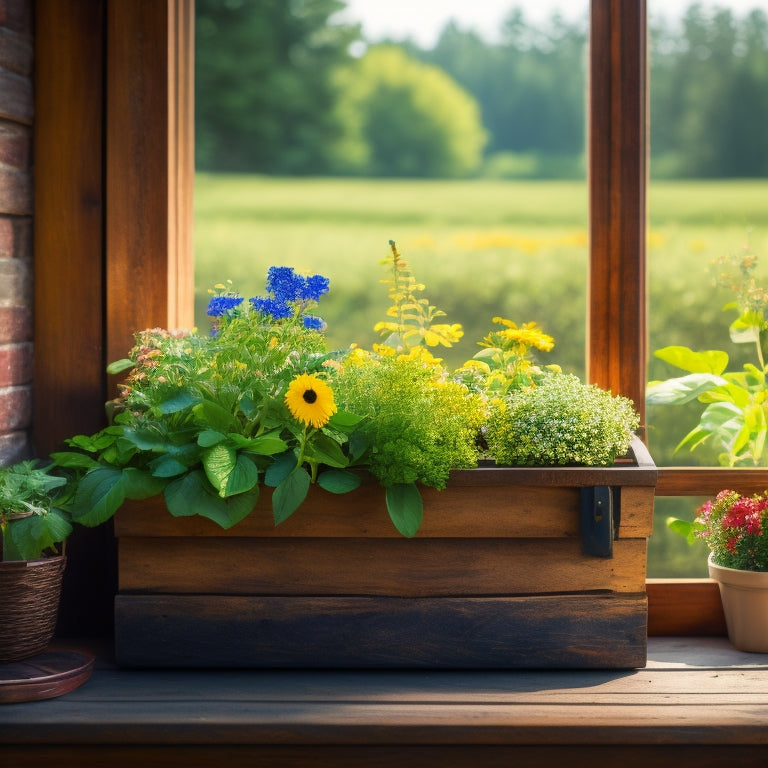
10 Essential Tips for DIY Window Planter Boxes
As you begin your DIY window planter box project, choose durable materials like cinder blocks or pressure-treated lumber, considering aesthetics and uniformity. Prepare the site by selecting a spot with adequate sunlight, clearing vegetation, and leveling the ground. Construct a sturdy base layer with a rectangular frame and secure blocks together using screws. Decide on a block pattern, such as running bond or herringbone, to add visual interest. Don't forget to drill drainage holes and add organic matter to the soil for best plant growth. By following these essential tips, you'll be well on your way to creating a beautiful and thriving planter box that will elevate your home's exterior - and with a solid foundation, the possibilities are endless.
Key Takeaways
• Select durable materials like concrete or fly ash cinder blocks and pressure-treated lumber or rot-resistant woods for outdoor use.
• Ensure proper drainage by drilling holes and adding water-absorbing materials like perlite or vermiculite to prevent waterlogged soil.
• Construct a rectangular frame with corner posts for even weight distribution and secure blocks together using 2.5' wood screws.
• Choose disease-resistant plant varieties and ensure sufficient space between plants for growth and air circulation, and inspect daily for signs of stress.
• Apply a moisture barrier and design with adequate drainage holes to protect materials from water damage and prevent root rot.
Choose the Right Cinder Blocks
Select cinder blocks that are specifically designed for outdoor use, as they can withstand harsh weather conditions and support the weight of the soil and plants.
You'll want to choose blocks made from durable materials like concrete, fly ash, or a mix of both. These materials will provide the necessary strength and stability for your planter box.
Consider the block design aesthetics, too. Do you prefer a smooth, sleek look or a more rustic, textured appearance? You can opt for blocks with a split face, which exposes the aggregate material, or those with a honed finish, which provides a more refined look.
Additionally, think about the block's color and how it will complement your window's exterior. Some popular colors include gray, beige, and red.
Be certain to select blocks that are the same size and shape to guarantee a uniform look.
Prepare the Site and Soil
With your cinder blocks chosen, you're ready to prepare the site where your planter box will sit, ensuring a level and stable foundation that will support the weight of the soil and plants.
Start by selecting a site that receives the right amount of sunlight for your plants and is close to a water source. Avoid areas with standing water or where water tends to collect, as this can lead to waterlogged soil and root rot.
Next, assess the soil type in your chosen site. Is it clay, sandy, or a mix? Each soil type has its own unique characteristics that will affect drainage and plant growth.
Take note of any existing vegetation or obstructions that may need to be removed or worked around. Clear the area of any debris, rocks, or weeds, and level the ground to create a smooth surface.
If necessary, add a layer of organic matter like compost or well-rotted manure to improve soil structure and fertility.
With a well-prepared site, you'll be ready to build a sturdy base layer for your planter box.
Build a Sturdy Base Layer
When building your window planter box, you'll start with a sturdy base layer that provides a solid foundation for your plants.
You'll need to choose the right construction materials, considering factors like durability, rot resistance, and weight capacity.
Base Construction Materials
You'll need pressure-treated lumber or naturally rot-resistant woods like cedar or redwood to build a sturdy base layer that can withstand outdoor elements and support the weight of your window planter box. These wooden materials are ideal for withstanding moisture and resisting decay.
When selecting lumber, look for pieces that are straight, free of knots, and have a smooth surface. Avoid using softwoods like pine or fir, as they're more prone to rot and insect damage.
Consider exploring recycled options like reclaimed wood or salvaged materials from old decks or fences. Not only is this an eco-friendly choice, but it can also add a unique character to your planter box. However, verify that the recycled materials are thoroughly cleaned, disinfected, and dry before using them.
You can also use composite materials like Trex or TimberTech, which are made from a mix of wood fibers and plastic. These materials are durable, low-maintenance, and resistant to rot and insects.
Whatever material you choose, make sure it's suitable for outdoor use and can support the weight of your planter box and its contents.
Platform Stability Matters
After selecting the right materials, construct a base layer that provides a solid foundation for your window planter box by creating a rectangular frame with four corner posts that can evenly distribute the weight of the planter and its contents. This foundation stability is essential to prevent the planter from toppling over or sagging under the weight of the soil, plants, and water.
To guarantee planter support, make sure the corner posts are securely attached to the frame using screws or nails. You can also add additional support by installing horizontal beams between the corner posts. This will provide extra stability and prevent the frame from shifting or warping over time.
When building the base layer, pay close attention to the dimensions and layout of the frame. Verify that the corners are square and the frame is level to prevent any unevenness or wobbling.
Lay Out the Block Pattern
As you prepare to lay out the block pattern, you'll need to decide on the arrangement of blocks that will form the walls of your planter box.
You'll have options to choose from, such as a running bond pattern, a stacked pattern, or a combination of both.
Consider the block size and how it will impact the overall design and functionality of your planter box, including the vital aspect of drainage.
Block Pattern Options
Lay out the block pattern by arranging the wooden blocks in a staggered formation, alternating between long and short blocks to create a strong and visually appealing structure.
This design inspiration will give your window planter box a unique and rustic charm. When deciding on a block pattern, contemplate the overall aesthetic you want to achieve. Do you want a modern, sleek look or a more rustic, country feel?
Here are some block pattern options to contemplate:
-
Alternating Blocks: Alternate between long and short blocks to create a staggered pattern that adds visual interest.
-
Running Bond: Lay out the blocks in a continuous pattern, with each row offset by half a block to create a strong and sturdy structure.
-
Herringbone: Arrange the blocks in a zigzag pattern to add a touch of whimsy and playfulness to your design.
- Stacked Blocks: Stack the blocks on top of each other, alternating between long and short blocks to create a layered, dimensional look.
Choose Block Size Wisely
To guarantee your window planter box turns out sturdy and visually appealing, you must carefully select the block size that complements your chosen pattern and the space available beneath your window. The block dimensions will considerably impact the overall aesthetic of your planter box, so it's essential to take into account both functional and aesthetic considerations.
Here's a rough guide to help you visualize different block sizes and their effects:
| Block Size | Pattern Style | Space Requirements |
|---|---|---|
| Small (4' x 4') | Geometric, intricate | Tight spaces, small windows |
| Medium (6' x 6') | Classic, traditional | Standard windows, average spaces |
| Large (8' x 8') | Bold, statement | Wide windows, spacious areas |
| Extra Large (10' x 10') | Dramatic, eye-catching | Expansive windows, grand spaces |
| Custom | Unique, personalized | Any space, tailored to fit |
Plan for Drainage
You'll need to map out the block pattern to confirm proper water drainage, an essential step in building a functional and long-lasting window planter box. A well-planned drainage system prevents waterlogged soil, reducing the risk of root rot and confirming healthy plant growth.
To achieve this, consider the following key factors:
-
Drainage materials: Choose materials with good moisture retention, such as coconut coir or perlite, to help regulate water flow.
-
Block spacing: Leave a 1-2 inch gap between each block to allow excess water to escape.
-
Slope and angle: Confirm the planter box is slightly angled to facilitate water flow towards the drainage holes.
- Drainage holes: Drill holes in the bottom of the planter box, spaced evenly apart, to allow water to escape.
Secure the Blocks Together
Using 2.5' wood screws, attach the blocks to each other, guaranteeing a snug fit and a sturdy structure that can support the weight of the soil and plants. Make sure to predrill the holes to avoid splitting the wood. As you assemble the blocks, contemplate using bonding methods like wood glue or epoxy to reinforce the joints. This will create a strong and durable structure that can withstand the elements.
Here are some adhesive options to contemplate:
| Adhesive | Bonding Strength | Drying Time |
|---|---|---|
| Wood Glue | High | 30 minutes |
| Epoxy | Very High | 24 hours |
| Polyurethane | Medium | 1 hour |
| Silicone | Low | 10 minutes |
When choosing an adhesive, think about the weight and moisture levels of your planter box. For example, if you're using a heavy soil mix, you may want to opt for a stronger bonding agent like epoxy. Additionally, if you're planning to install the planter box in a humid or wet environment, choose an adhesive that's resistant to moisture. By selecting the right bonding method and adhesive, you'll guarantee a secure and long-lasting structure for your window planter box.
Add Drainage and Irrigation
With the structural integrity of your planter box assured, focus now on incorporating a well-designed drainage and irrigation system to prevent waterlogged soil and foster healthy plant growth. This vital step guarantees your plants receive the right amount of water without suffocating them.
To achieve this, consider the following drainage solutions and irrigation techniques:
-
Drainage Holes: Drill holes at the bottom of your planter box to allow excess water to escape, preventing waterlogged soil.
-
Irrigation Tubes: Install tubes that deliver water directly to the roots, reducing evaporation and runoff.
-
Water-Absorbing Materials: Add materials like perlite or vermiculite to your soil mix to improve drainage and retain moisture.
- Self-Watering System: Create a self-watering system by adding a water reservoir and a wicking material that draws water up to the plants as needed.
Fill With Soil and Plants
As you've successfully addressed drainage and irrigation, turn your attention to filling your planter box with a well-balanced soil mix and selecting the perfect plants to thrive in their new home. This is where the magic happens, and your DIY project comes to life.
When it comes to soil types, you have options. Consider a mix specifically designed for containers, which will retain moisture but drain excess water. You can also create your own blend using a combination of peat moss, vermiculite, and perlite.
For plant selection, think about the amount of sunlight your window receives and choose plants that thrive in those conditions. Consider a mix of flowers, herbs, and greenery to add visual interest.
Here's a breakdown of popular soil types and plants to get you started:
| Soil Type | Description | Plants |
|---|---|---|
| Container Mix | Retains moisture, drains excess | Flowers, Herbs |
| Peat Moss | Acidic, retains moisture | Ferns, Mosses |
| Vermiculite | Neutral, improves drainage | Succulents, Cacti |
Remember to leave enough space between plants for proper growth and air circulation. With the right soil and plants, your window planter box will be a thriving oasis.
Add Decorative Touches Safely
As you add decorative touches to your window planter box, make sure you're doing so safely and thoughtfully.
You'll want to secure any decorations firmly to prevent them from falling or shifting, which can damage the box or surrounding area.
Secure the Decorations
Securely attaching decorative elements, such as ribbons or bows, to your window planter box guarantees they withstand outdoor weather conditions without compromising the structural integrity of your DIY project.
You want to verify that your hanging decorations, whether they're part of a seasonal theme or a permanent fixture, are securely fastened to prevent them from being damaged or dislodged by wind, rain, or sunlight.
Here are some tips to help you secure your decorations:
-
Choose the right adhesive: Select a weather-resistant adhesive that can withstand outdoor conditions. Make sure it's compatible with the materials you're working with, such as wood, metal, or plastic.
-
Use sturdy fasteners: Opt for screws, nails, or clips that can hold the weight of your decorations. Avoid using weak or flimsy fasteners that may break or bend easily.
-
Consider the weight: Be mindful of the weight of your decorations and verify that the fasteners or adhesive can support it.
- Test and adjust: Before adding your decorations, test the fasteners or adhesive to verify they can hold the weight. Make adjustments as needed to prevent damage or failure.
Avoid Weight Overload
When adding decorative touches to your window planter box, you must calculate the weight capacity of your design to prevent overload and potential damage. It's crucial to evaluate the weight distribution of your plants, soil, and decorative elements to guarantee your planter box can support the combined weight.
Choose plants with varying weights and sizes to achieve a visually appealing arrangement while maintaining a balanced weight distribution. For example, pair lighter plants like ferns or ivy with heavier plants like succulents or shrubs. This strategy will prevent your planter box from becoming too top-heavy or unbalanced.
Additionally, select a plant choice that complements your planter box's material and size. If you have a smaller planter box, opt for compact or dwarf plant varieties to avoid overwhelming the space.
Prevent Water Damage
How can you guarantee that your window planter box design doesn't succumb to water damage, especially when adding decorative touches that may compromise its waterproofing? To ascertain your planter box remains waterproof, you'll need to incorporate effective waterproofing techniques into your design.
Here are some essential tips to prevent water damage:
-
Apply a moisture barrier: Use a waterproof membrane or coating to prevent water from seeping into the wood or other materials.
-
Use water-resistant materials: Choose materials that can withstand exposure to moisture, such as rot-resistant wood or recycled plastic.
-
Guarantee proper drainage: Design your planter box with adequate drainage holes to prevent water from accumulating and causing damage.
- Seal all gaps and joints: Use a waterproof sealant to seal any gaps or joints where water could potentially seep in.
Maintain and Water Properly
Regularly inspect your window planter boxes for signs of moisture stress, such as wilted leaves or dry soil, to guarantee timely watering. This will help you establish a consistent watering schedule that suits your plants' specific needs.
To determine the ideal watering frequency, consider the following factors:
| Factor | Impact on Watering Schedule |
|---|---|
| Soil Type | Well-draining soils require less frequent watering, while dense soils need more frequent watering |
| Climate | Hot and dry climates require more frequent watering, while cool and humid climates require less |
| Plant Type | Succulents and cacti need infrequent watering, while ferns and peace lilies require more frequent watering |
| Season | Plants require more water during active growing seasons and less during dormant seasons |
Troubleshoot Common Issues
As you monitor your window planter boxes, be prepared to address common issues that may arise, such as pests, diseases, and nutrient deficiencies, which can quickly spread and decimate your plants if left unchecked.
To stay on top of potential problems, regularly inspect your plants for signs of trouble. Check for pests like aphids, whiteflies, and spider mites, and take action promptly if you spot any. Implement effective pest management strategies, such as introducing beneficial insects or using organic pesticides.
Here are some additional tips to help you troubleshoot common issues:
-
Inspect your plants daily: Catching problems early can make all the difference in preventing their spread.
-
Choose disease-resistant plant varieties: Select plants that are bred to resist common diseases, reducing the risk of infection.
-
Maintain good air circulation: Guarantee adequate space between plants and provide sufficient air movement to prevent moisture buildup.
- Fertilize thoughtfully: Avoid over-fertilizing, which can lead to nutrient deficiencies and other problems.
Frequently Asked Questions
Can I Use Old Pallets Instead of Cinder Blocks for My Planter Box?
You're considering repurposing old pallets instead of cinder blocks for your planter box. That's a great idea!
Pallet durability can vary, but if you choose sturdy ones, they'll work well. Plus, pallets can add a rustic charm to your planter aesthetics.
Just disassemble, clean, and disinfect them before use. Make sure to reinforce the pallets with screws or nails to guarantee they can hold the soil and plants' weight.
With some creativity, you'll create a unique and functional planter box that reflects your personal style.
How Do I Prevent Weeds From Growing up Through the Planter Box?
A million weeds are just waiting to ruin your beautiful planter box! But don't let them win! You're in control.
To prevent weeds from growing up through your planter, you'll need a solid weed prevention strategy. Start by lining the bottom with a thick soil barrier, like landscaping fabric or plastic sheeting. This will block those pesky weeds from germinating.
Then, add a layer of mulch or small rocks to further smother any would-be invaders. With these defenses in place, you'll be the one calling the shots, not the weeds!
What Is the Ideal Depth for a Window Planter Box?
When building a window planter box, you'll want to take into account the ideal depth to guarantee healthy plant growth.
Aim for a minimum of 6-8 inches to provide enough room for roots to spread.
However, if you're using ideal materials like wood or composite, you can get away with a shallower depth, around 4-6 inches, as long as you prioritize drainage factors.
Consider adding a layer of gravel or mesh to prevent waterlogged soil.
Can I Install a Window Planter Box on a Brick or Stucco Wall?
You're wondering if you can install a window planter box on a brick or stucco wall.
Well, the answer is yes, but it requires some extra planning.
For brick installation, you'll need to use specialized anchors that won't damage the brick.
With stucco considerations, you'll need to make certain the box is securely fastened to the wall studs to prevent water damage.
It's doable, but you'll need to take the right precautions to guarantee a sturdy and beautiful installation.
Do I Need to Seal the Cinder Blocks for Outdoor Use?
When using cinder blocks for outdoor planters, you'll want to guarantee they can withstand the elements.
Yes, you do need to seal the cinder blocks for outdoor use to prevent water absorption and damage.
Apply a concrete sealer to protect the blocks from moisture and freeze-thaw cycles, which can cause cracking.
This step is essential for maintaining outdoor durability and preventing structural issues down the line.
Conclusion
You've made it! Your DIY window planter box is now complete. Don't be surprised if it becomes the envy of your neighbors.
If you're still hesitant about visualizing the project, grab graph paper and sketch out your design. Measure your window, block dimensions, and soil depth to scale.
This will help you see how the blocks fit together and make adjustments before breaking out the cement.
Happy building!
Related Posts
-
3 Best DIY Planter Ideas for Backyard Decor
You can elevate your backyard's style and functionality by choosing the right DIY planter ideas. Start with a mix of ...
-
3 Best DIY Planter Ideas for Backyard Decor
You can elevate your backyard's style and functionality by choosing the right DIY planter ideas. Start with a mix of ...
-
3 Best DIY Planter Ideas for Backyard Decor
You can elevate your backyard's style and functionality by choosing the right DIY planter ideas. Start with a mix of ...
-
3 Best DIY Planter Ideas for Backyard Decor
You can elevate your backyard's style and functionality by choosing the right DIY planter ideas. Start with a mix of ...
-
3 Best DIY Planter Ideas for Backyard Decor
You can elevate your backyard's style and functionality by choosing the right DIY planter ideas. Start with a mix of ...
-
3 Best DIY Planter Ideas for Backyard Decor
You can elevate your backyard's style and functionality by choosing the right DIY planter ideas. Start with a mix of ...
-
3 Best DIY Planter Ideas for Backyard Decor
You can elevate your backyard's style and functionality by choosing the right DIY planter ideas. Start with a mix of ...
-
3 Best DIY Planter Ideas for Backyard Decor
You can elevate your backyard's style and functionality by choosing the right DIY planter ideas. Start with a mix of ...
-
3 Best DIY Planter Ideas for Backyard Decor
You can elevate your backyard's style and functionality by choosing the right DIY planter ideas. Start with a mix of ...
-
3 Best DIY Planter Ideas for Backyard Decor
You can elevate your backyard's style and functionality by choosing the right DIY planter ideas. Start with a mix of ...
-
3 Best DIY Planter Ideas for Backyard Decor
You can elevate your backyard's style and functionality by choosing the right DIY planter ideas. Start with a mix of ...
-
3 Best DIY Planter Ideas for Backyard Decor
You can elevate your backyard's style and functionality by choosing the right DIY planter ideas. Start with a mix of ...
-
3 Best DIY Planter Ideas for Backyard Decor
You can elevate your backyard's style and functionality by choosing the right DIY planter ideas. Start with a mix of ...
-
3 Best DIY Planter Ideas for Backyard Decor
You can elevate your backyard's style and functionality by choosing the right DIY planter ideas. Start with a mix of ...
-
3 Best Space-Saving Gardening Ideas for Urban Renters
You can turn even the smallest urban space into a lush oasis by utilizing clever space-saving gardening ideas. Maximi...
-
3 Best Space-Saving Gardening Ideas for Urban Renters
You can turn even the smallest urban space into a lush oasis by utilizing clever space-saving gardening ideas. Maximi...
-
3 Best Space-Saving Gardening Ideas for Urban Renters
You can turn even the smallest urban space into a lush oasis by utilizing clever space-saving gardening ideas. Maximi...
-
3 Best Space-Saving Gardening Ideas for Urban Renters
You can turn even the smallest urban space into a lush oasis by utilizing clever space-saving gardening ideas. Maximi...
-
3 Best Space-Saving Gardening Ideas for Urban Renters
You can turn even the smallest urban space into a lush oasis by utilizing clever space-saving gardening ideas. Maximi...
-
3 Best Space-Saving Gardening Ideas for Urban Renters
You can turn even the smallest urban space into a lush oasis by utilizing clever space-saving gardening ideas. Maximi...
-
3 Best Space-Saving Gardening Ideas for Urban Renters
You can turn even the smallest urban space into a lush oasis by utilizing clever space-saving gardening ideas. Maximi...
-
3 Best Space-Saving Gardening Ideas for Urban Renters
You can turn even the smallest urban space into a lush oasis by utilizing clever space-saving gardening ideas. Maximi...
-
3 Best Space-Saving Gardening Ideas for Urban Renters
You can turn even the smallest urban space into a lush oasis by utilizing clever space-saving gardening ideas. Maximi...
-
3 Best Space-Saving Gardening Ideas for Urban Renters
You can turn even the smallest urban space into a lush oasis by utilizing clever space-saving gardening ideas. Maximi...
-
3 Best Space-Saving Gardening Ideas for Urban Renters
You can turn even the smallest urban space into a lush oasis by utilizing clever space-saving gardening ideas. Maximi...
-
3 Best Space-Saving Gardening Ideas for Urban Renters
You can turn even the smallest urban space into a lush oasis by utilizing clever space-saving gardening ideas. Maximi...
-
3 Best Space-Saving Gardening Ideas for Urban Renters
You can turn even the smallest urban space into a lush oasis by utilizing clever space-saving gardening ideas. Maximi...
-
3 Best Space-Saving Gardening Ideas for Urban Renters
You can turn even the smallest urban space into a lush oasis by utilizing clever space-saving gardening ideas. Maximi...
-
10 Tips for Training Vines in a Vertical Garden
When training vines in a vertical garden, you'll want to choose the right species for your climate, prepare your wall...
-
10 Tips for Training Vines in a Vertical Garden
When training vines in a vertical garden, you'll want to choose the right species for your climate, prepare your wall...
-
10 Tips for Training Vines in a Vertical Garden
When training vines in a vertical garden, you'll want to choose the right species for your climate, prepare your wall...
-
10 Tips for Training Vines in a Vertical Garden
When training vines in a vertical garden, you'll want to choose the right species for your climate, prepare your wall...
-
10 Tips for Training Vines in a Vertical Garden
When training vines in a vertical garden, you'll want to choose the right species for your climate, prepare your wall...
-
10 Tips for Training Vines in a Vertical Garden
When training vines in a vertical garden, you'll want to choose the right species for your climate, prepare your wall...
-
10 Tips for Training Vines in a Vertical Garden
When training vines in a vertical garden, you'll want to choose the right species for your climate, prepare your wall...
-
10 Tips for Training Vines in a Vertical Garden
When training vines in a vertical garden, you'll want to choose the right species for your climate, prepare your wall...
-
10 Tips for Training Vines in a Vertical Garden
When training vines in a vertical garden, you'll want to choose the right species for your climate, prepare your wall...
-
10 Tips for Training Vines in a Vertical Garden
When training vines in a vertical garden, you'll want to choose the right species for your climate, prepare your wall...
-
10 Tips for Training Vines in a Vertical Garden
When training vines in a vertical garden, you'll want to choose the right species for your climate, prepare your wall...
-
10 Tips for Training Vines in a Vertical Garden
When training vines in a vertical garden, you'll want to choose the right species for your climate, prepare your wall...
-
10 Tips for Training Vines in a Vertical Garden
When training vines in a vertical garden, you'll want to choose the right species for your climate, prepare your wall...
-
10 Tips for Training Vines in a Vertical Garden
When training vines in a vertical garden, you'll want to choose the right species for your climate, prepare your wall...
-
10 Tips for Training Vines in a Vertical Garden
When training vines in a vertical garden, you'll want to choose the right species for your climate, prepare your wall...
-
10 Tips for Training Vines in a Vertical Garden
When training vines in a vertical garden, you'll want to choose the right species for your climate, prepare your wall...
-
10 Tips for Training Vines in a Vertical Garden
When training vines in a vertical garden, you'll want to choose the right species for your climate, prepare your wall...
-
10 Tips for Training Vines in a Vertical Garden
When training vines in a vertical garden, you'll want to choose the right species for your climate, prepare your wall...
-
10 Tips for Training Vines in a Vertical Garden
When training vines in a vertical garden, you'll want to choose the right species for your climate, prepare your wall...
-
10 Tips for Training Vines in a Vertical Garden
When training vines in a vertical garden, you'll want to choose the right species for your climate, prepare your wall...
-
10 Tips for Training Vines in a Vertical Garden
When training vines in a vertical garden, you'll want to choose the right species for your climate, prepare your wall...
-
10 Tips for Training Vines in a Vertical Garden
When training vines in a vertical garden, you'll want to choose the right species for your climate, prepare your wall...
-
10 Tips for Training Vines in a Vertical Garden
When training vines in a vertical garden, you'll want to choose the right species for your climate, prepare your wall...
-
10 Tips for Training Vines in a Vertical Garden
When training vines in a vertical garden, you'll want to choose the right species for your climate, prepare your wall...
-
10 Tips for Training Vines in a Vertical Garden
When training vines in a vertical garden, you'll want to choose the right species for your climate, prepare your wall...
-
10 Tips for Training Vines in a Vertical Garden
When training vines in a vertical garden, you'll want to choose the right species for your climate, prepare your wall...
-
10 Tips for Training Vines in a Vertical Garden
When training vines in a vertical garden, you'll want to choose the right species for your climate, prepare your wall...
-
10 Tips for Training Vines in a Vertical Garden
When training vines in a vertical garden, you'll want to choose the right species for your climate, prepare your wall...
-
10 Tips for Training Vines in a Vertical Garden
When training vines in a vertical garden, you'll want to choose the right species for your climate, prepare your wall...
-
10 Tips for Training Vines in a Vertical Garden
When training vines in a vertical garden, you'll want to choose the right species for your climate, prepare your wall...
-
10 Tips for Training Vines in a Vertical Garden
When training vines in a vertical garden, you'll want to choose the right species for your climate, prepare your wall...
-
10 Tips for Training Vines in a Vertical Garden
When training vines in a vertical garden, you'll want to choose the right species for your climate, prepare your wall...


